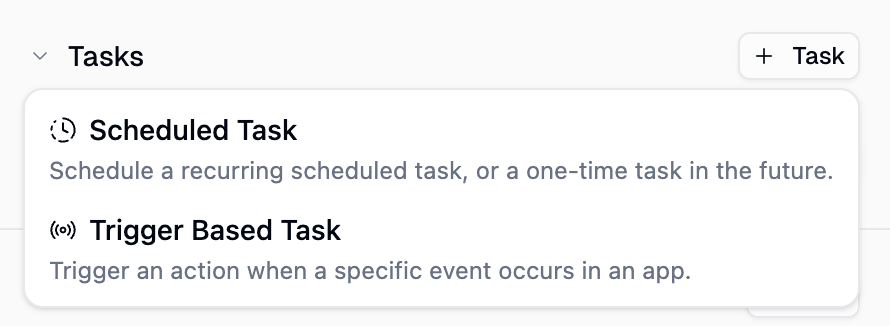
Scheduled Triggers
Schedule your agent to run automatically on a recurring schedule or as a one-time trigger. When a trigger fires, the agent receives a prompt you configure and processes it exactly as if you had typed it in the chat.Setting Up a Scheduled Trigger
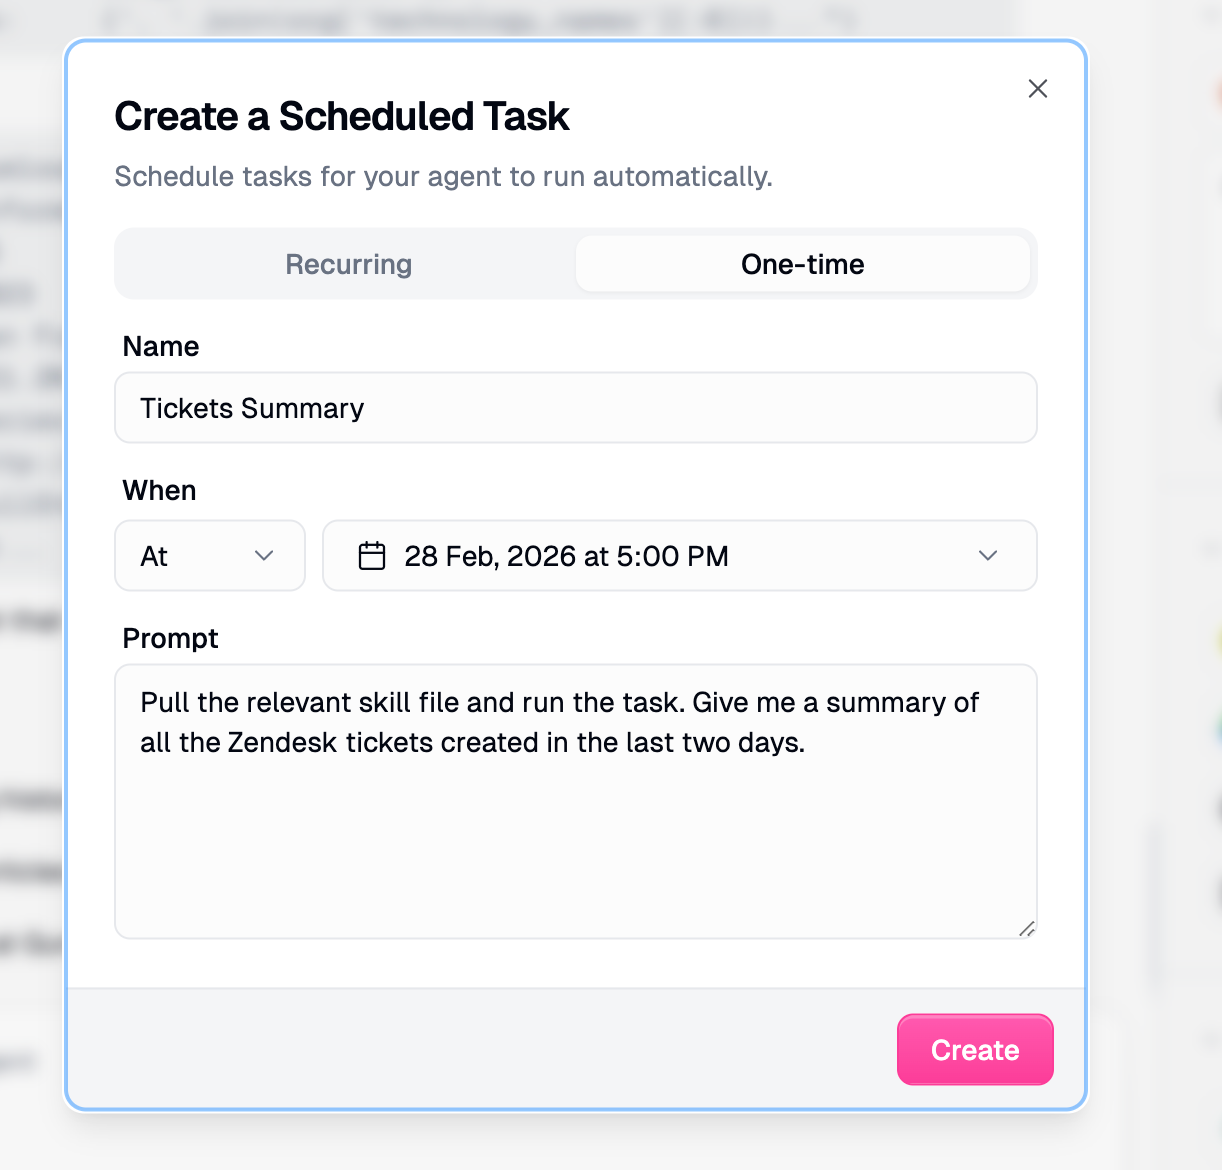
Go to your agent’s configuration page, find the Triggers section, and click + Trigger. Choose Scheduled Trigger as the type, then fill in three fields:- Name: A short label (e.g., “Daily Ticket Summary”)
- Schedule: When the trigger should run (recurring cron or one-time)
- Prompt: The message your agent receives when the trigger fires
- Recurring
- One-time
Runs on a cron schedule until you pause or delete it. You don’t need to know cron syntax: describe your schedule in plain language and the AI generates the expression.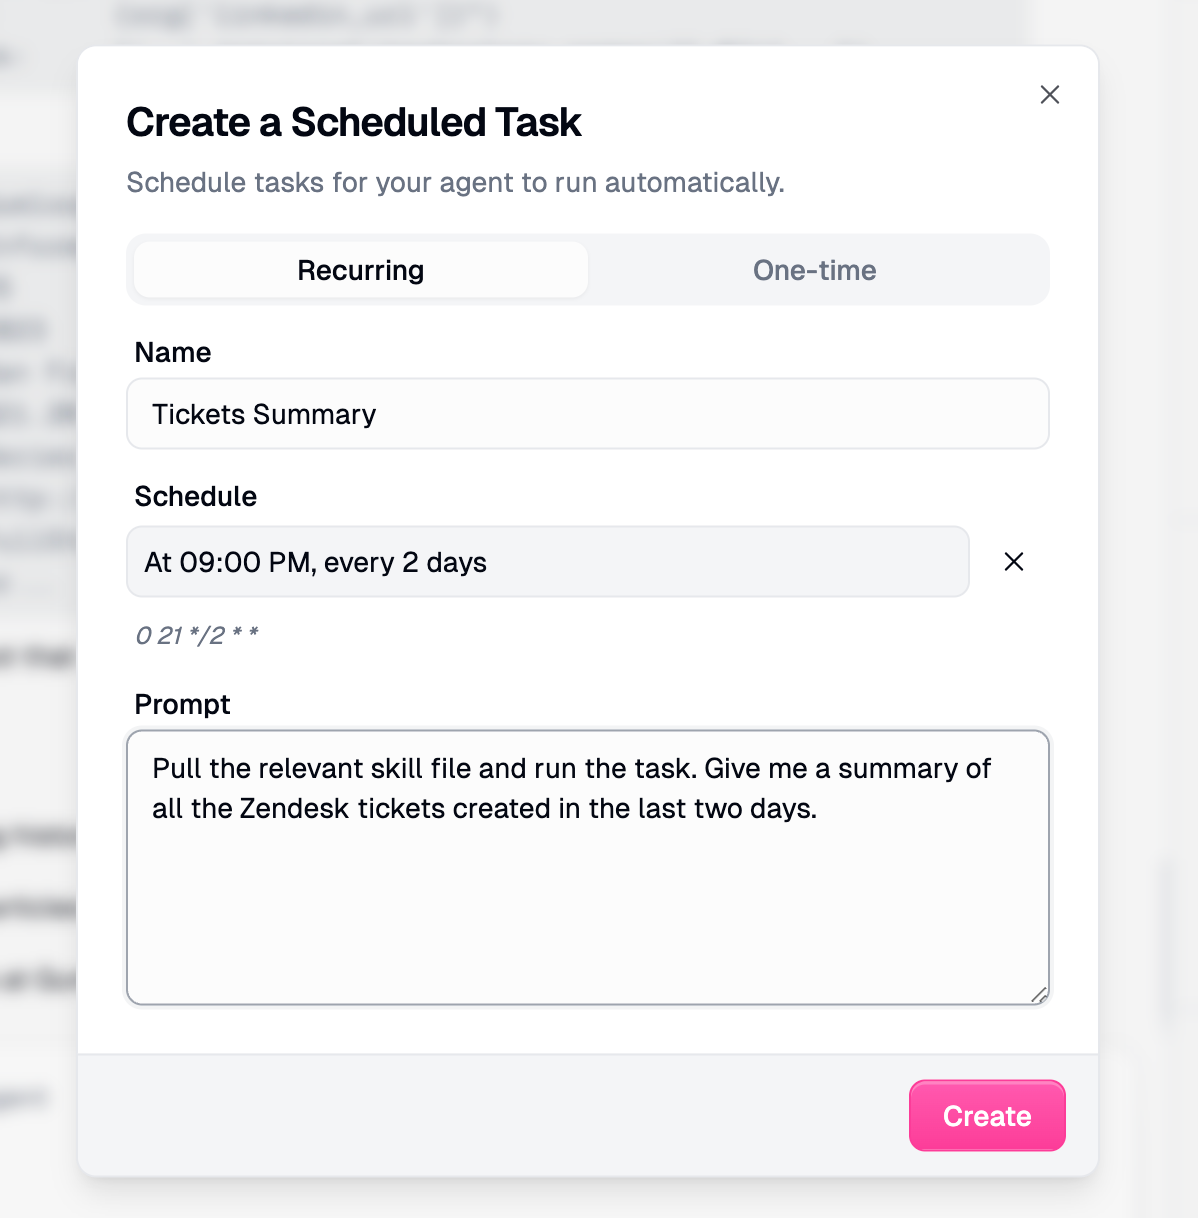
Minimum interval is 1 minute. Timezones default to your browser’s timezone.
Writing Good Trigger Prompts
The prompt is what your agent receives when the trigger fires. Be specific:Self-Scheduling
Your agent can create and manage its own triggers during a conversation. Just tell it what you need:
Agents can only manage their own schedules, not those of other agents.
Event-Based Triggers
Event-based triggers fire your agent when something happens in an external service. Instead of checking manually, your agent reacts automatically to new emails, messages, database changes, and more. When a trigger fires, the event data (e.g., the email body, the Slack message) is injected into a prompt template you write. The agent processes it as if you had typed it in the chat.Supported Integrations
Gmail
New email in a label
Slack
New channel message
Slack Reaction
Emoji reaction on a message
Microsoft Teams
New channel message
Google Drive
New file in a folder
Google Sheets
New or updated row
Google Calendar
Upcoming event
Notion
New or updated page
Airtable
New or updated record
Zendesk
New ticket or comment
Salesforce
New or updated record in any object
Linear
New or updated issue
Jira
New issue created
Parallel Web Monitor
Web changes matching a query
Also supported: Google Forms, Typeform, HubSpot, incident.io, and Jira. Some integrations (Gmail, Slack, Slack Reaction, Teams, Drive, Forms, Typeform, Zendesk, Parallel Web Monitor) are real-time and fire within seconds. Others (Sheets, Calendar, Notion, Airtable, HubSpot, incident.io, Salesforce, Linear, Jira) use polling and check for changes approximately every 60 seconds.
Setting Up an Event-Based Trigger
Go to your agent’s configuration page, find the Triggers section, and click + Trigger. Choose Event-Based Trigger as the type. Then follow three steps:1
Select a Trigger
Choose which integration event should fire your agent.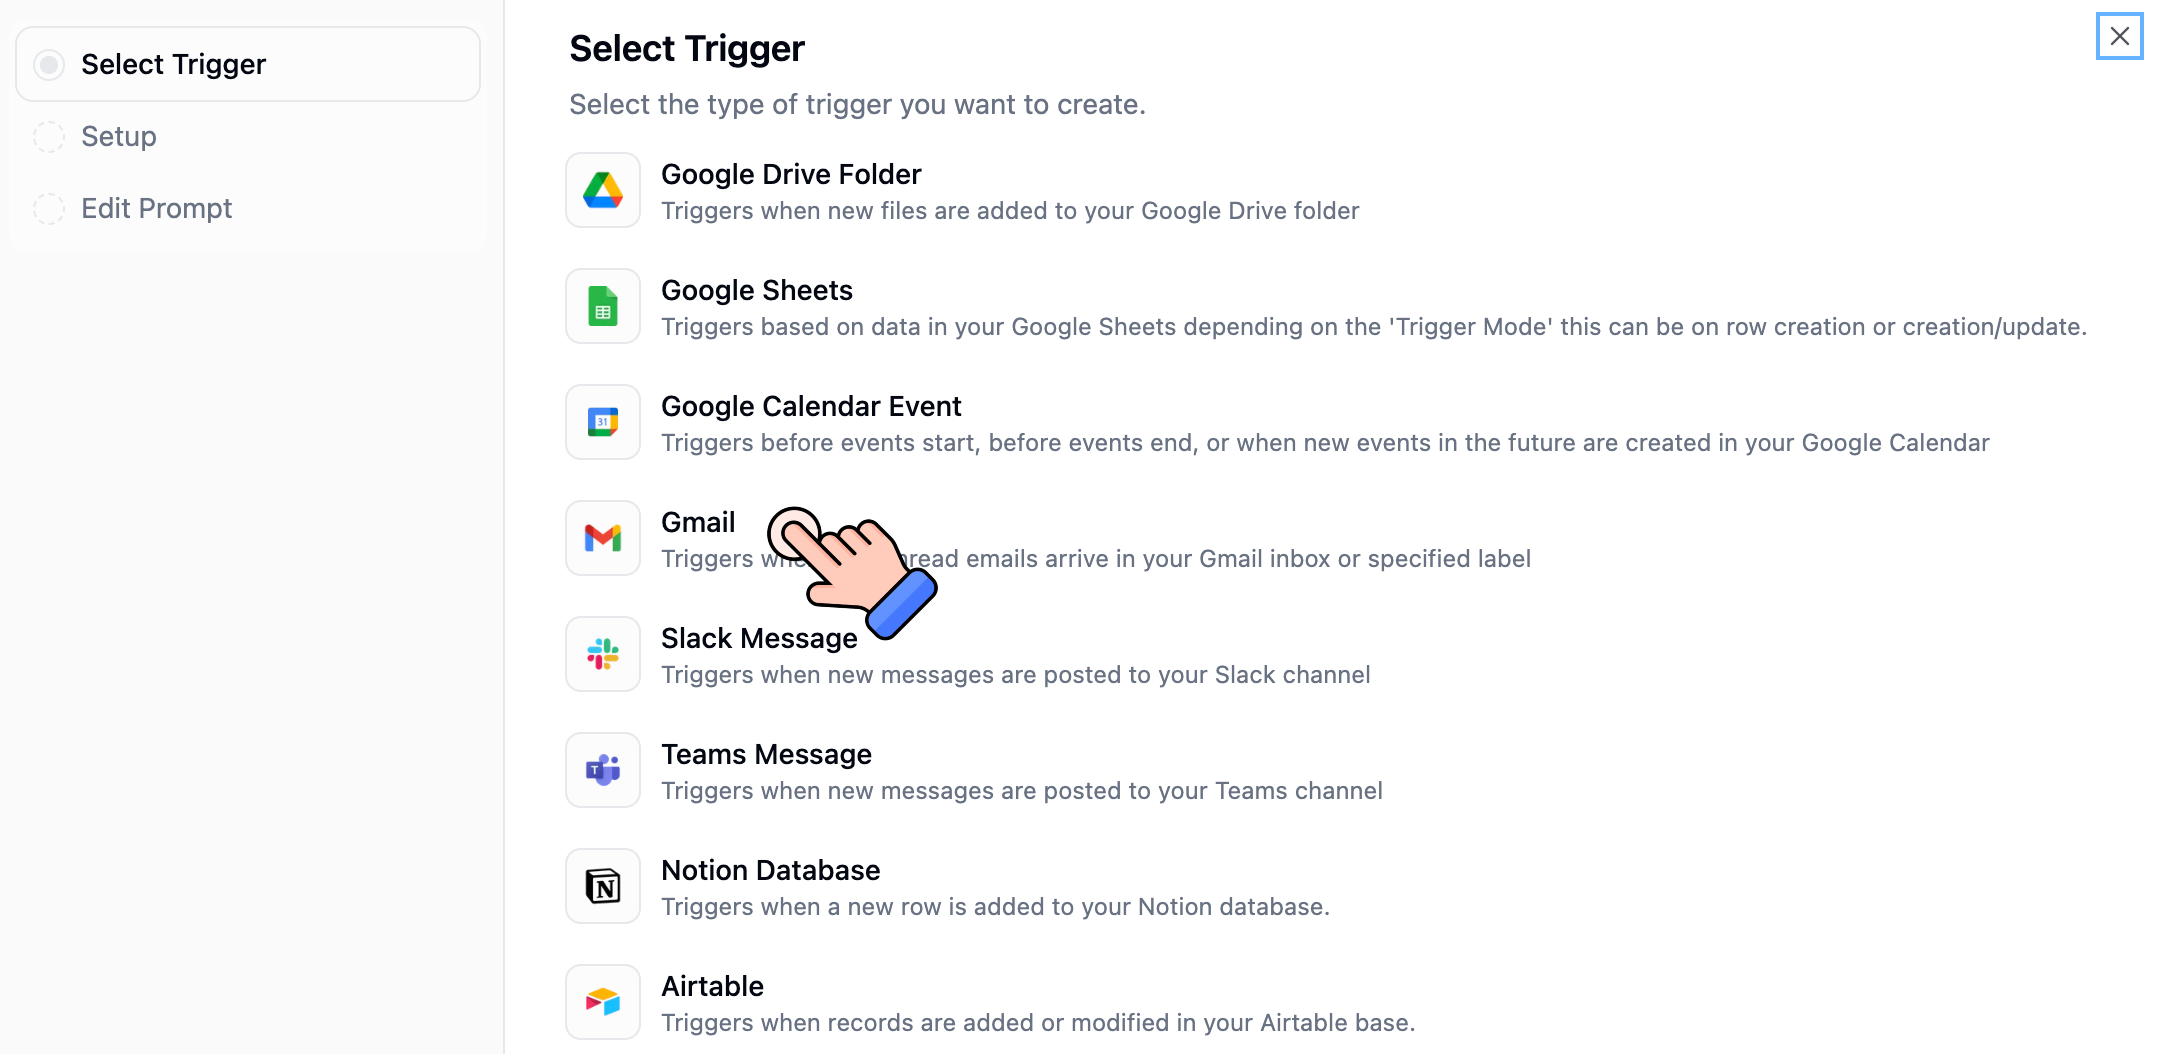
2
Configure the Integration
Connect your credentials and set up the specific parameters for your trigger. For example, with Gmail you can choose which label to monitor, whether to mark emails as read, and whether to read HTML content.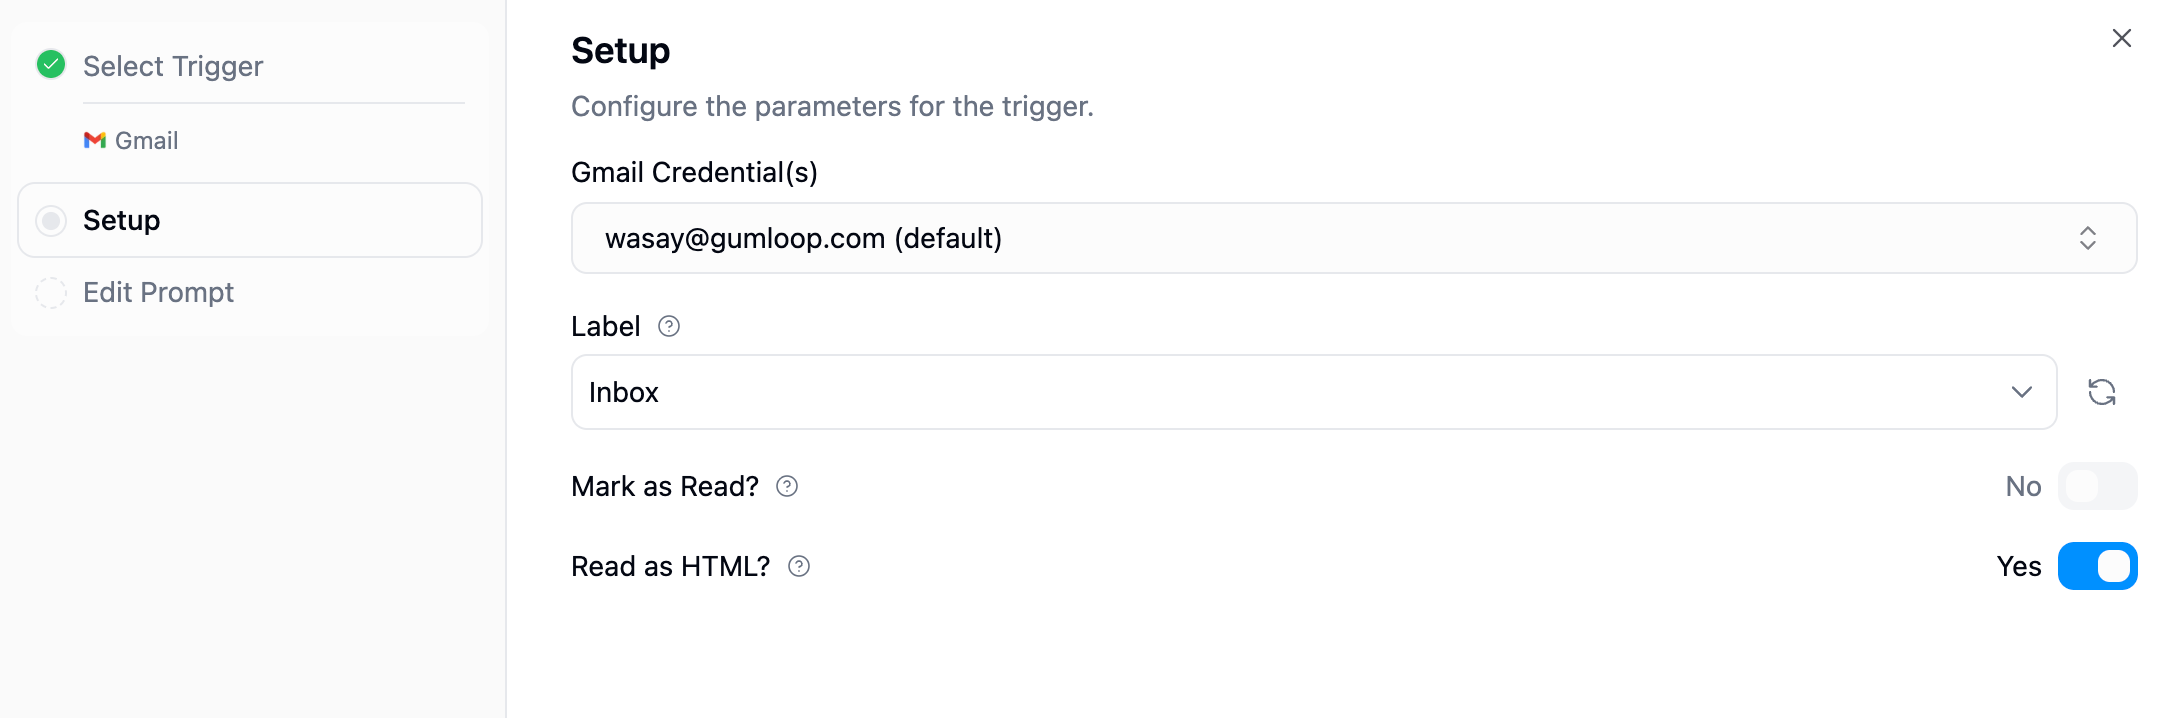
Your agent uses the credentials of the person who created the trigger. Make sure you’ve connected the required app on your Connectors page before setting up the trigger.
3
Write a Prompt Template
Define what your agent should do when the trigger fires. Use template variables (shown as badges) to inject event data into your prompt.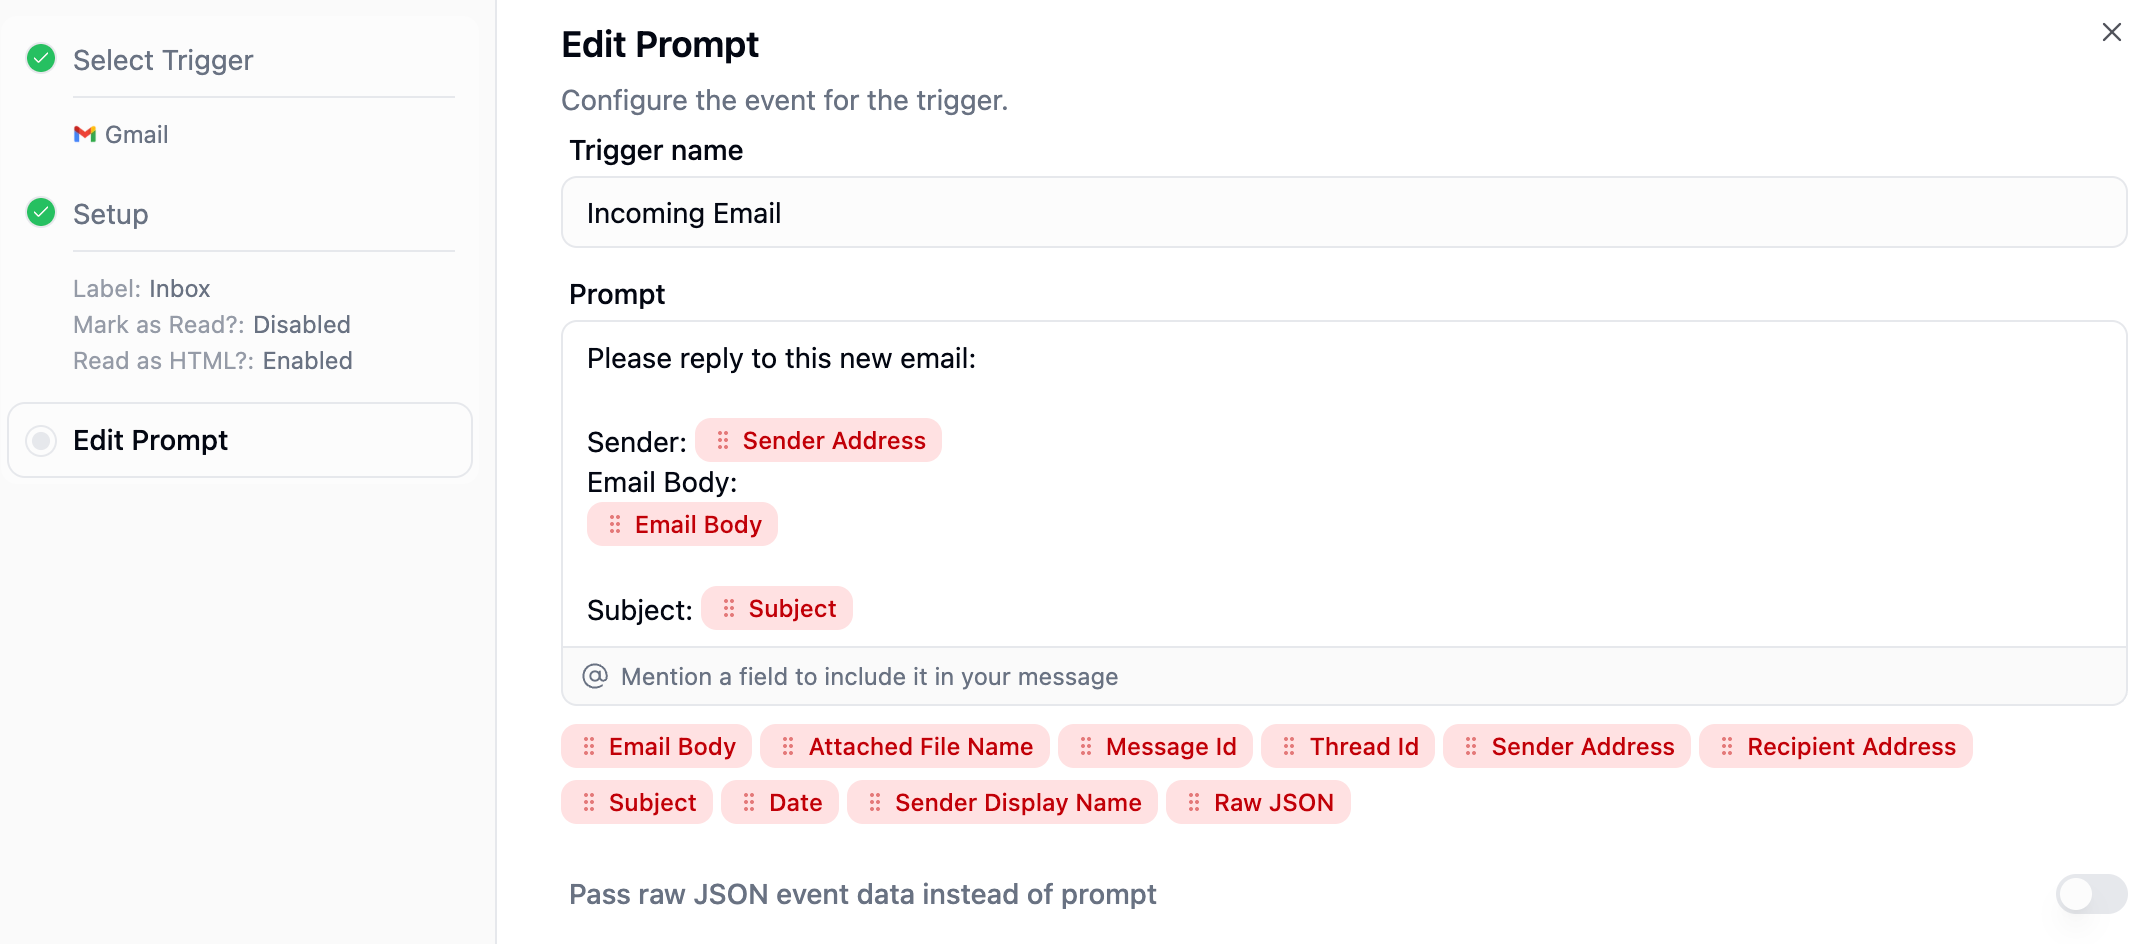
Email Body, Subject, Sender, and Attached File Name. For Slack, you get Message, Sender Name, Channel Name, etc.Prompt Templates
When an event-based trigger fires, the event data is injected into your prompt template before the agent receives it. How it works:- You write a prompt template with placeholder variables (shown as badges in the UI)
- When the trigger fires, each variable is replaced with the actual event data
- The agent receives the fully resolved prompt and acts on it
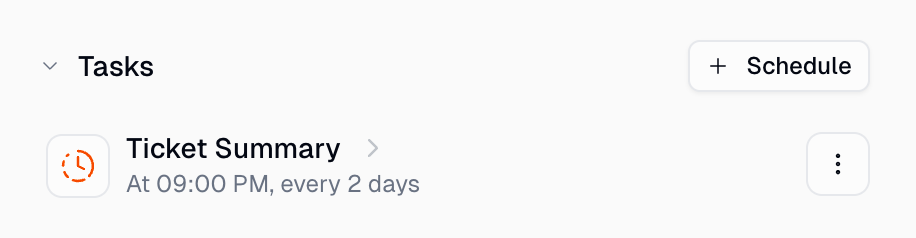
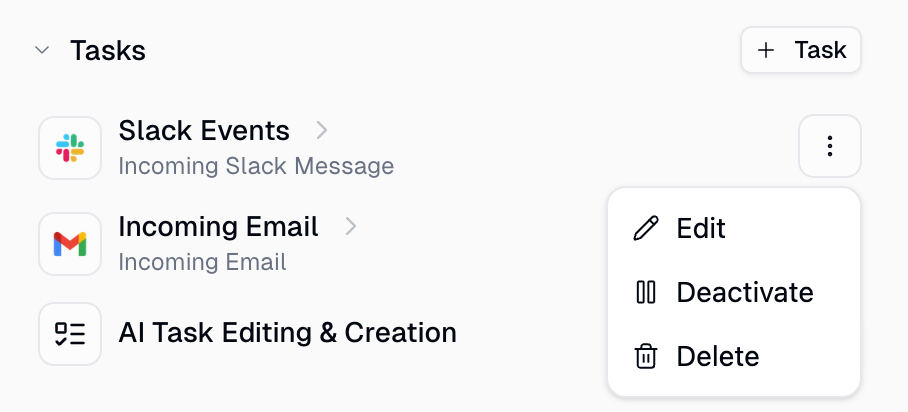
Managing Active Triggers
All your triggers (both scheduled and event-based) appear in the Triggers section of your agent’s configuration. From here you can edit, deactivate, or delete any trigger. Deactivating every trigger is the supported way to switch an agent off: the agent stops running on its own, but its configuration, connectors, and triggers stay intact and you can re-enable them at any time. Do not useis_active: false on the agents API or gumloop agents update --inactive for this — that retires the agent instead of pausing it.
Integration Details
Gmail
Gmail
Fires when: A new email arrives in the specified label. (Real-time)Configuration: Choose your Gmail credential, select a label to monitor (e.g., INBOX, a custom label), and optionally enable “Mark as Read” and “Read as HTML”.Available variables: Email Body, Subject, Sender, Attached File Name, Date, Message ID, Thread ID
Slack
Slack
Fires when: A new message is posted in the specified channel. (Real-time)Configuration: Choose your Slack credential and select the channel to monitor. “Ignore Bot Messages” is enabled by default. You can also optionally ignore thread replies.Available variables: Message, Sender Name, Channel Name, Channel ID, Date, Thread ID, Attachment Names
Slack Reaction
Slack Reaction
Fires when: Someone reacts to a message with an emoji in the specified channel. (Real-time)Configuration: Choose your Slack credential and select the channel to watch. Optionally filter by specific emoji (e.g.,
white_check_mark, thumbsup). Leave the emoji filter empty to trigger on any reaction. “Ignore Reactions From Bots” is enabled by default. You can also include or exclude reactions on thread replies, and optionally read the full thread for additional context.Available variables: Message, Emoji, Reaction Count, Reacted By, Message Sender, Attachment Names, Thread ID, Thread Link, Channel Name, Channel ID, DateMicrosoft Teams
Microsoft Teams
Fires when: A new message is posted in the specified Teams channel. (Real-time)Configuration: Choose your Teams credential, select the team and channel. Optionally ignore bot messages and thread replies.Available variables: Message, Sender Name, Channel Name, Channel ID, Date, Subject
Google Drive
Google Drive
Fires when: A new file is uploaded to the specified folder. (Real-time)Configuration: Choose your Google Drive credential and select the folder to watch.Available variables: File Name, File ID, File Type, Modified Date
Google Sheets
Google Sheets
Fires when: A new row is added or an existing row is updated, depending on your trigger mode. (Polling, ~60s)Configuration: Choose your Google Sheets credential, select the spreadsheet and worksheet. Pick a trigger mode: “Create Row” (new rows only) or “Create or Update Row” (new and modified rows).Available variables: All column values from the row that triggered the event
Google Calendar
Google Calendar
Fires when: An event is approaching on your calendar. (Polling, ~60s)Configuration: Choose your Google Calendar credential, select the calendar, and set how many minutes before the event the trigger should fire (default: 15 minutes).Available variables: Event Title, Start Time, End Time, Attendees, Description, Location
Notion
Notion
Fires when: A new page is created or an existing page is updated in the specified database. (Polling, ~60s)Configuration: Choose your Notion credential and select the database to monitor.Available variables: All database property values from the page that triggered the event
Airtable
Airtable
Fires when: A new record is created or an existing record is updated in the specified table. (Polling, ~60s)Configuration: Choose your Airtable credential, select the base, table, and optionally a view. Requires a “Last Modified Timestamp” field in your table.Available variables: All field values from the record that triggered the event
Zendesk
Zendesk
Fires when: Depending on your trigger mode: new ticket created, new comment added, ticket status changed, or ticket enters a view. (Real-time)Configuration: Choose your Zendesk credential and select a trigger mode. Optionally filter by ticket type, priority, or status.Available variables: Ticket ID, URL, Subject, Description, Status, Priority, Type, Requester Email, Assignee Email, Comments
Google Forms
Google Forms
Fires when: A new form response is submitted. (Real-time)Configuration: Choose your Google credential and select the Google Form to monitor.Available variables: All submitted form field values
Typeform
Typeform
Fires when: A new form submission is received. (Real-time)Configuration: Choose your Typeform credential and select the form to monitor.Available variables: All submitted form field values
HubSpot
HubSpot
Fires when: New records appear in a specified HubSpot list. (Polling, ~60s)Configuration: Choose your HubSpot credential, select the list to monitor, and configure the object type.Available variables: All property values from the records that triggered the event
incident.io
incident.io
Fires when: A new incident is detected. (Polling, ~60s)Configuration: Choose your incident.io credential. Optionally filter by severity (Minor, Major, Critical) and mode (Standard, Retrospective, Tutorial, Test).Available variables: Incident ID, Name, Status, Severity, Timestamps, Summary, Permalink, Slack Channel ID
Salesforce
Salesforce
Fires when: A new record is created or an existing record is updated in the selected Salesforce object, depending on the trigger mode. (Polling, ~60s)Configuration: Choose your Salesforce credential, select the object to monitor (e.g., Lead, Contact, Opportunity, Account, Case, or any custom object), and choose a Trigger Mode:
- New Record: Fires when a new record is created
- Updated Record: Fires when an existing record is modified (newly created records are automatically excluded)
The trigger uses a compound cursor based on the relevant timestamp field (
CreatedDate or LastModifiedDate) and record Id to avoid duplicates. It fetches up to 5 records per poll. In Updated Record mode, each modification to a record triggers the agent again.Linear
Linear
Fires when: A new issue is created or an existing issue is updated in the selected Linear team, depending on the trigger mode. (Polling, ~60s)Configuration: Choose your Linear credential, select the Team to monitor (required), and choose a Trigger Mode:
- New Issue: Fires when a new issue is created
- Updated Issue: Fires when an existing issue is modified (newly created issues are automatically excluded)
- Status: Filter by issue status (e.g., In Progress, Done, Backlog)
- Project: Filter by Linear project
- Priority: Filter by priority level (e.g., Urgent, High, Medium, Low)
- Labels: Filter by issue labels (matches issues with at least one of the selected labels)
- Assignee: Filter by the team member assigned to the issue
The trigger fetches up to 5 issues per poll. In Updated Issue mode, each modification to an issue triggers the agent again. A Team must be selected — it is a required parameter.
Jira
Jira
Fires when: A new issue is created in the selected Jira project. (Polling, ~60s)Configuration: Choose your Jira credential, select the Resource (your Jira instance), the Project to monitor, and optionally apply filters to narrow which issues fire the trigger.Filter options:
- Standard Filters: Filter by Status, Priority, Labels, Issue Type, Assignee, and Custom Fields
- JQL: Write a custom Jira Query Language expression for advanced filtering
- Saved Filter: Use an existing filter saved in your Jira instance
The trigger fetches up to 5 new issues per poll. Uses a compound cursor based on the issue’s
created timestamp and issue key to avoid duplicates. You must connect your Jira account on the Connectors page before setting up the trigger.Parallel Web Monitor
Parallel Web Monitor
Fires when: Relevant changes are detected on the web matching your natural-language query. (Real-time via webhook)Configuration: No credentials required — works out of the box. Write a Query describing what you want to monitor and set the Frequency for how often to check (hourly, daily, or weekly).Unlike other triggers that watch a specific service, the Parallel Web Monitor uses AI to scan the entire web for material changes matching your query. This makes it ideal for open-ended monitoring like tracking competitors, news, or market changes.Query examples:
- “OpenAI product announcements and API pricing changes”
- “Acme Corp product launches, pricing changes, and new partnerships”
- “YC Startups that have raised Series A funding”
- “SEC rulings on cryptocurrency ETF applications”
- “New job postings for VP of Engineering at FAANG companies”
Good to Know
File and Attachment Handling
When a trigger passes files or attachments to your agent, the agent automatically receives and can process them. This includes:- Email attachments from Gmail triggers (PDFs, spreadsheets, images, etc.)
- Slack file attachments from Slack message triggers
- Google Drive files from Drive triggers (the actual file content, not just the metadata)
- Teams attachments from Microsoft Teams message triggers
Credentials
Triggers use the credentials of the person who created the trigger, not whoever is chatting with the agent. Make sure you’ve connected the required app on your Connectors page before setting up a trigger. For team agents, if team credentials are configured, those can be used instead of personal credentials.Auto-Disable on Failure
All triggers (scheduled and event-based) automatically deactivate after 3 consecutive failed runs. Common causes include expired credentials, deleted resources (channels, folders, databases), or permission changes. When this happens, the trigger owner receives a notification through email, Slack DM, and in-app. The notification links straight to the most recent failed run so you can see what went wrong. You can dismiss it once you’ve handled it. To fix: resolve the underlying issue, then re-enable the trigger from the Triggers section. Re-enabling resets the failure count, so a trigger won’t be immediately disabled again by earlier failures — only failures that happen after you re-enable it count toward the next auto-disable.Overlapping Runs
If a previous trigger execution is still running when the next one fires, the new execution is skipped. This prevents duplicate work and ensures your agent finishes one task before starting the next.Credits
Each trigger execution costs credits based on model and tool usage, the same as a normal chat message. One-time scheduled triggers are automatically deleted after execution (whether they succeed or fail).FAQ
Can I change a recurring trigger to one-time (or vice versa)?
Can I change a recurring trigger to one-time (or vice versa)?
No. Delete the existing trigger and create a new one with the desired type.
What model does the agent use for triggered runs?
What model does the agent use for triggered runs?
The same model configured for the agent. There’s no separate model setting for triggered vs. interactive runs.
Are triggered runs visible in history?
Are triggered runs visible in history?
Yes. They appear in the agent’s run history as triggered executions.
Can my agent handle file attachments from triggers?
Can my agent handle file attachments from triggers?
Yes. When a trigger includes files (email attachments, Slack files, Google Drive uploads), the agent automatically receives them and can read text-based files, parse images, and use the content in its response.
Why is there a delay with some triggers?
Why is there a delay with some triggers?
Some integrations use polling instead of real-time webhooks. Polling-based triggers (Google Sheets, Notion, Airtable, Google Calendar, HubSpot, incident.io, Jira) check for changes approximately every 60 seconds. Real-time triggers (Gmail, Slack, Slack Reaction, Teams, Google Drive, Zendesk, Google Forms, Typeform, Parallel Web Monitor) fire within seconds.
Can one agent have multiple triggers?
Can one agent have multiple triggers?
Yes. You can add as many scheduled triggers and event-based triggers as you need to a single agent. Each trigger operates independently.
Can my agent create its own event-based triggers?
Can my agent create its own event-based triggers?
Yes! Agents can create and manage their own scheduled triggers and custom AI triggers during conversations. Just describe what you want to monitor and the agent builds it. See Create Triggers With AI for details. Pre-built integration triggers must still be set up from the agent’s configuration page.
Related Documentation
Create Triggers With AI
Build custom multi-service triggers in natural language
Agents
Learn about building and configuring agents
Workflow Triggers
Trigger workflows (not agents) based on events
Agent Skills
Teach your agent reusable processes