

When to use a Custom Slack App
The standard Gumloop integration (@Gumloop) is the fastest way to get agents into Slack—it works out of the box with minimal setup. However, there are scenarios where connecting your own custom Slack app makes sense:
Custom branding
Multiple agents, same workspace
Enterprise compliance
White-label solutions
Standard integration vs Custom Slack App
Prerequisites
Before setting up a custom Slack app, ensure you have:- Slack requirements
- Gumloop requirements
- Admin access to your Slack workspace (to create and install apps)
- Permission to create Slack apps at api.slack.com
Setup options
Gumloop offers two ways to connect a custom Slack app to your agent:- New app (recommended)
- Existing app
Option 1: Create a new app (recommended)
This guided workflow walks you through creating a new Slack app with all the correct settings pre-configured.Open Channels → Slack
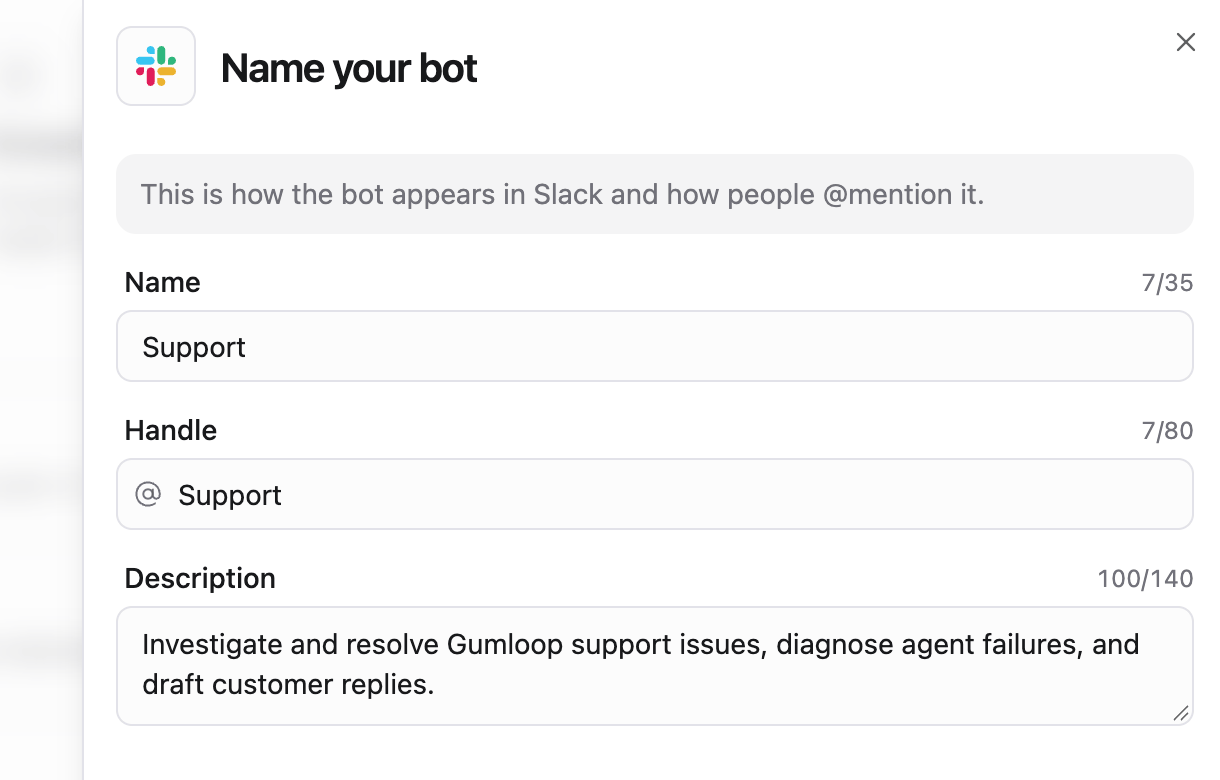
Name your bot
- Name: display name (for example
Support) - Handle: the @mention (for example
@Support) - Description: what the bot does
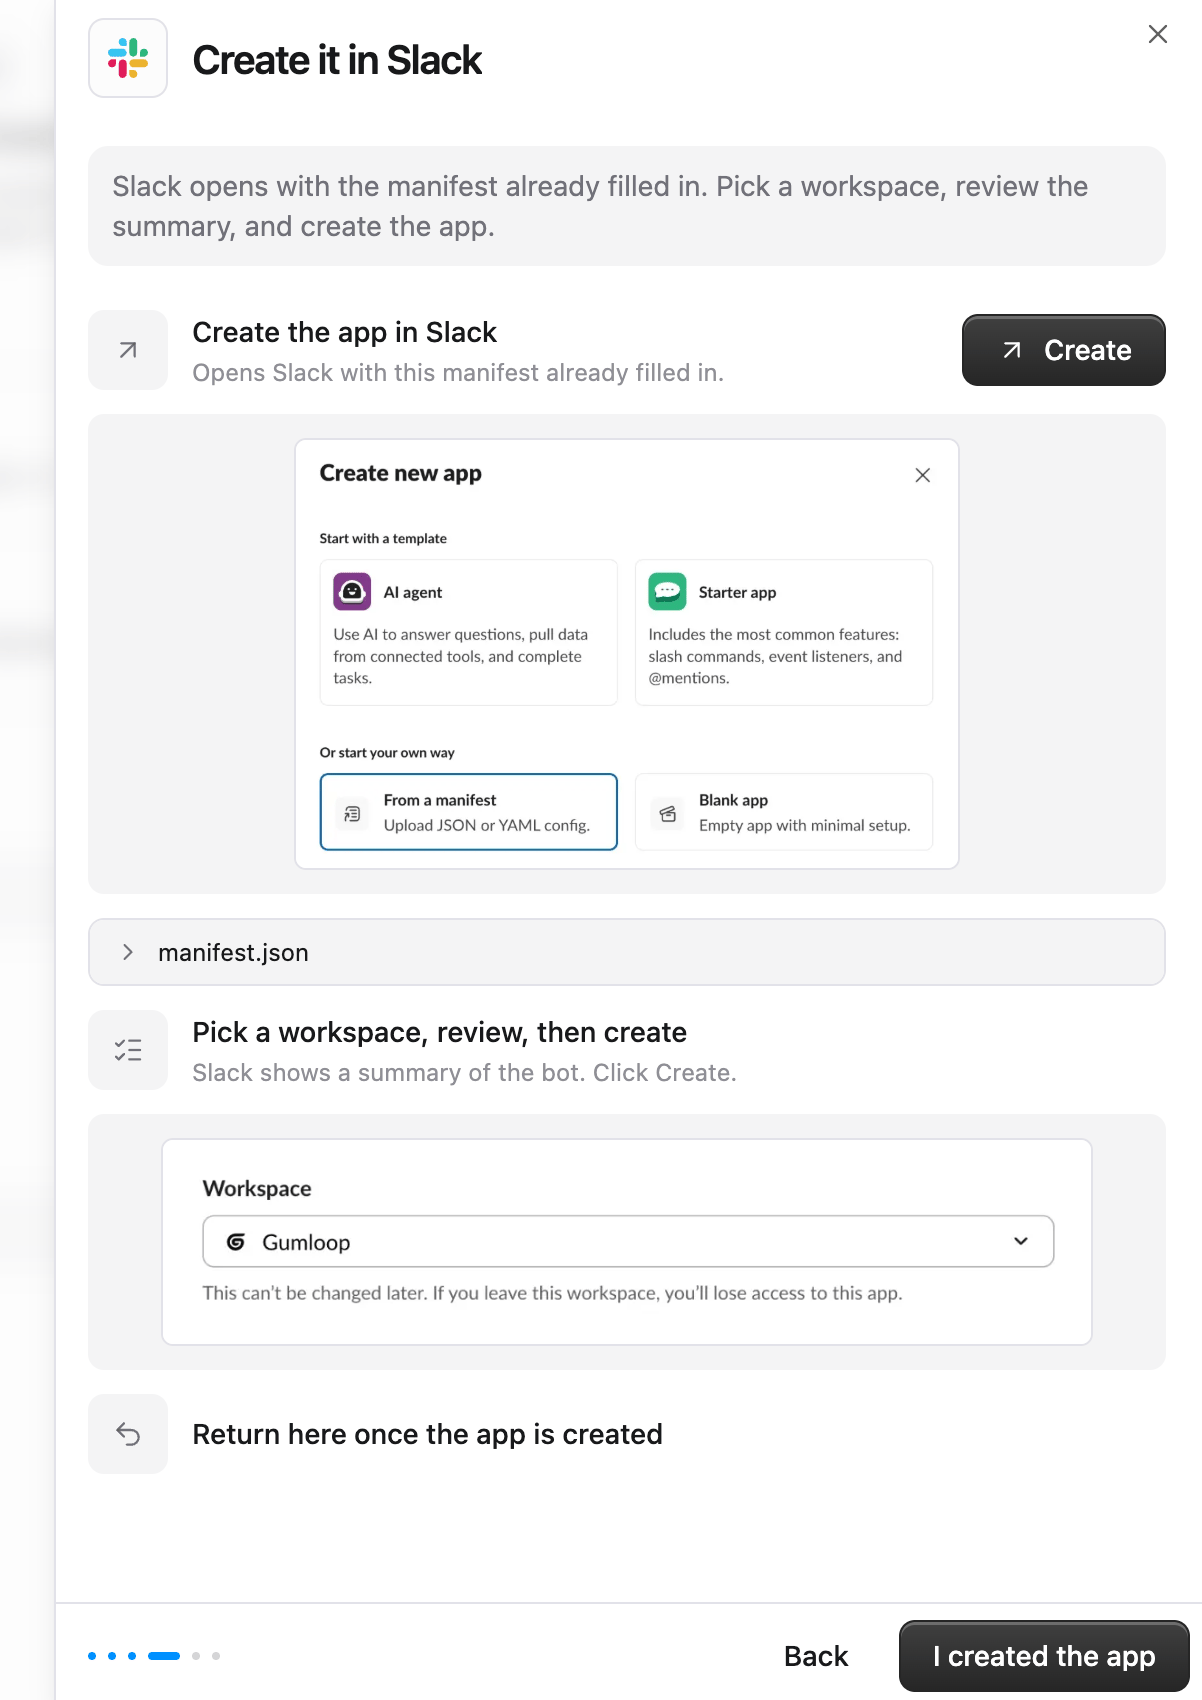
Create it in Slack
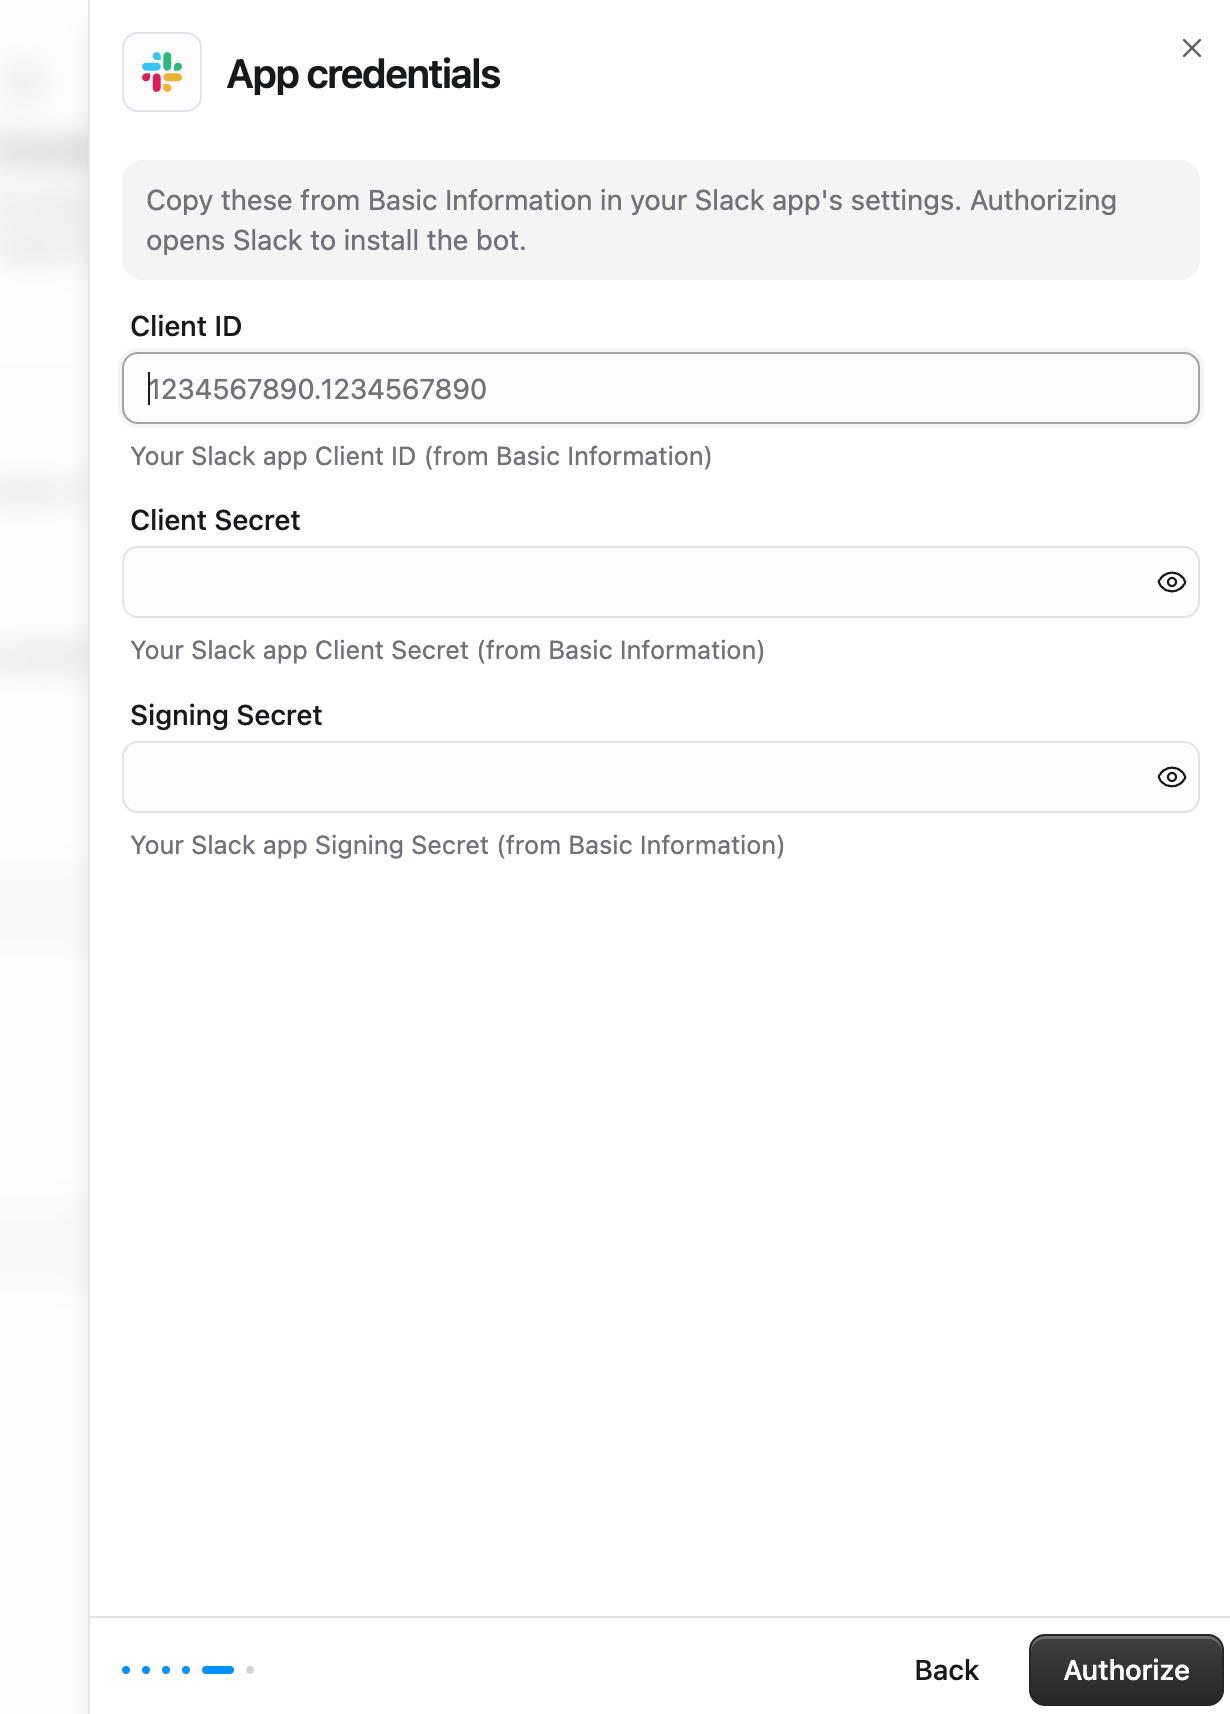
Enter app credentials
- Client ID
- Client Secret
- Signing Secret
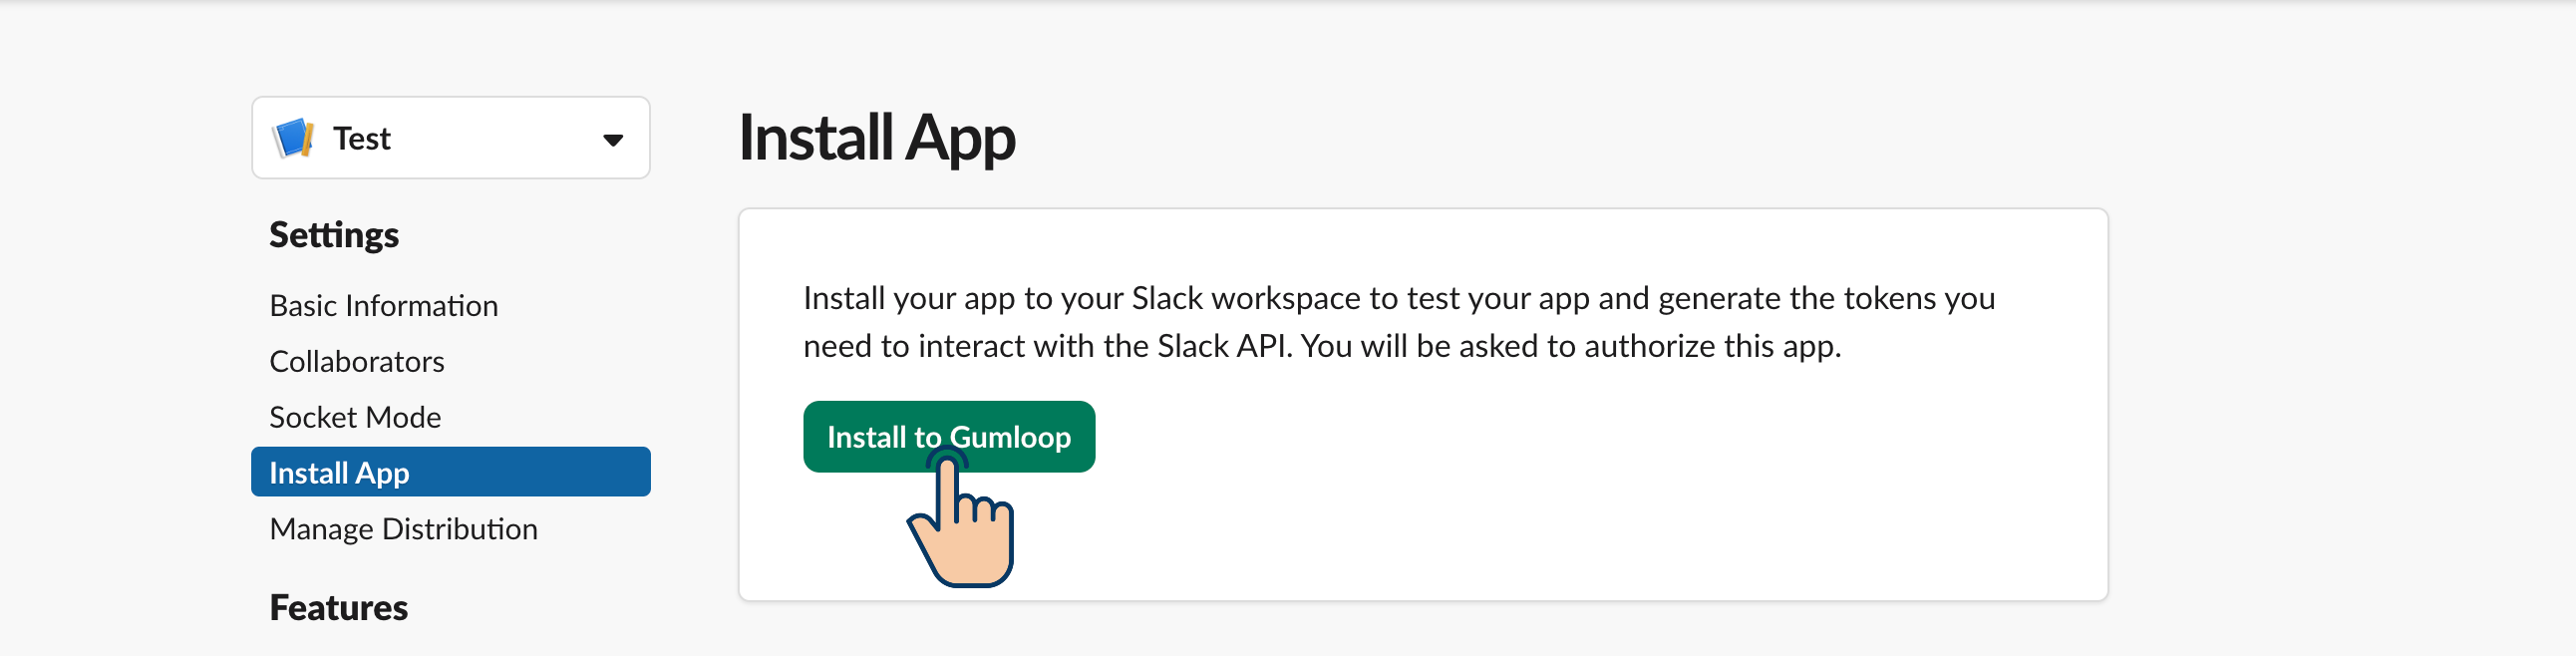
Ensure Slack app is installed to the workspace
Invite your bot to channels
@YourBotName with the App Tag you configured (e.g., @salesassistant).
Option 2: Connect an existing app
If you already have a Slack app or need custom configurations, you can connect it directly to Gumloop.Open Channels → Slack
Choose Existing App
Configure your Slack app (if not already done)
Required bot token scopes
Required bot token scopes
assistant:write to have your bot appear in Slack’s agents & assistants dropdown (top right of the Slack client). It isn’t required for DMs or mentions to work—see Enabling DMs on an already-connected app.Required event subscriptions
Required event subscriptions
- Toggle “Enable Events” to ON
- Set the Request URL to:
- Wait for verification (green checkmark)
- Under “Subscribe to bot events”, add:
app_mentionmessage.channelsmessage.groups(for private channels)message.im(for direct messages)agent_session_stopped(for Slack’s Stop button)app_context_changed(to share what the user has open in Slack)
- Save changes
Required App Home configuration (for DMs)
Required App Home configuration (for DMs)
- Under Show Tabs, enable the Messages Tab.
- Check “Allow users to send Slash commands and messages from the messages tab”.
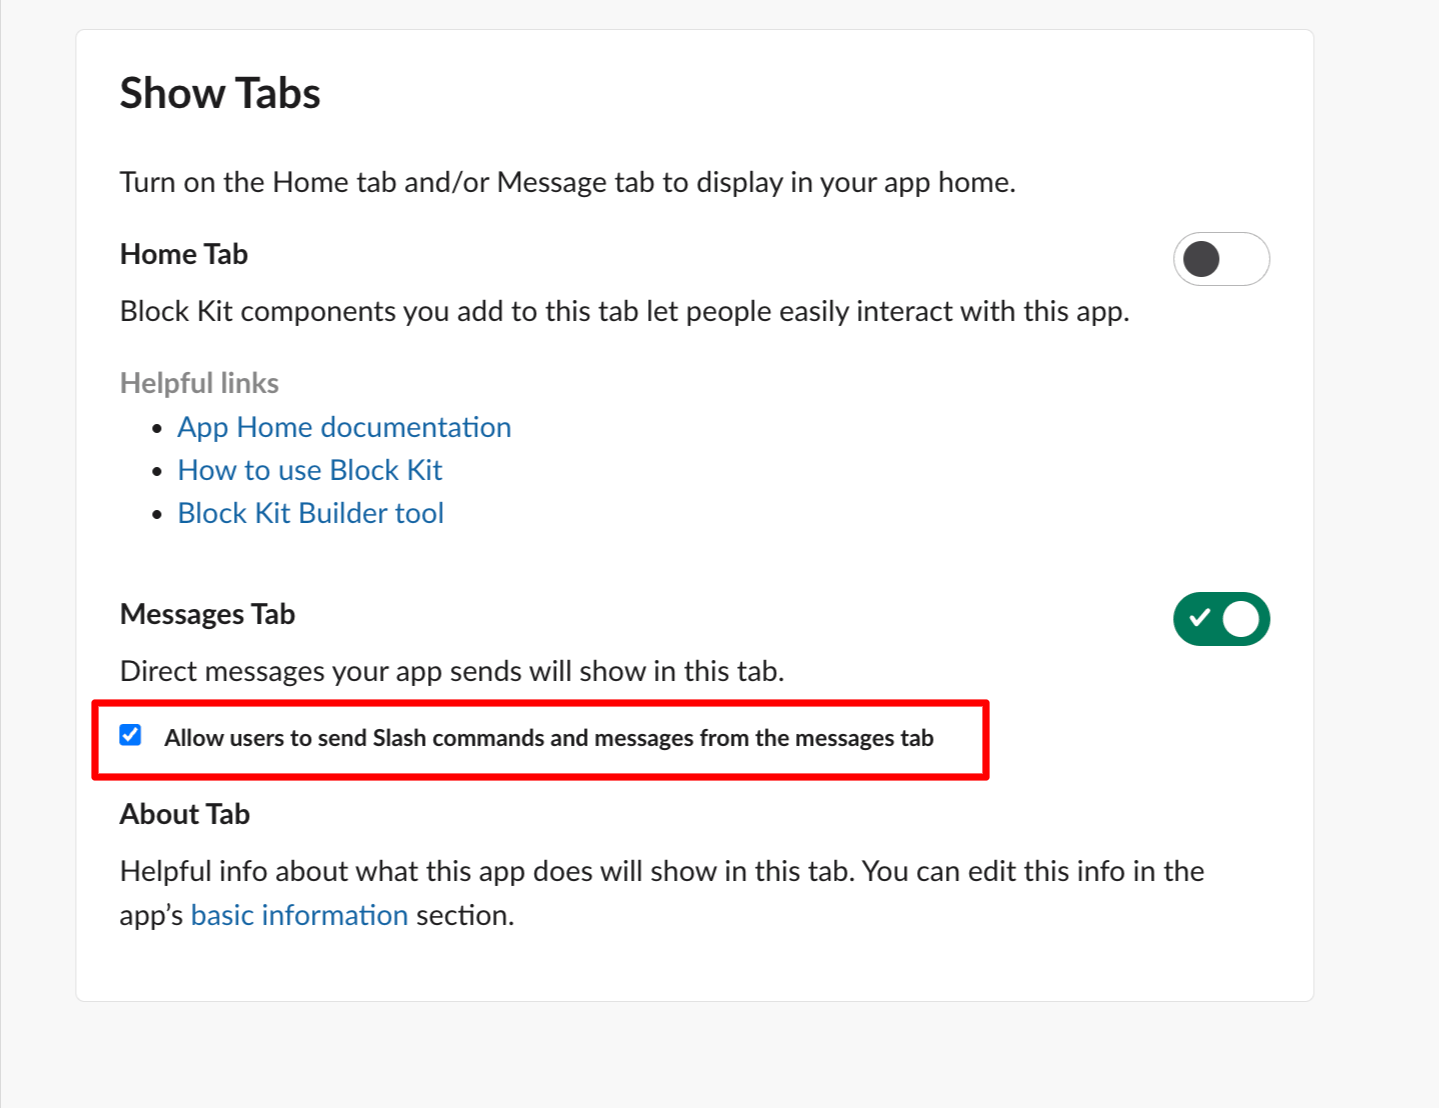
Required interactivity configuration
Required interactivity configuration
- Toggle “Interactivity” to ON
- Set the Request URL to:
- Save changes
Install to Workspace
Install to Workspace
Enter your app credentials
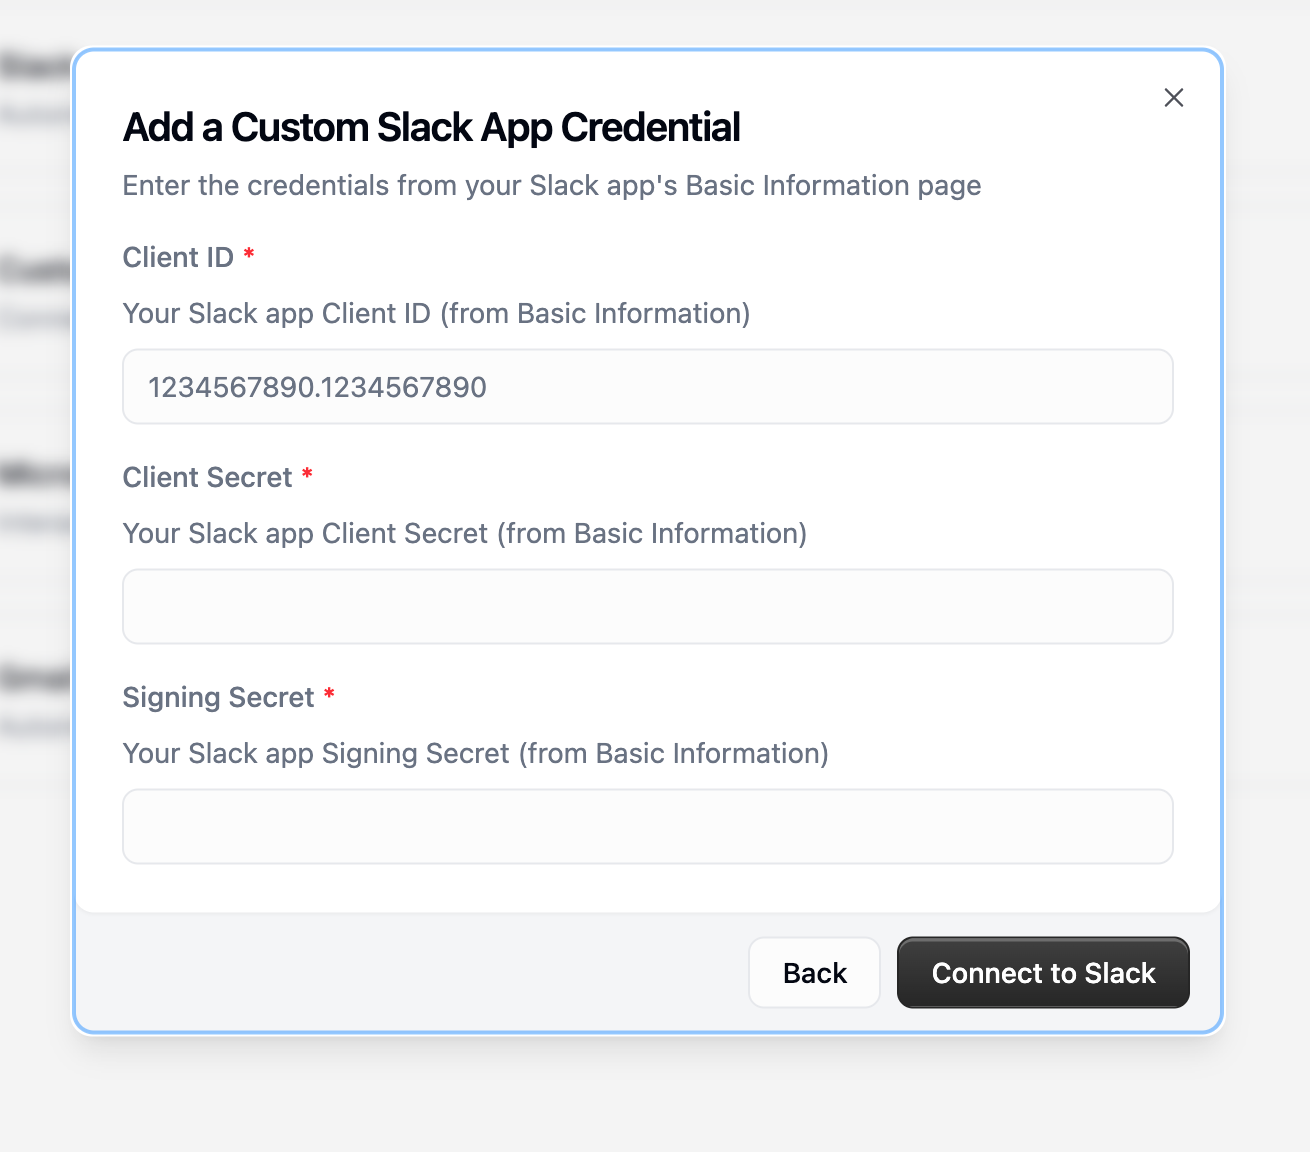
- Client ID — Found under “App Credentials”
- Client Secret — Click “Show” to reveal, then copy
- Signing Secret — Click “Show” to reveal, then copy
Assign to your agent and invite to channels
Enabling DMs on an already-connected app
Direct message support was added after custom Slack apps first launched. If you connected your custom app before DMs were available, the missing piece is the App Home Messages tab—without it, Slack hides the message box so users can’t DM your bot. Themessage.im event subscription and the im:* scopes were already part of Gumloop’s manifest, so apps created with the New App flow already have them and there’s nothing new to add.
Enable DMs with the one-time steps below.
Enable the App Home Messages tab
- Enable the Messages Tab.
- Check “Allow users to send Slash commands and messages from the messages tab”.
Reinstall the app to your workspace
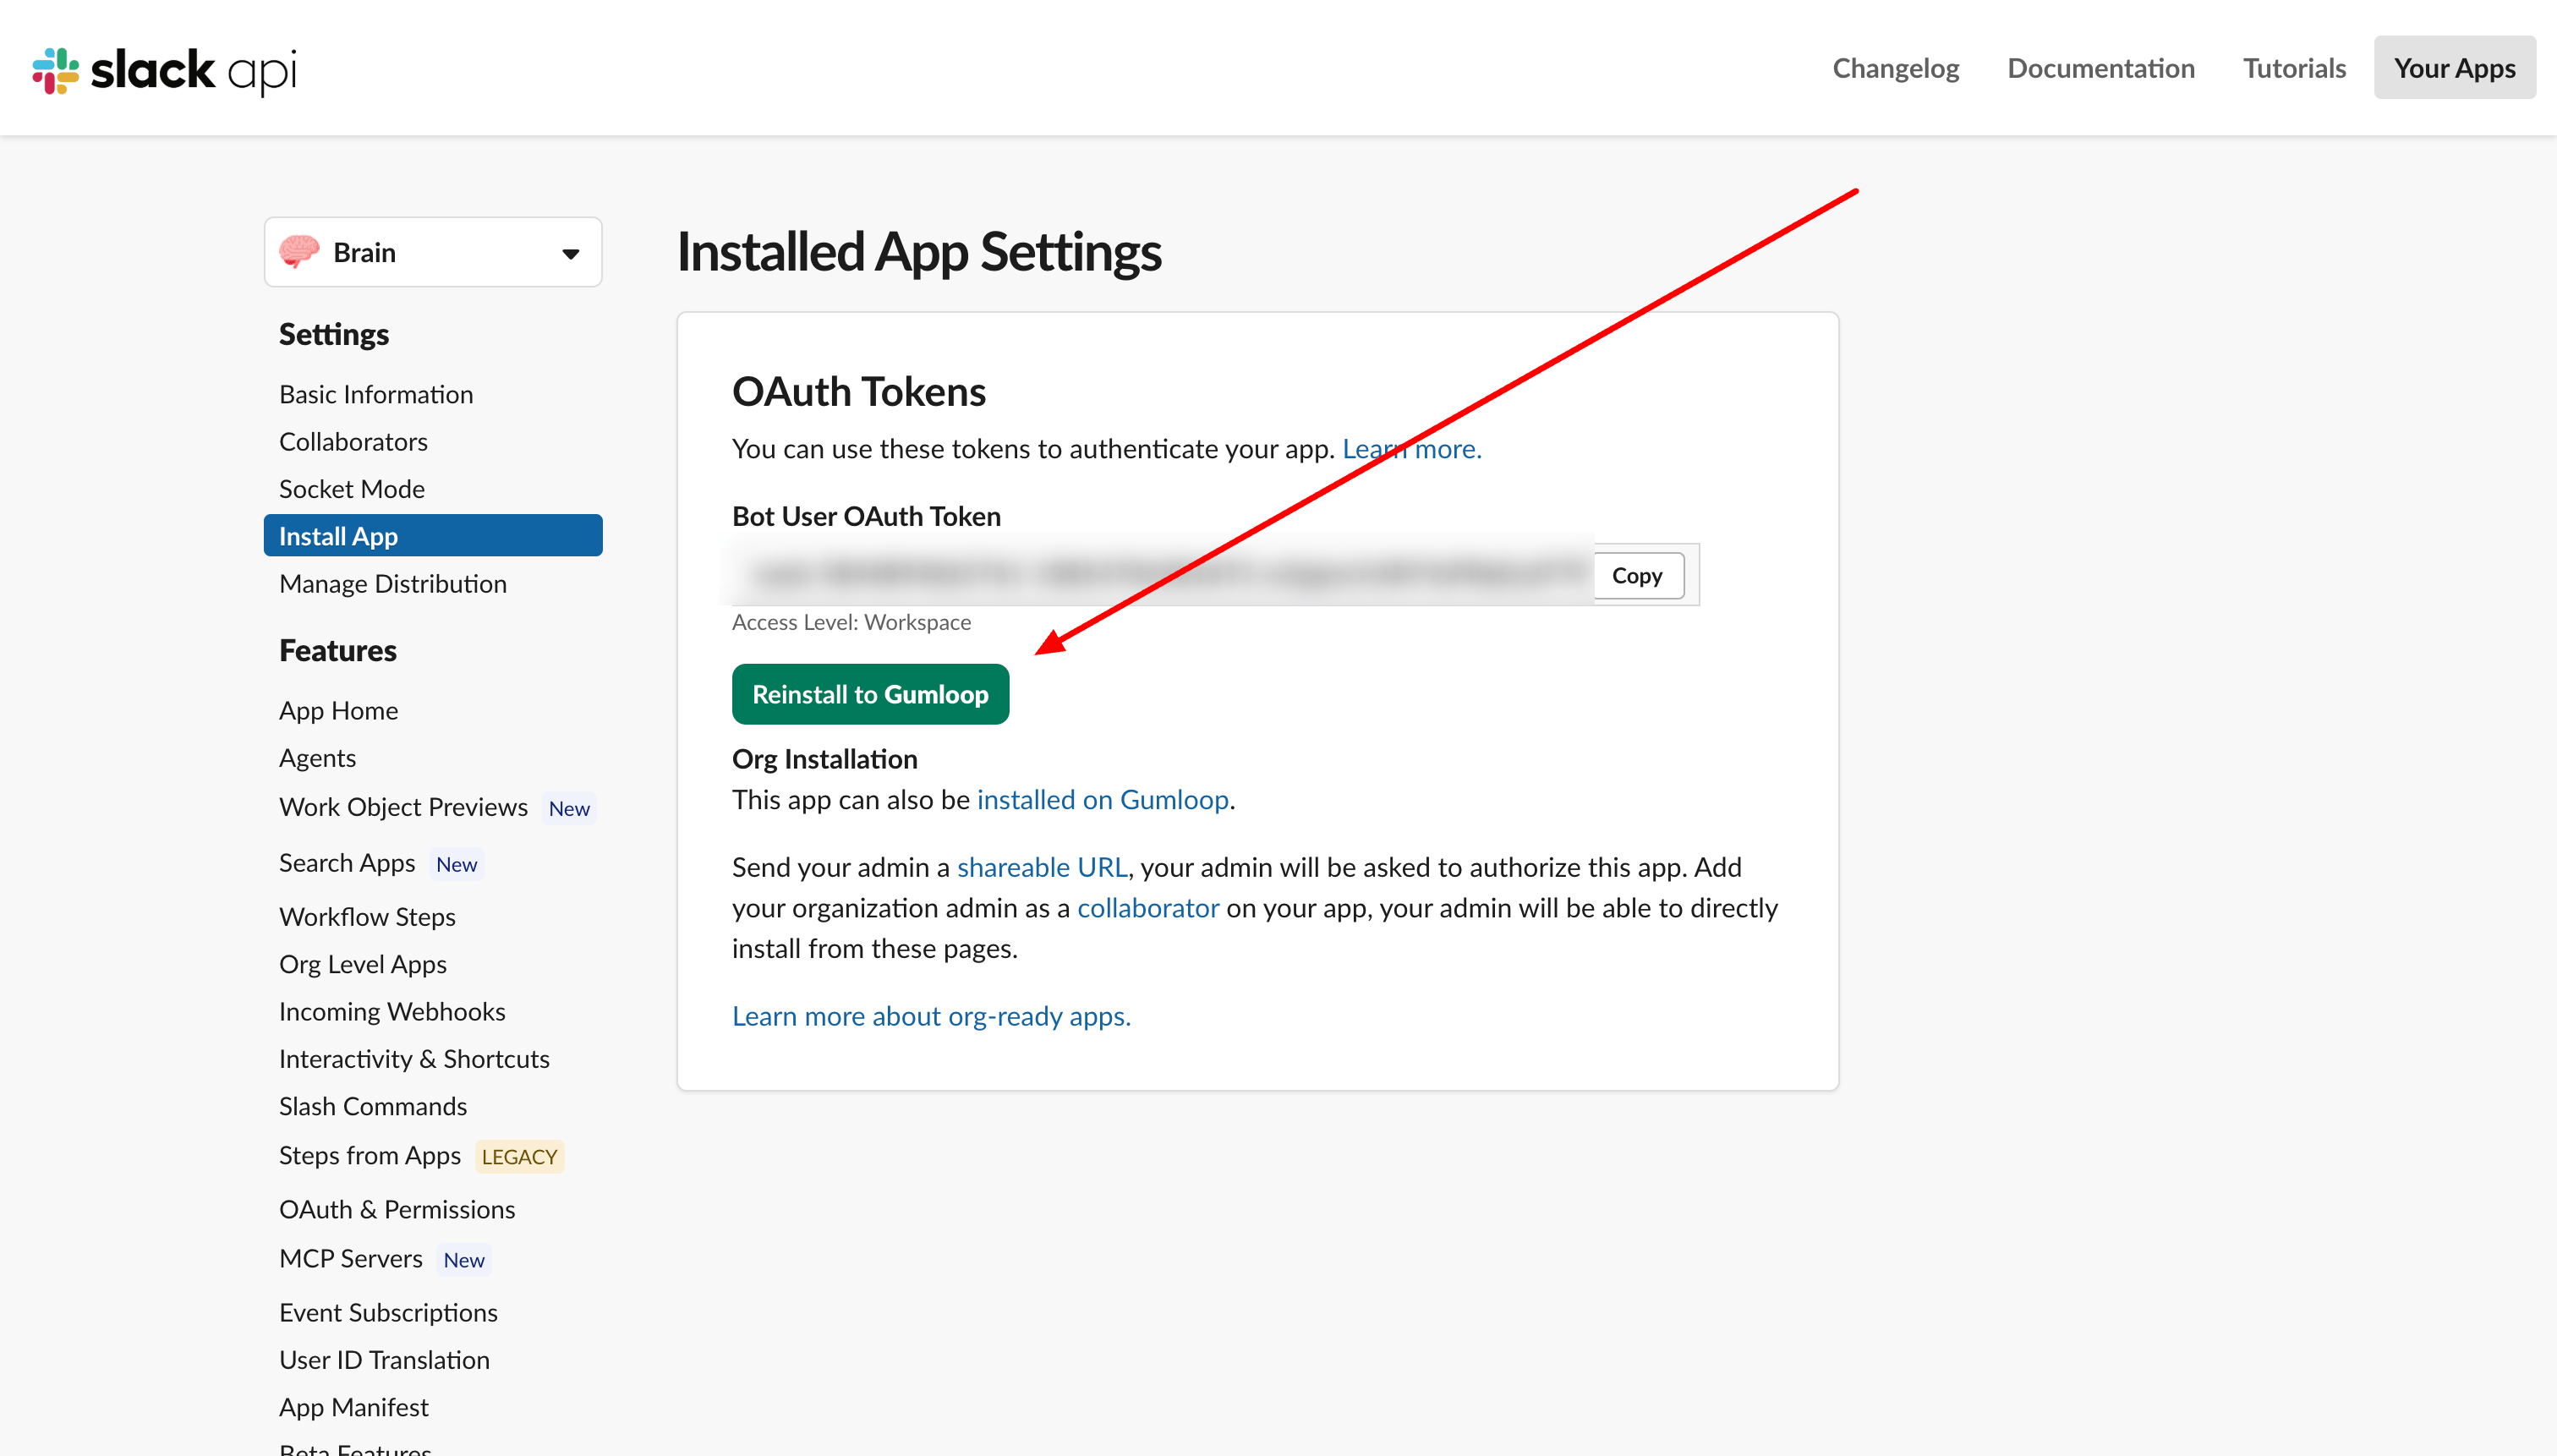
chat:write and im:write), so once the Messages tab is enabled and the app is reinstalled, DMs work without re-authorizing.(Existing apps only) Verify the DM event and scopes
- Event Subscriptions → Subscribe to bot events includes
message.im. - OAuth & Permissions → Bot Token Scopes includes
im:history,im:read, andim:write.
(Optional) Add the assistant:write scope to show your bot in Slack's agents list
assistant:write bot scope. This scope is not part of Gumloop’s New App manifest, so apps created or re-created from the manifest lose their spot in that list until you add it back.To add it, go to OAuth & Permissions → Bot Token Scopes, add assistant:write, then reinstall the app to your workspace.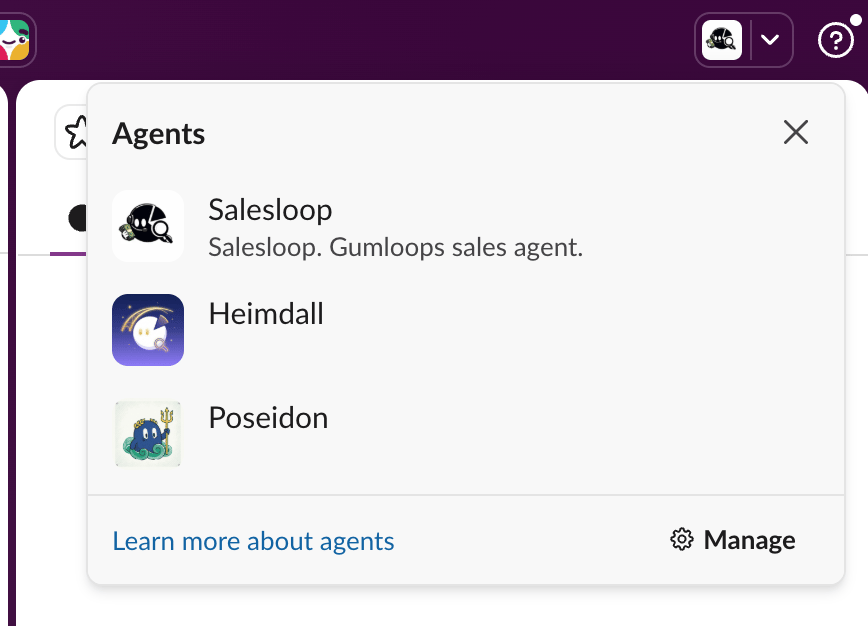
assistant:write is optional: DMs work without it. The scope is also required for Slack’s Working… indicator used by the Stop button.Adding newer Slack events to an existing app
Gumloop’s New App manifest subscribes to two Slack events that older apps may not have:!stop instead), and DMs don’t include what the user has open.
Open Event Subscriptions
Add the bot events
agent_session_stopped and app_context_changed.Save
Using your Custom Slack App agent
Once set up, interacting with your custom Slack app agent works similarly to the standard Gumloop integration, with a few key differences.Starting a conversation
@mention your custom bot in any channel where it’s been invited:
- Process your request using its configured tools
- Respond in a thread to keep conversations organized
- Continue the conversation within the thread based on your agent’s settings
Stopping a response
Apps with theassistant:write scope can show Slack’s Working… indicator. If the app is also subscribed to agent_session_stopped, the indicator includes a Stop button.
Click Stop to end the current response. The agent’s message reads This response was stopped. If it had not posted anything yet, it replies Stopped this chat. instead.
The stop applies only to this Slack app. Other Slack apps in the thread keep running, and messages you send afterward are not cancelled.
agent_session_stopped. Apps created before it was added, and existing apps you connected yourself, need it added by hand. See Adding newer Slack events to an existing app. !stop works either way.Direct messages (DMs)
Your custom bot can also be messaged directly—no channel or @mention required. Open a DM with your bot from the Slack sidebar (or the Messages tab on the app’s profile) and just start typing:What the User has open in Slack
When your app is subscribed to theapp_context_changed event, Slack attaches what the user has open (a channel, thread, canvas, or list) to the DMs they send your bot. The agent can then act on requests like “summarize this thread” or “read the sales data in this canvas” without being given a link or ID.
- This applies to DMs only. Messages in channel threads don’t carry it.
- The agent uses its Slack tools to read what’s open. Reading a list also requires the
lists:readscope on the Slack connector the agent uses.
im:history, im:read, and im:write scopes to be granted. Apps created with Gumloop’s New App manifest have this configured automatically. If you connected an existing app—or linked a custom app before DM support shipped—follow Enabling DMs on an already-connected app.Interactive features
Custom Slack apps support the same interactive messages as the standard Gumloop integration:- Gumloop’s buttons and forms: approval buttons, connect prompts, browser handoff forms, and other buttons and modals Gumloop posts in the thread work the same way, under your app’s name.
- Block Kit messages from the agent: with the Slack connector on the agent, it can post Block Kit messages with sections, images, and buttons. See Rich messages and buttons. The standard @Gumloop bot can do this too, so you don’t need a custom app just for Block Kit.
url) open their link. Clicks on other buttons in messages the agent builds aren’t sent back to the agent.
Key differences from standard integration
No slash commands
No slash commands
/gummie slash commands. You cannot use:/gummie add— Bot is added by inviting to channels instead/gummie remove— Remove bot by kicking from channels/gummie active— You know which bot is in a channel by its name/gummie help— Not available
- Add to channels:
/invite @YourBotName - Remove from channels:
/kick @YourBotNameor remove via channel settings
Works across all channels
Works across all channels
Distinct bot identity
Distinct bot identity
@YourBotName instead of @Gumloop.Slack preferences
All the same Slack preferences available for standard agents apply to custom Slack apps:- Thread Replies: Choose Auto (default), Only on mentions, or On all messages. See Thread Replies
- Slack Attribution Stamp: Show or hide the agent name and View conversation link under each reply. See Slack Attribution Stamp
- Show Detailed Steps: List each step on the progress card, or show only a short status. See Show Detailed Steps
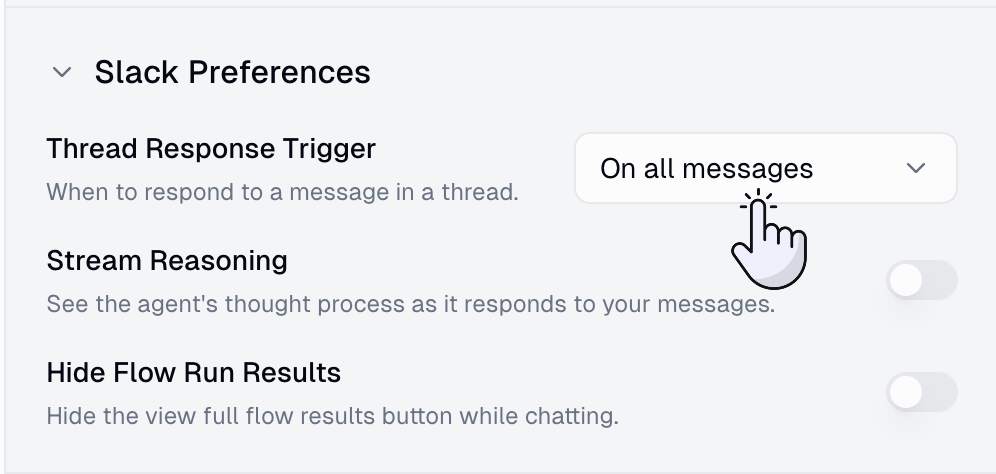
Choosing which bot the agent acts as
If an agent has more than one custom Slack app connected — say a workspace bot and a white-labeled “Sales Assistant” — you can pick which one it acts as when it uses Slack tools on its own. Open your agent, go to Connectors, and click the Slack app. Under Account you’ll find a Bot Account selector: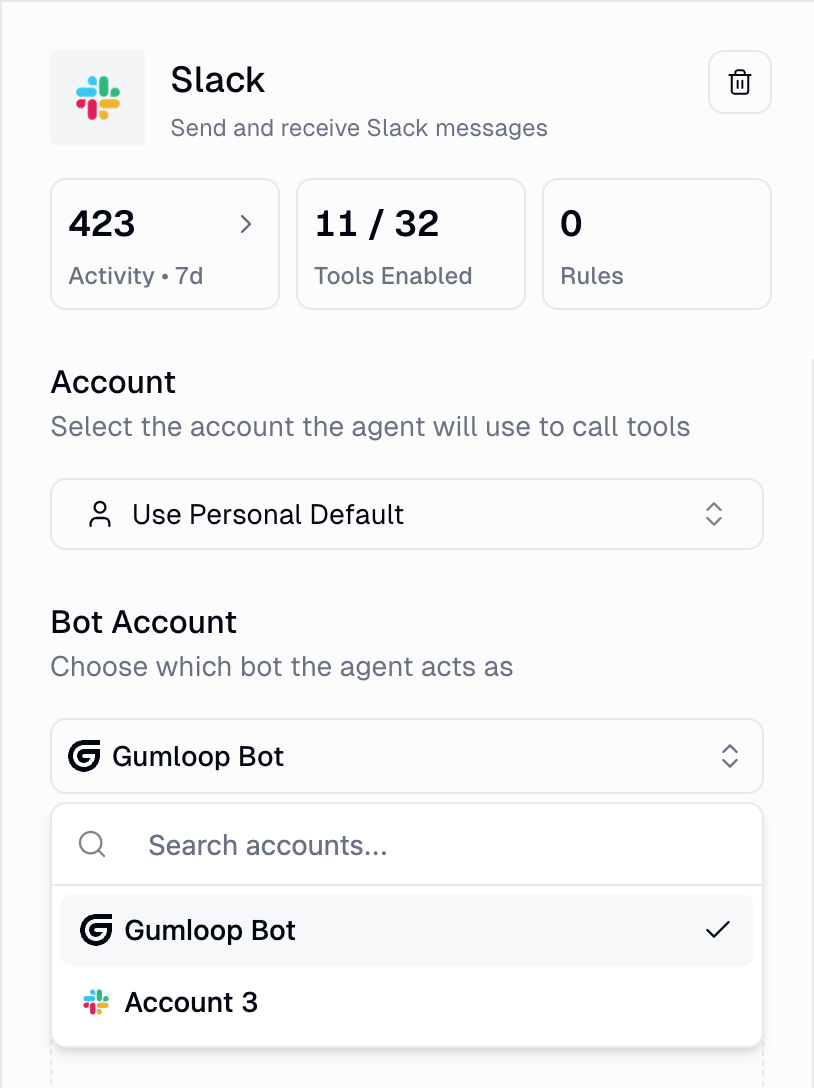
- Gumloop Bot (the default) — the agent’s Slack tool calls go out as Gumloop’s bot.
- Any custom Slack app connected to this agent — listed by the name you gave the credential. Pick one and its bot becomes the identity the agent acts as.
Credential ownership options
When creating your custom Slack app credential, you can choose who has access:Troubleshooting
Slack rejected this app's Client ID or Client Secret
Slack rejected this app's Client ID or Client Secret
Slack didn't finish installing the app
Slack didn't finish installing the app
Bot doesn't respond to messages
Bot doesn't respond to messages
-
Is the Slack app installed to your workspace? This is the most common issue. Go to your Slack app settings → OAuth & Permissions → Install to Workspace.
-
Is the bot invited to the channel? (
/invite @YourBotName) - Did you @mention the bot in your message?
- Are the event subscriptions configured correctly in Slack?
-
Is the webhook URL verified? (
https://api.gumloop.com/api/v1/external/slack/events) - Is the credential properly assigned to your agent in Gumloop?
- Does the user have a Gumloop account with matching email?
Bot doesn't respond to direct messages (DMs)
Bot doesn't respond to direct messages (DMs)
- Is the App Home Messages tab enabled? Go to your Slack app settings → Features → App Home → enable the Messages Tab and check “Allow users to send Slash commands and messages from the messages tab”.
- Is
message.imsubscribed under Event Subscriptions → Subscribe to bot events? - Are the
im:history,im:read, andim:writescopes granted under OAuth & Permissions? - Did you connect this app before DM support shipped? The App Home Messages tab was added to the manifest later, so older apps have it disabled. Enable the Messages tab and reinstall the app—no need to reconnect the credential in Gumloop. See Enabling DMs on an already-connected app.
Bot works in some channels but not others
Bot works in some channels but not others
- Is the bot invited to the non-working channels?
- For private channels, do you have
groups:historyandgroups:readscopes configured? - Is there a different agent assigned via the standard integration in that channel?
Webhook URL verification fails in Slack
Webhook URL verification fails in Slack
https://api.gumloop.com/api/v1/external/slack/events should verify automatically.If it fails:- Check for typos in the URL
- Ensure you’re using HTTPS (not HTTP)
- Try again after a few minutes (temporary network issues)
- Contact Gumloop support if the issue persists
Can't find credentials in Slack
Can't find credentials in Slack
- Client ID, Client Secret, Signing Secret: Found in Basic Information → App Credentials
- Click “Show” next to each secret to reveal it, then copy
Important limitations
One agent per custom app
No slash commands
/gummie commands. Manage your bot by inviting/removing it from channels directly.Credential exclusivity
Manual channel management
Security considerations
Credential protection
Credential protection
User matching
User matching
Permission verification
Permission verification
- The user has a valid Gumloop account
- The user has permission to access the agent
- For team agents, team membership is verified
FAQ
Can I use both the standard @Gumloop bot and a custom app in the same workspace?
Can I use both the standard @Gumloop bot and a custom app in the same workspace?
/gummie commands, while custom apps use bot-based mapping with direct invites. You can have both active in different channels.What's the difference between New App and Existing App setup?
What's the difference between New App and Existing App setup?
What happens if I delete my custom Slack app in Slack?
What happens if I delete my custom Slack app in Slack?
How do I update my bot's name or avatar?
How do I update my bot's name or avatar?
Can I have multiple custom apps assigned to one agent?
Can I have multiple custom apps assigned to one agent?