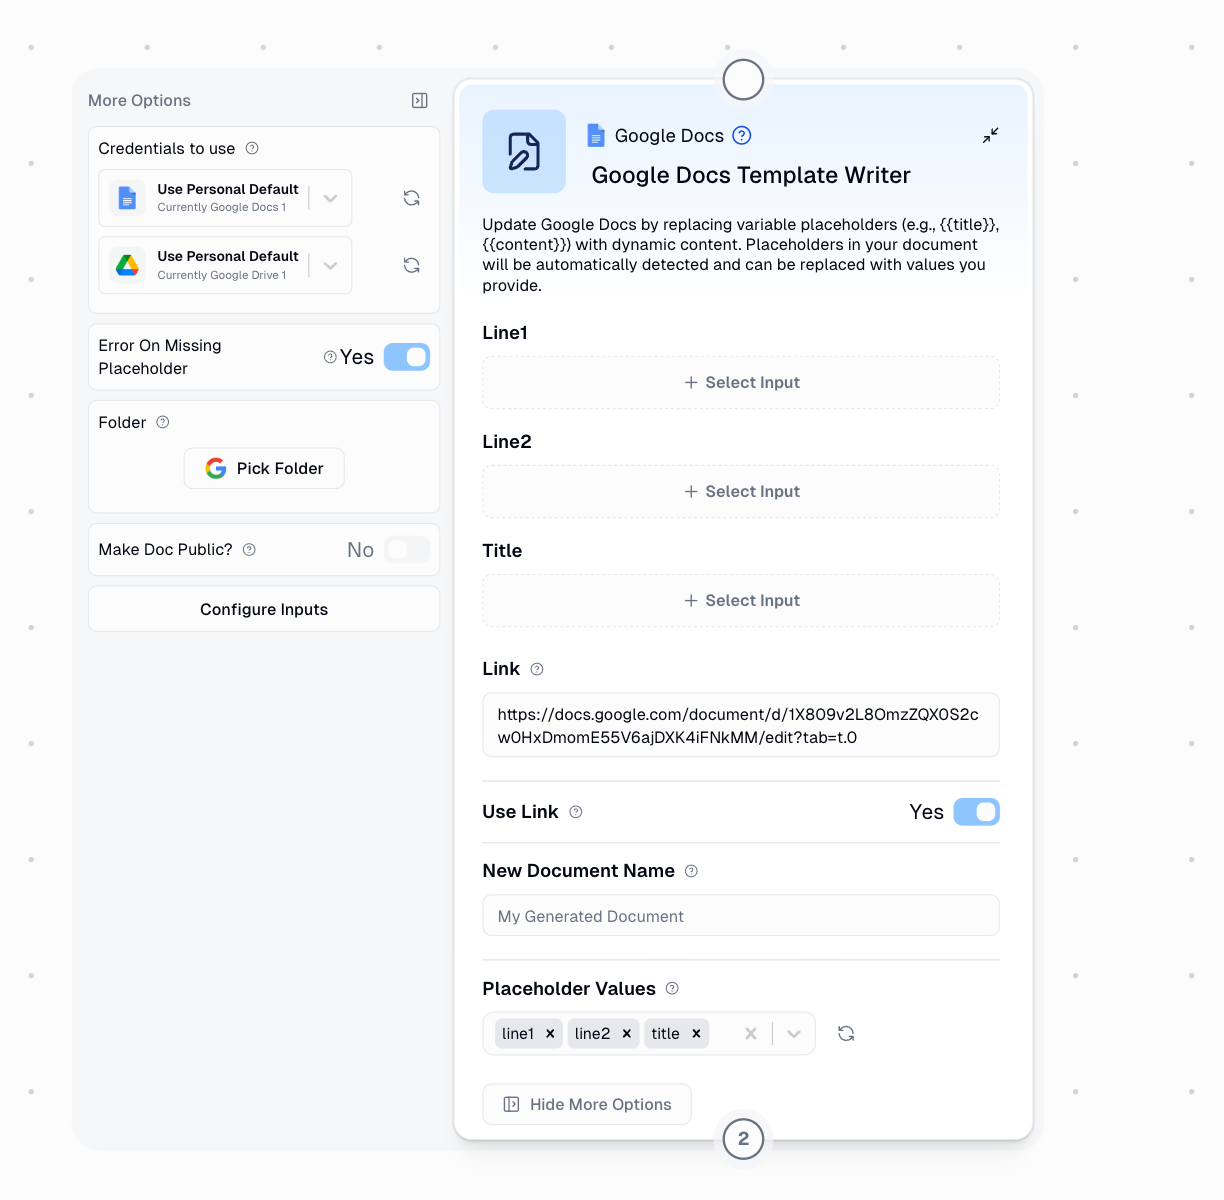
This document explains the Google Docs Template Writer node, which automates document creation by using templates with placeholder variables.
How It Works
Imagine you have a Google Doc template for contracts, invoices, or reports. Instead of manually copying and editing this template each time, you can add placeholder variables wherever content needs to change. The Google Docs Template Writer node automatically detects these placeholders and replaces them with your data.
Here’s the process:
- Create a template in Google Docs with placeholder variables
- Add the node to your Gumloop workflow
- Enter the template link - the node automatically detects all placeholders
- Connect data from other nodes to fill in the placeholders
- Run the workflow - a new document is created with your data
Note: The node creates a new document each time it runs. Your original template remains unchanged.

Understanding Placeholders
Creating Placeholders in Your Template
To mark content as replaceable, wrap it in double curly braces: {{placeholder_name}}
For example, in your Google Doc template:
- Instead of writing “John Smith”, write
{{client_name}}
- Instead of writing “January 15, 2025”, write
{{contract_date}}
- Instead of writing “$5,000”, write
{{total_amount}}
When you enter your Google Doc template link in the node:
- The node scans your entire template
- It finds all placeholders (anything inside
{{ }})
- Each placeholder automatically appears as an input field in the node
- You can then connect outputs from other nodes (like Google Sheets data, AI-generated content, or calculated values) to these inputs
This means you don’t need to manually configure what to replace - the node handles it automatically based on your template design.
Placeholder Naming Rules
Valid formats:
- Letters and numbers:
{{invoice123}}
- Underscores:
{{first_name}}
- Spaces:
{{Company Name}}
- Dots:
{{client.address}}
- Hyphens:
{{q1-revenue}}
Invalid characters:
- Forward slashes:
{{path/to/file}} ❌
- Square brackets:
{{array[0]}} ❌
- Colons:
{{time:date}} ❌
Basic Configuration
The node has minimal required configuration:
Required:
- Template Link: URL to your Google Docs template
Optional:
- New Document Name: Custom name for the generated document (auto-generated if blank)
- Folder: Where to save the new document
- Make Doc Public: Share the document publicly
- Error On Missing Placeholder: Whether to fail if a placeholder has no value
Output:
- Document Link: URL to your newly created document
- Document ID: Unique identifier for the document
Example: Creating an Invoice
Let’s walk through a practical example of automating invoice creation.
Step 1: Create Your Template
In Google Docs, create an invoice template with these placeholder variables:
Invoice Header:
INVOICE # followed by {{invoice_number}}Date: followed by {{invoice_date}}
Billing Information:
Bill To: section with {{client_name}} and {{client_address}}
Service Details:
Services: followed by {{service_description}}
Payment Information:
Total: followed by {{total_amount}}Due Date: followed by {{due_date}}
Step 2: Build Your Workflow
-
Enter template link - The node detects 7 placeholders
-
Connect your data sources:
invoice_number ← Sheet column Ainvoice_date ← Datetime nodeclient_name ← Sheet column Bclient_address ← Sheet column Cservice_description ← Sheet column Dtotal_amount ← Sheet column Edue_date ← Calculated date
-
Set document name to
"Invoice-{{invoice_number}}"
-
Run the workflow
Result
A new Google Doc is created with all placeholders replaced with actual data, ready to send to your client.
Common Use Cases
Automated Contracts
Personalized Proposals
Processing Multiple Documents
To create multiple documents from a list of data:
- Enable Loop Mode on the Google Docs Template Writer node
- Connect list inputs - Each placeholder receives a list of values
- Run once - Creates multiple documents automatically
Example: Creating 50 personalized contracts from a spreadsheet with 50 rows of client data.
Best Practices
1. Template Design
Start with a well-structured template:
- Use descriptive placeholder names (
{{client_full_name}} not {{name}})
- Place placeholders strategically where content varies
- Test with sample data
2. Data Preparation
Ensure your data is ready:
- Format dates and numbers consistently
- Clean text data (remove extra spaces, fix capitalization)
- Validate required fields before processing
Important Considerations
Placeholders are case-sensitive. The placeholder {{Company}} is different from {{company}}. Ensure exact matches between your template and data sources.
You must authenticate with Google to use this node. Connect your Google account in the Credentials page. Troubleshooting Guide
| Issue | Cause | Solution |
|---|
| ”Google Doc not found” | Invalid URL or no access | Check URL and ensure the template is shared with your Google account |
| ”No placeholders detected” | Wrong format | Verify placeholders use {{name}} format |
| ”Missing placeholder value” | No data connected | Connect data to all placeholders or disable “Error On Missing Placeholder" |
| "Cannot create document” | Permission issue | Check Google Drive permissions and available storage |
Comparison: Template Writer vs Google Docs Writer
| Use Case | Template Writer | Google Docs Writer |
|---|
| Starting Point | Existing template with placeholders | Blank or existing document |
| Content Replacement | Automatic placeholder detection | Manual content insertion |
| Best For | Structured, repeatable documents | Free-form writing and updates |
| Examples | Contracts, invoices, certificates | Meeting notes, documentation |


