Node Inputs
The Google Sheets Reader node accepts the following inputs:Sheet Selection (Choose one method)
- Select Sheet: Choose a Google Sheet directly from your Drive
- Use Link: Option to use a direct Google Sheets URL
- Link: The URL of your Google Sheet (required if using link method)
Configuration Options
-
Sheet Name: Specific worksheet within the Google Sheets file
- Example: “Sales Data” or “Q3 Reports”
- When to use: When your Google Sheet contains multiple tabs/worksheets and you need data from a specific one
-
Row Range: Specify exact rows to read (Cannot include row 1 since Gumloop uses the first row to identify headers)
- Format: Use commas for individual rows and dashes for ranges
- Examples:
2-10: Read rows 2 through 102,5,8: Read only rows 2, 5, and 82-5,8,10-12: Read rows 2 through 5, row 8, and rows 10 through 12
- When to use:
- When you need specific sections of your sheet
- When processing historical data from specific row ranges
- When targeting specific entries by their row positions
-
Search Column: Column to use for filtering data
- Example: If your sheet has a column named “Status”, you can filter by this column
- When to use:
- When you need to find rows matching certain criteria
- When processing only specific categories of data
- When implementing conditional workflows based on data values
- Note: Select “No Search Column” if you want all data without filtering
-
Search Value: Value to match in the specified search column
- Example: If Search Column is “Status”, Search Value might be “Completed”
- When to use:
- When extracting records matching exact criteria
- When processing items of a specific status or category
- When automated actions should only apply to certain values
- Note: The search is case-sensitive and requires exact matching
-
Number of Rows: Limit the number of rows returned
- Examples:
10: Return only the first 10 matching rows- Leave blank to return all matching rows
- When to use:
- When working with large sheets but only need a sample
- When implementing pagination in your outputs
- When testing workflows before processing full datasets
- Examples:
-
Sort: Choose the sorting direction
- Top-Down: Sort data from top to bottom (ascending)
- When to use: For chronological data, oldest first
- Bottom-Up: Sort data from bottom to top (descending)
- When to use: For accessing most recent entries first
- Top-Down: Sort data from top to bottom (ascending)
Refreshing Column Headers
Important: If you modify column headers in your Google Sheet, you must refresh the node’s column data in Gumloop.
- Click the refresh icon (🔄) next to the Sheet Name dropdown
- This will update the available columns to match your current Google Sheet structure
- You’ll need to reconnect any outputs that were using columns that have been renamed
- Column names not appearing in the node’s outputs
- Missing new columns that were recently added
- Workflow errors after renaming columns in your sheet
Node Output
The Google Sheets Reader node produces:- Sheet Data: Structured data from the Google Sheet based on your column headers. Each column header is exposed as a list of text output containing all records from that column.
Node Functionality
The Google Sheets Reader node provides automated access to Google Sheets data with advanced filtering and sorting capabilities. Key features include:- Flexible row range selection
- Search and filter functionality
- Customizable data retrieval options
- Secure authentication with Gumloop
When To Use
The Google Sheets Reader node is particularly valuable in scenarios requiring automated data extraction from Google Sheets. Common use cases include:- Data Analysis: Extract data for reports and analytics
- Content Management: Pull content stored in spreadsheets
- Inventory Tracking: Monitor stock levels and changes
- Project Management: Track task status and updates
- Lead Management: Extract new leads from submission forms
- Event Planning: Access event details and attendee information
- Budget Tracking: Pull financial data for automated reporting
Trigger Functionality
This node can also function as a trigger to start your workflow when your Google Sheet updates:- Automatically starts your workflow when data in your Google Sheet changes
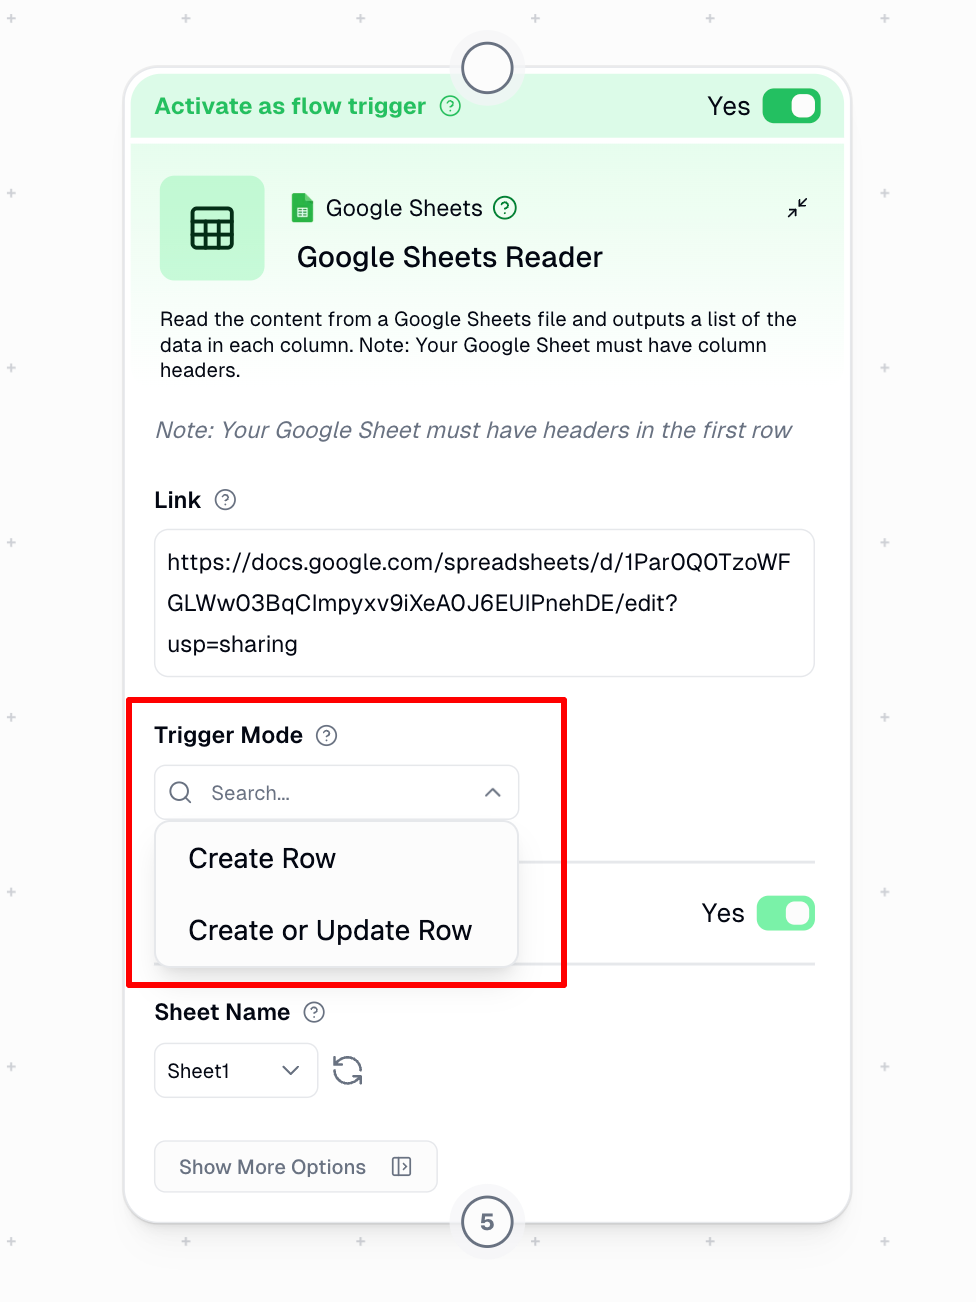
- Two trigger modes:
- Create: Only triggers on new rows added to the sheet
- Create or Update: Triggers when rows are added OR existing rows are modified
- Understanding Row Events:
- Row Creation: Triggers when any new row is added to your sheet
- Row Update: Triggers when any cell value is changed in any existing row
- Configuration:
- Select your Google Sheet (via direct selection or URL)
- Specify worksheet tab to monitor
- Choose trigger mode based on your needs
- Toggle
Activate as workflow trigger - Save workflow
Trigger Activation Time and Behavior
Important: When configuring a Google Sheets trigger, be aware of the following:- Activation Time: After creating or updating a trigger, it may upto 5 minutes for the trigger to become active. If you’ve just set up a trigger, please be patient during this initialization period.
- Polling Frequency: Subsequently, the system checks for updates approximately every 60 seconds.
Troubleshooting
If your Google Sheets trigger isn’t working as expected:- Verify Activation: Ensure you’ve saved the workflow after setting up the trigger and running the workflow manually works.
- Check Permissions: Confirm your Google account has appropriate access to the spreadsheet.
- Inspect Headers: Make sure your sheet has headers in the first row and atleast one row of data thereafter.
- Test Simple Changes: Test the trigger with a simple row addition to verify functionality.
- Refresh Column Data: If you’ve modified your sheet structure, click the refresh icon (🔄) next to the Sheet Name and save.
- Consider Row Order: If using the “Create” mode, remember that it only detects newly added rows, not modified existing rows.
- Unique Identifiers: For mission-critical workflows, include a unique ID column to ensure reliable row tracking.
- Reset Trigger: Consider resetting the trigger by disabling the “Activate as workflow trigger” toggle, saving, enabling the same toggle and saving again.
Understanding Edge Cases
When using Google Sheets triggers, here’s how the system handles specific spreadsheet modifications:Column Changes
- Adding New Columns: New columns are automatically included in trigger data
- Inserting Columns: System adapts to columns inserted between existing ones, but may trigger for any rows where the the row hash changes
- Deleting Columns: System adapts to columns deleted between existing ones, but may trigger for any rows where the the row hash changes
Row Operations
- Row Additions: Always triggers workflows in both “Create” and “Create or Update” modes
- Row Updates: Only trigger in “Create or Update” mode
- Row Deletions:
- In “Create” mode: No trigger occurs when rows are deleted
- In “Create or Update” mode: Triggers for rows that shift position after deletion
- Row Reordering:
- In “Create” mode: Not detected
- In “Create or Update” mode: Triggers for all affected rows as their position-based hashes change
Important Considerations:
- Requires Authentication with Google - Set up in the Connectors page
- Sheet must have headers in the first row (ie. the data you want to extract)
- Row Range cannot include row 1 (headers)
- You must have access to the Google Sheet
- When using as a trigger, ensure your workflow is saved before and after adding the trigger
- After modifying column headers in your Google Sheet, click the refresh button (🔄) next to the Sheet Name to update the available columns in Gumloop
- Allow 5 minutes for trigger activation after creation or mode modification