> ## Documentation Index
> Fetch the complete documentation index at: https://docs.gumloop.com/llms.txt
> Use this file to discover all available pages before exploring further.
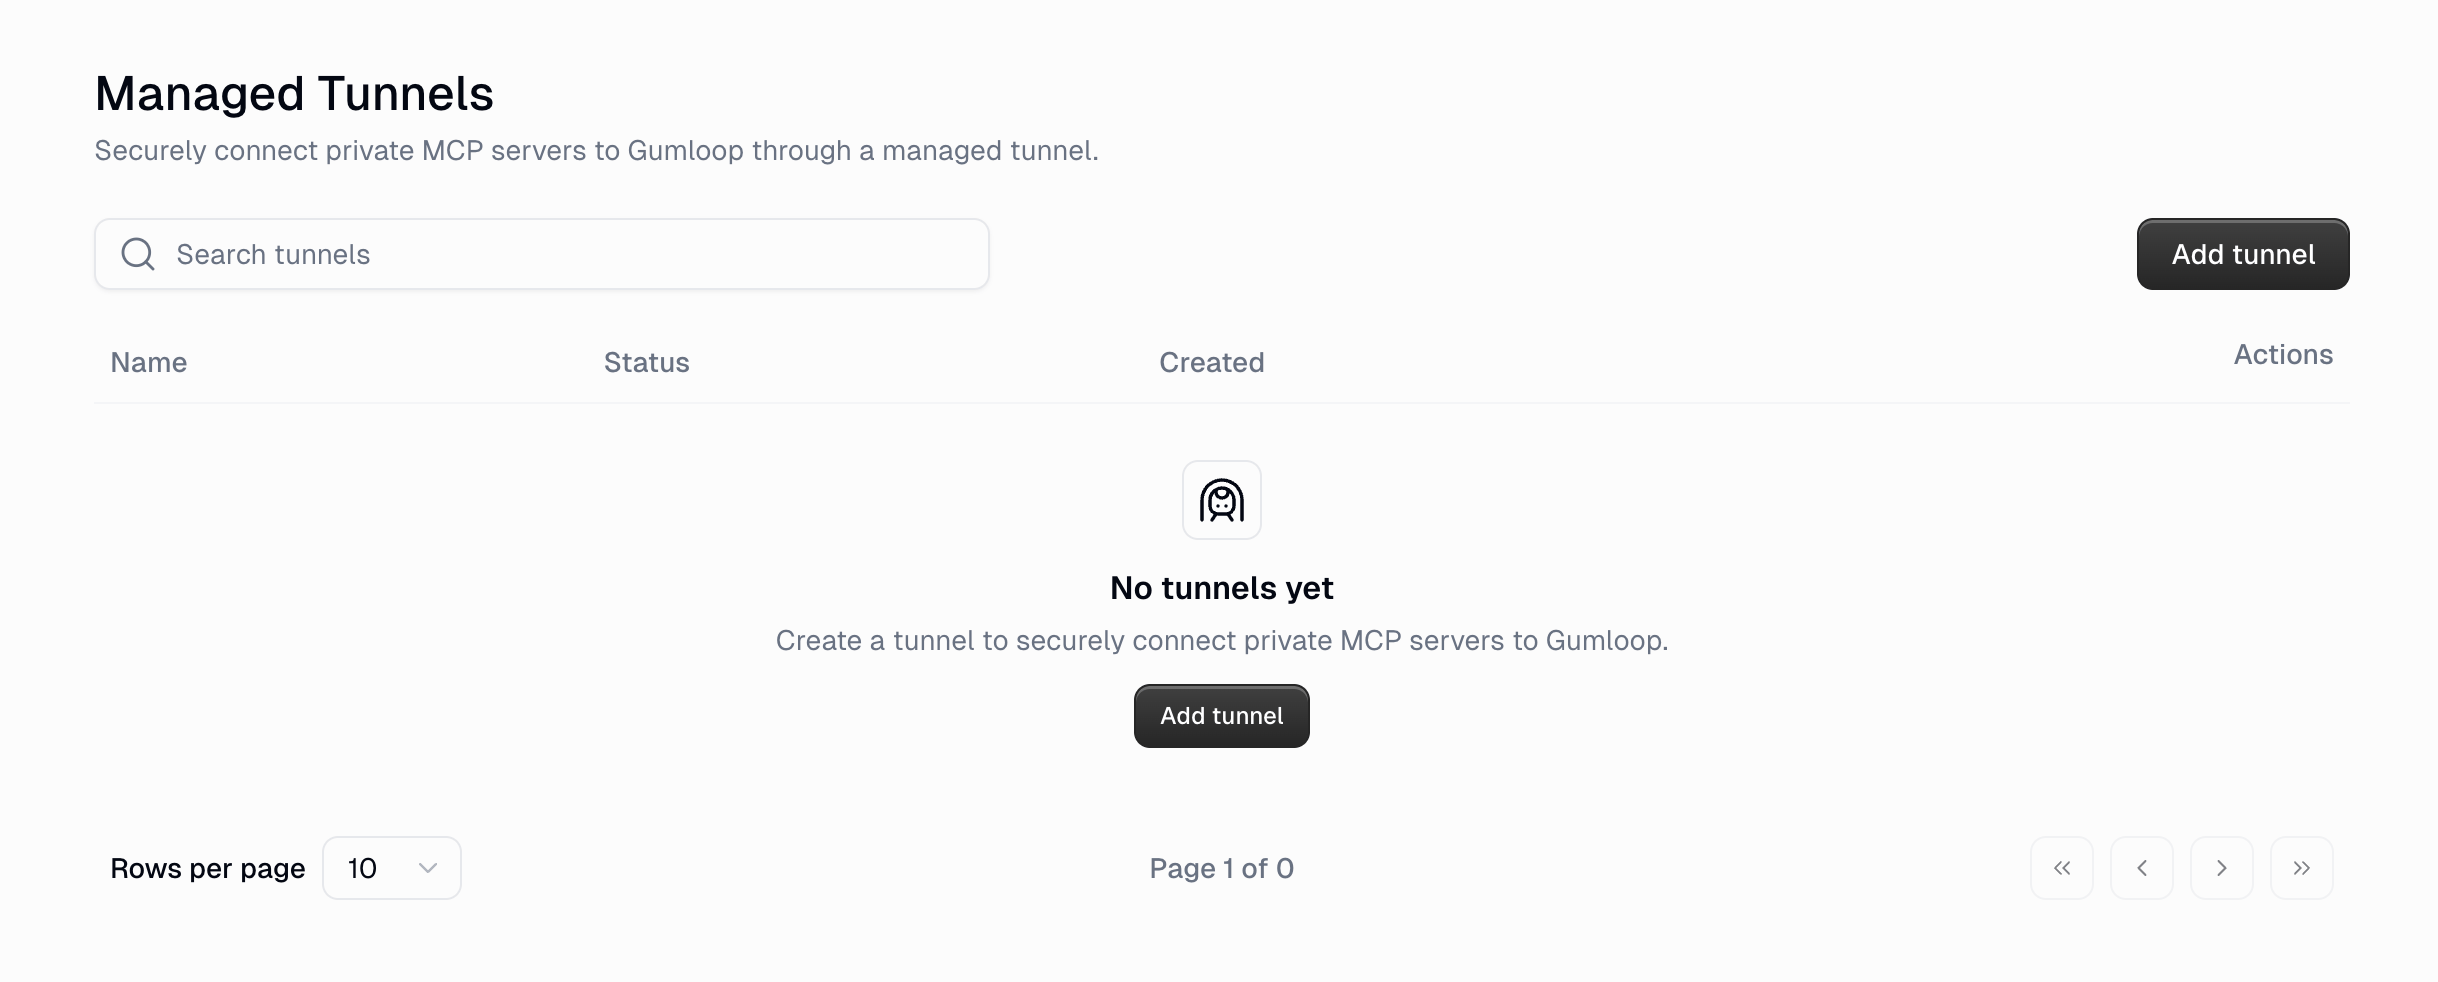
# Managed Tunnels
> Securely connect MCP servers running inside your private network to Gumloop, without opening any inbound ports.
A managed tunnel gives Gumloop a secure path to MCP servers that only exist inside your network — on a VPC, a corporate network, or a developer machine. You run a lightweight connector next to your servers, it dials out to Gumloop, and each server becomes usable in Gumloop like any other [Proxied MCP](/enterprise-features/proxied_mcps).
No inbound firewall rules, no public IP, and no changes to the MCP servers themselves.
 ## Where to find it
Go to **Settings → Organization → Managed Tunnels** at
[gumloop.com/settings/organization/managed-tunnels](https://gumloop.com/settings/organization/managed-tunnels).
Managed Tunnels is an **Enterprise** feature, and creating, editing, or
deleting a tunnel requires the same organization-admin permission as
[Proxied MCPs](/enterprise-features/proxied_mcps). Contact your organization
admin if you don't see it under **Settings → Organization**.
## How it works
1. You create a tunnel in Gumloop. Gumloop provisions it for you and assigns it a domain — you don't need a Cloudflare account of your own.
2. You run the Cloudflare connector (`cloudflared`) on a machine that can reach your MCP servers, using the tunnel's connector token. The connector makes an **outbound** connection only.
3. You attach each MCP server to the tunnel by giving it a name and the local address it runs on (for example `http://localhost:8000/mcp`).
4. Gumloop publishes each attached server on its own subdomain under `gumlooptunnels.com` and routes requests through the tunnel to that local address. Every hostname is protected by its own access credential that Gumloop manages, so only Gumloop can call it.
### When to use a tunnel
| | Proxied MCP (plain URL) | Proxied MCP over a managed tunnel | [Hosted MCP](/enterprise-features/hosted_mcps) |
| -------------------------------- | ----------------------------- | --------------------------------- | ---------------------------------------------- |
| **Where the server runs** | Third party / anywhere public | Inside your network | On Gumloop's infrastructure |
| **Reachable from the internet?** | Yes | No | N/A |
| **What you run** | Nothing | The `cloudflared` connector | Nothing (deployed from GitHub) |
| **Best for** | Third-party MCP servers | Internal or on-prem MCP servers | Custom MCP servers you build |
## Create a tunnel
On the Managed Tunnels page, click **Add tunnel** and give it a name that describes the network it reaches into — for example, "Prod network". A domain is assigned automatically once the tunnel is created.
## Where to find it
Go to **Settings → Organization → Managed Tunnels** at
[gumloop.com/settings/organization/managed-tunnels](https://gumloop.com/settings/organization/managed-tunnels).
Managed Tunnels is an **Enterprise** feature, and creating, editing, or
deleting a tunnel requires the same organization-admin permission as
[Proxied MCPs](/enterprise-features/proxied_mcps). Contact your organization
admin if you don't see it under **Settings → Organization**.
## How it works
1. You create a tunnel in Gumloop. Gumloop provisions it for you and assigns it a domain — you don't need a Cloudflare account of your own.
2. You run the Cloudflare connector (`cloudflared`) on a machine that can reach your MCP servers, using the tunnel's connector token. The connector makes an **outbound** connection only.
3. You attach each MCP server to the tunnel by giving it a name and the local address it runs on (for example `http://localhost:8000/mcp`).
4. Gumloop publishes each attached server on its own subdomain under `gumlooptunnels.com` and routes requests through the tunnel to that local address. Every hostname is protected by its own access credential that Gumloop manages, so only Gumloop can call it.
### When to use a tunnel
| | Proxied MCP (plain URL) | Proxied MCP over a managed tunnel | [Hosted MCP](/enterprise-features/hosted_mcps) |
| -------------------------------- | ----------------------------- | --------------------------------- | ---------------------------------------------- |
| **Where the server runs** | Third party / anywhere public | Inside your network | On Gumloop's infrastructure |
| **Reachable from the internet?** | Yes | No | N/A |
| **What you run** | Nothing | The `cloudflared` connector | Nothing (deployed from GitHub) |
| **Best for** | Third-party MCP servers | Internal or on-prem MCP servers | Custom MCP servers you build |
## Create a tunnel
On the Managed Tunnels page, click **Add tunnel** and give it a name that describes the network it reaches into — for example, "Prod network". A domain is assigned automatically once the tunnel is created.
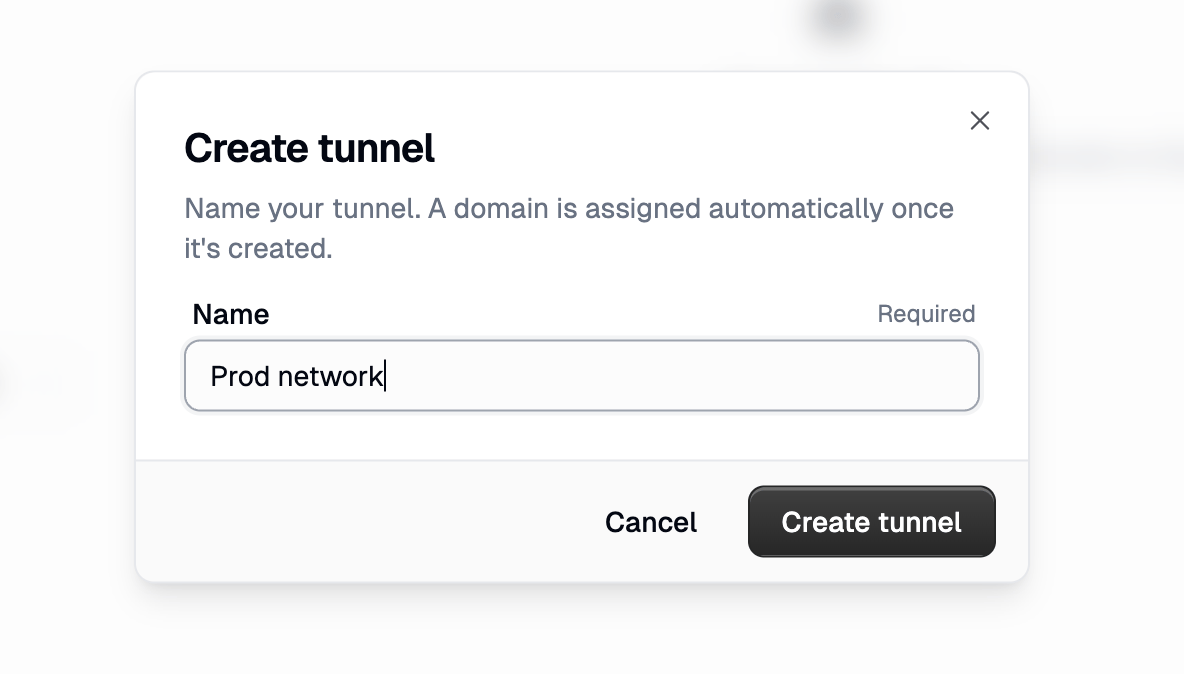 Each organization can have one managed tunnel. You can attach as many MCP servers to it as you need.
Gumloop shows the connection steps as soon as the tunnel is created, including the exact command to run with the tunnel's token.
Each organization can have one managed tunnel. You can attach as many MCP servers to it as you need.
Gumloop shows the connection steps as soon as the tunnel is created, including the exact command to run with the tunnel's token.
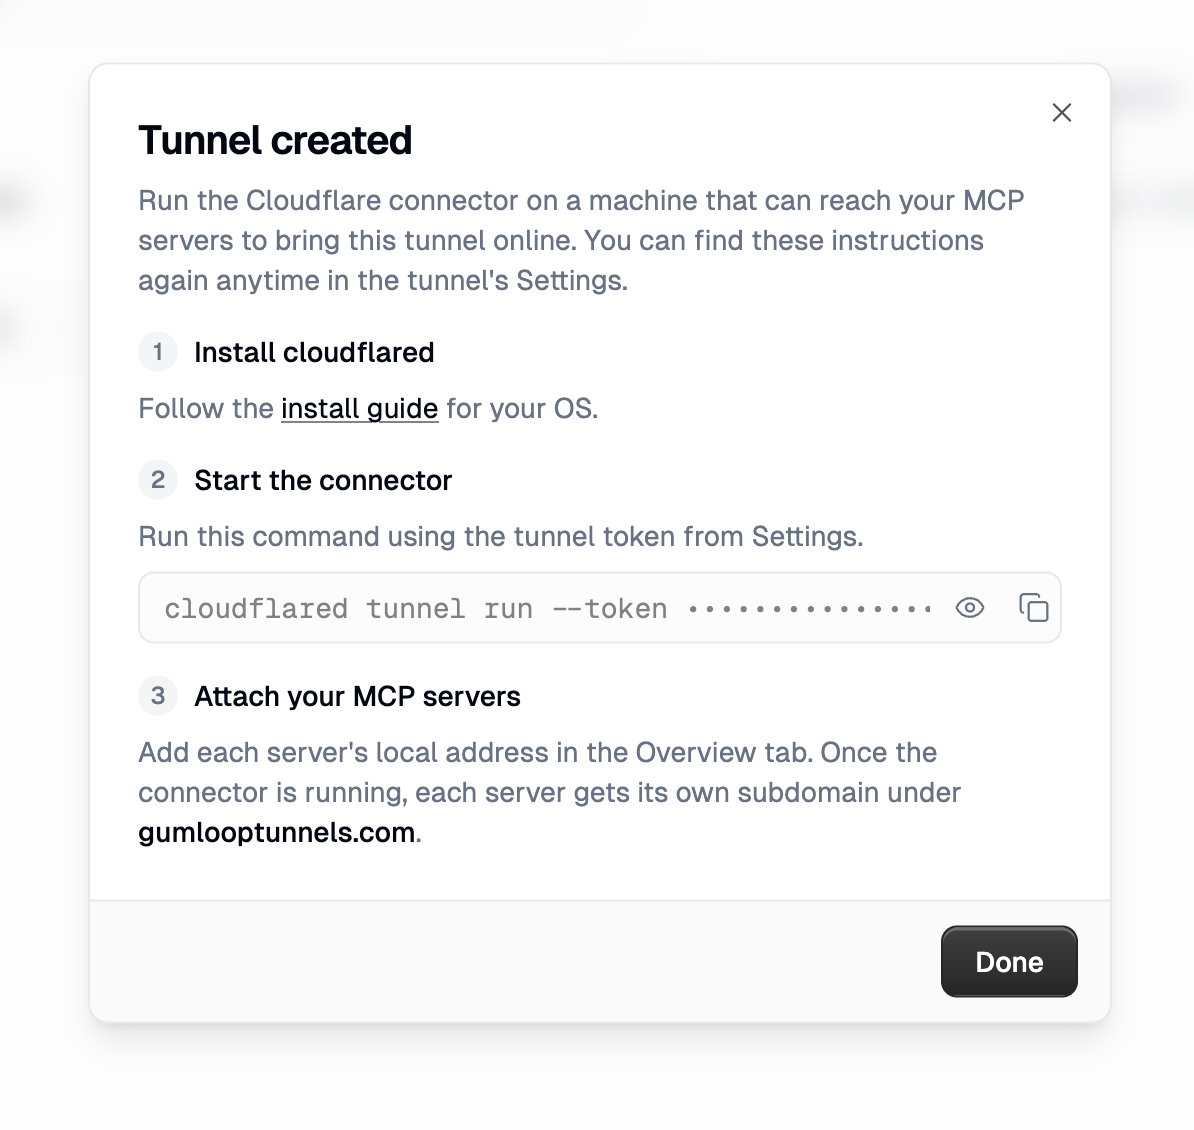 1. Install `cloudflared` on a machine that can reach your MCP servers — follow Cloudflare's [install guide](https://developers.cloudflare.com/cloudflare-one/connections/connect-networks/downloads/) for your OS.
2. Run the connector with your tunnel token:
```bash theme={"dark"}
cloudflared tunnel run --token
```
3. Keep it running. The tunnel stays online only while the connector is running, so run it as a service on a long-lived host rather than an ad-hoc terminal.
You can reopen these instructions and reveal or copy the token any time from the tunnel's **Settings** tab.
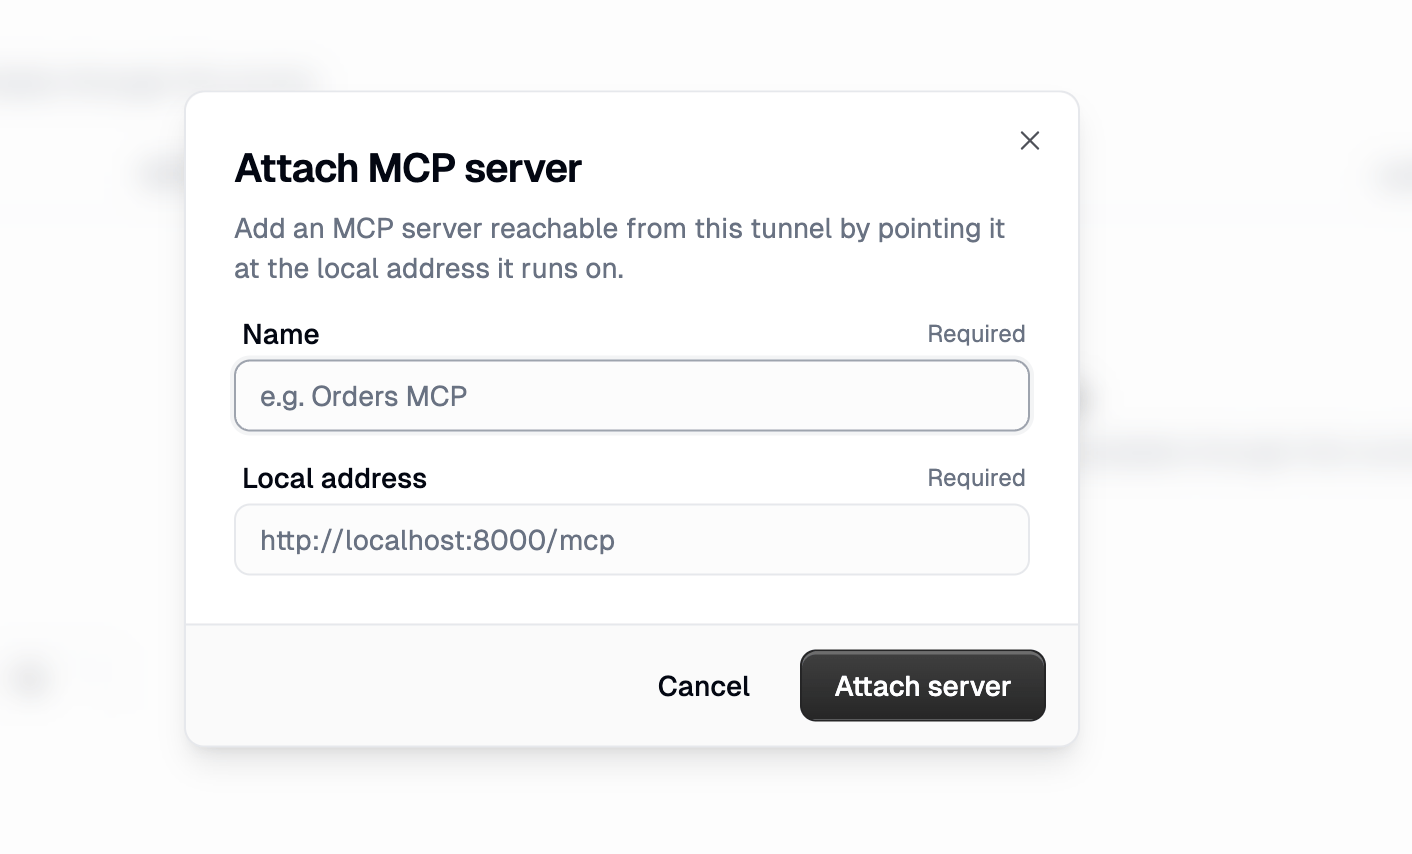
Open the tunnel and, on the **Overview** tab, click **Attach server**.
1. Install `cloudflared` on a machine that can reach your MCP servers — follow Cloudflare's [install guide](https://developers.cloudflare.com/cloudflare-one/connections/connect-networks/downloads/) for your OS.
2. Run the connector with your tunnel token:
```bash theme={"dark"}
cloudflared tunnel run --token
```
3. Keep it running. The tunnel stays online only while the connector is running, so run it as a service on a long-lived host rather than an ad-hoc terminal.
You can reopen these instructions and reveal or copy the token any time from the tunnel's **Settings** tab.
Open the tunnel and, on the **Overview** tab, click **Attach server**.
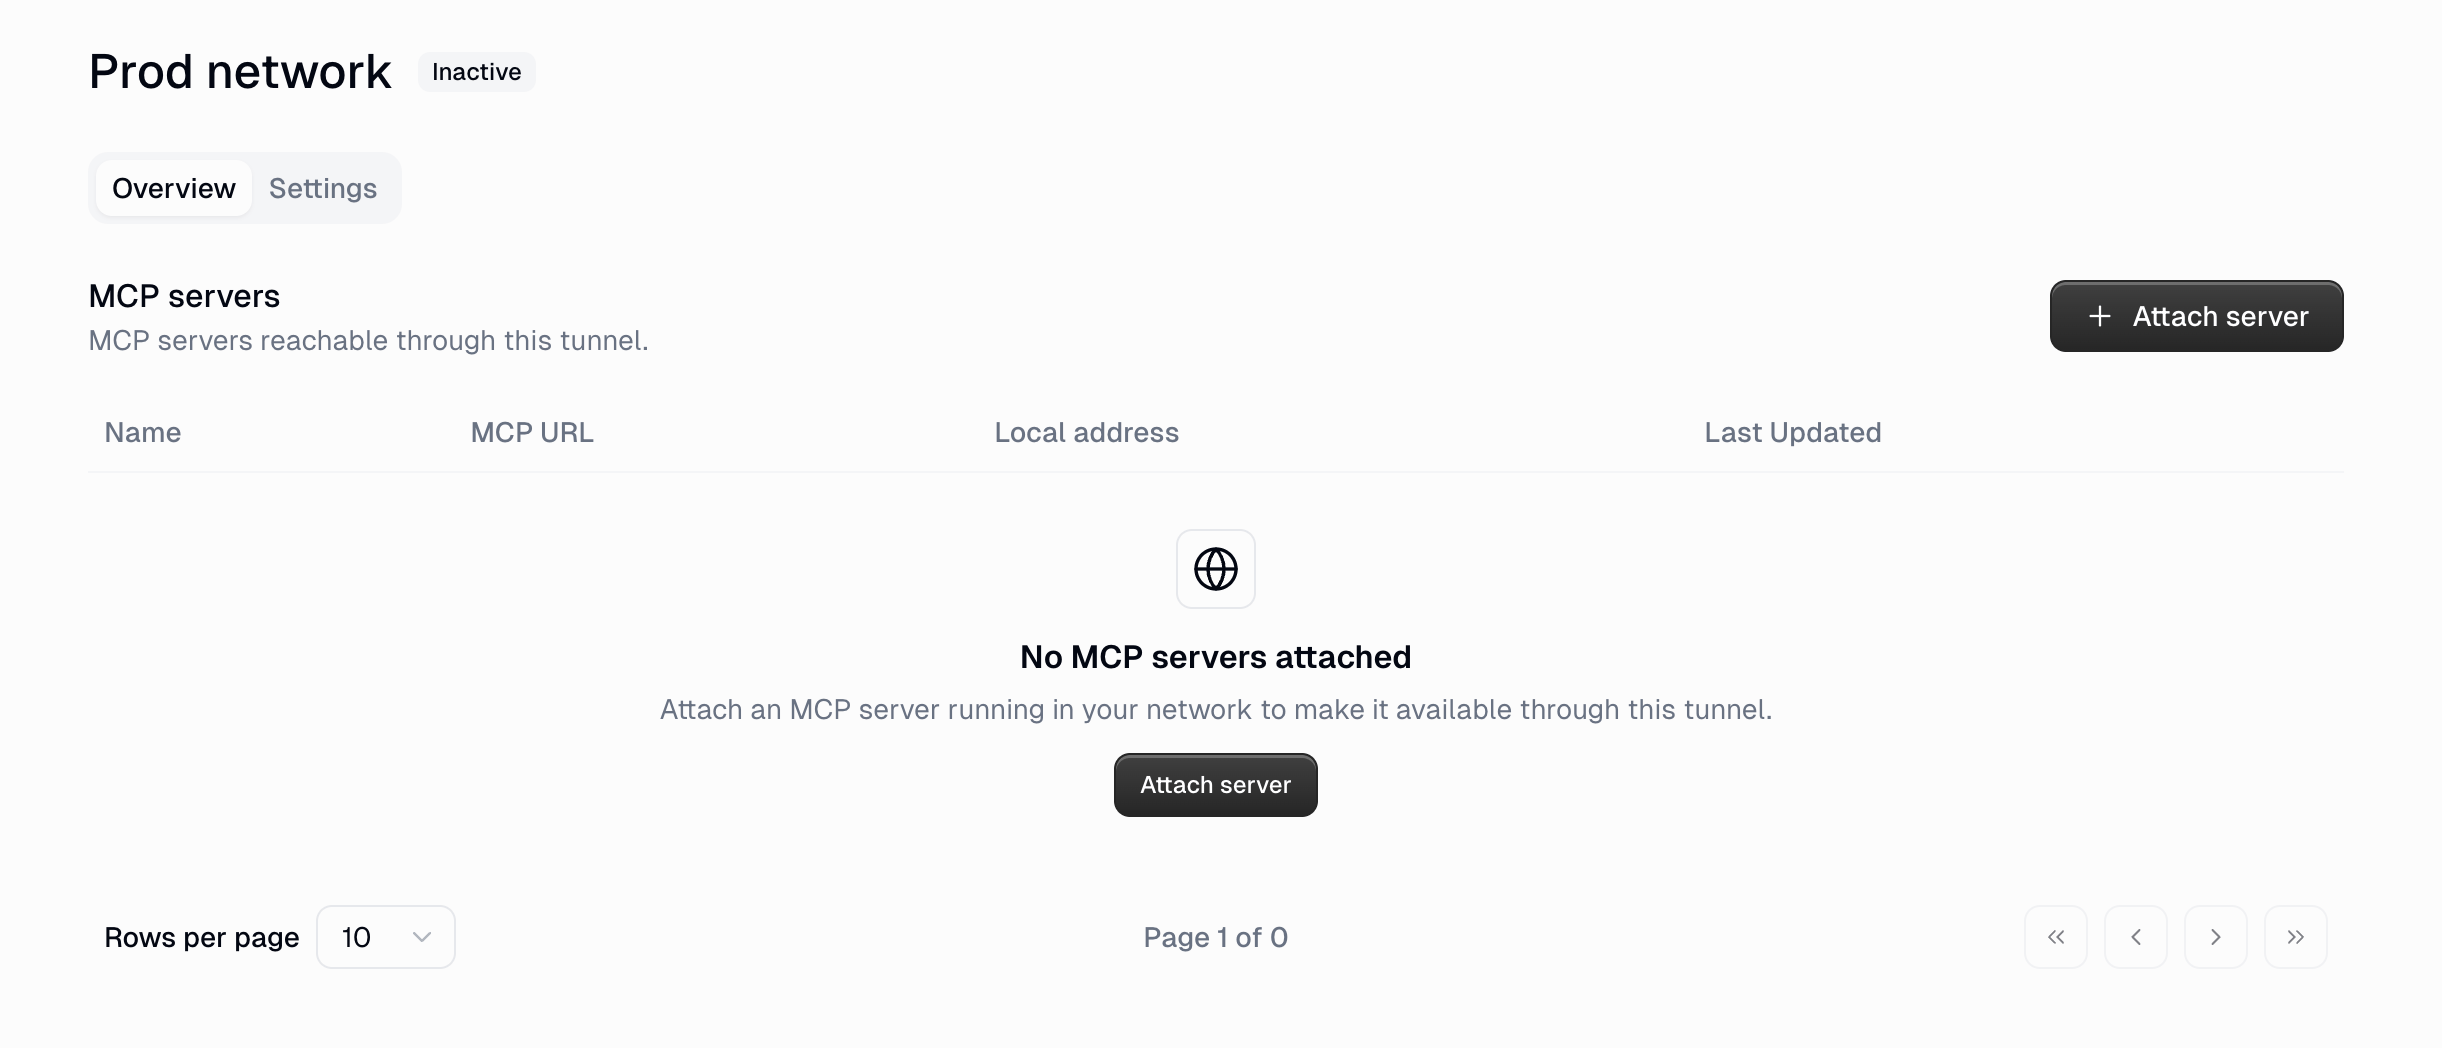 Give the server a name and the **local address** the connector should forward to — the address the server listens on from the connector machine's point of view, including the scheme and the MCP path.
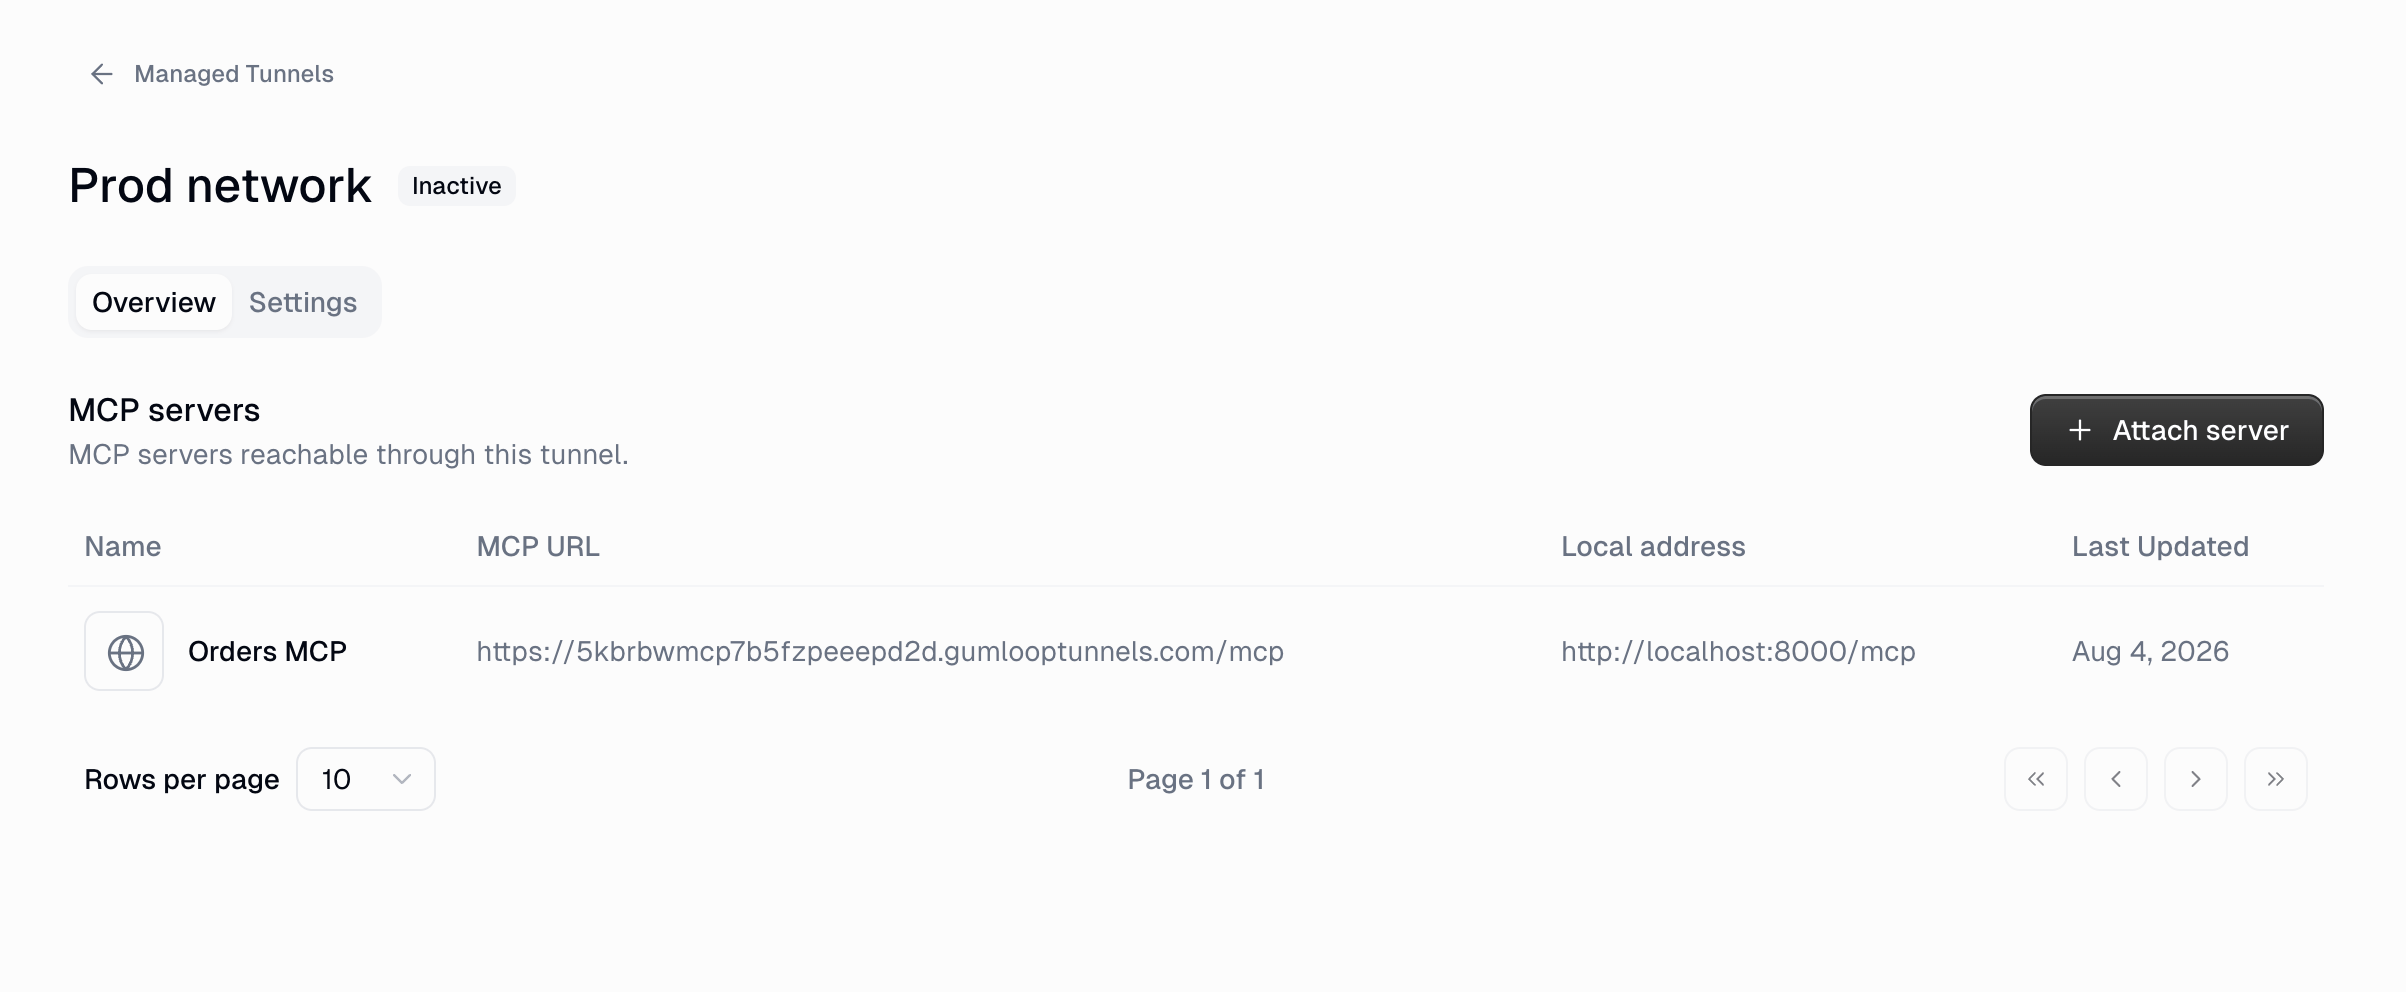
 Each attached server gets its own subdomain and MCP URL, listed on the Overview tab next to the local address it points at.
 An attached server appears in **Proxied MCPs**, with a **Tunneled via *tunnel name*** link back to the tunnel and the local address shown on its Overview tab.
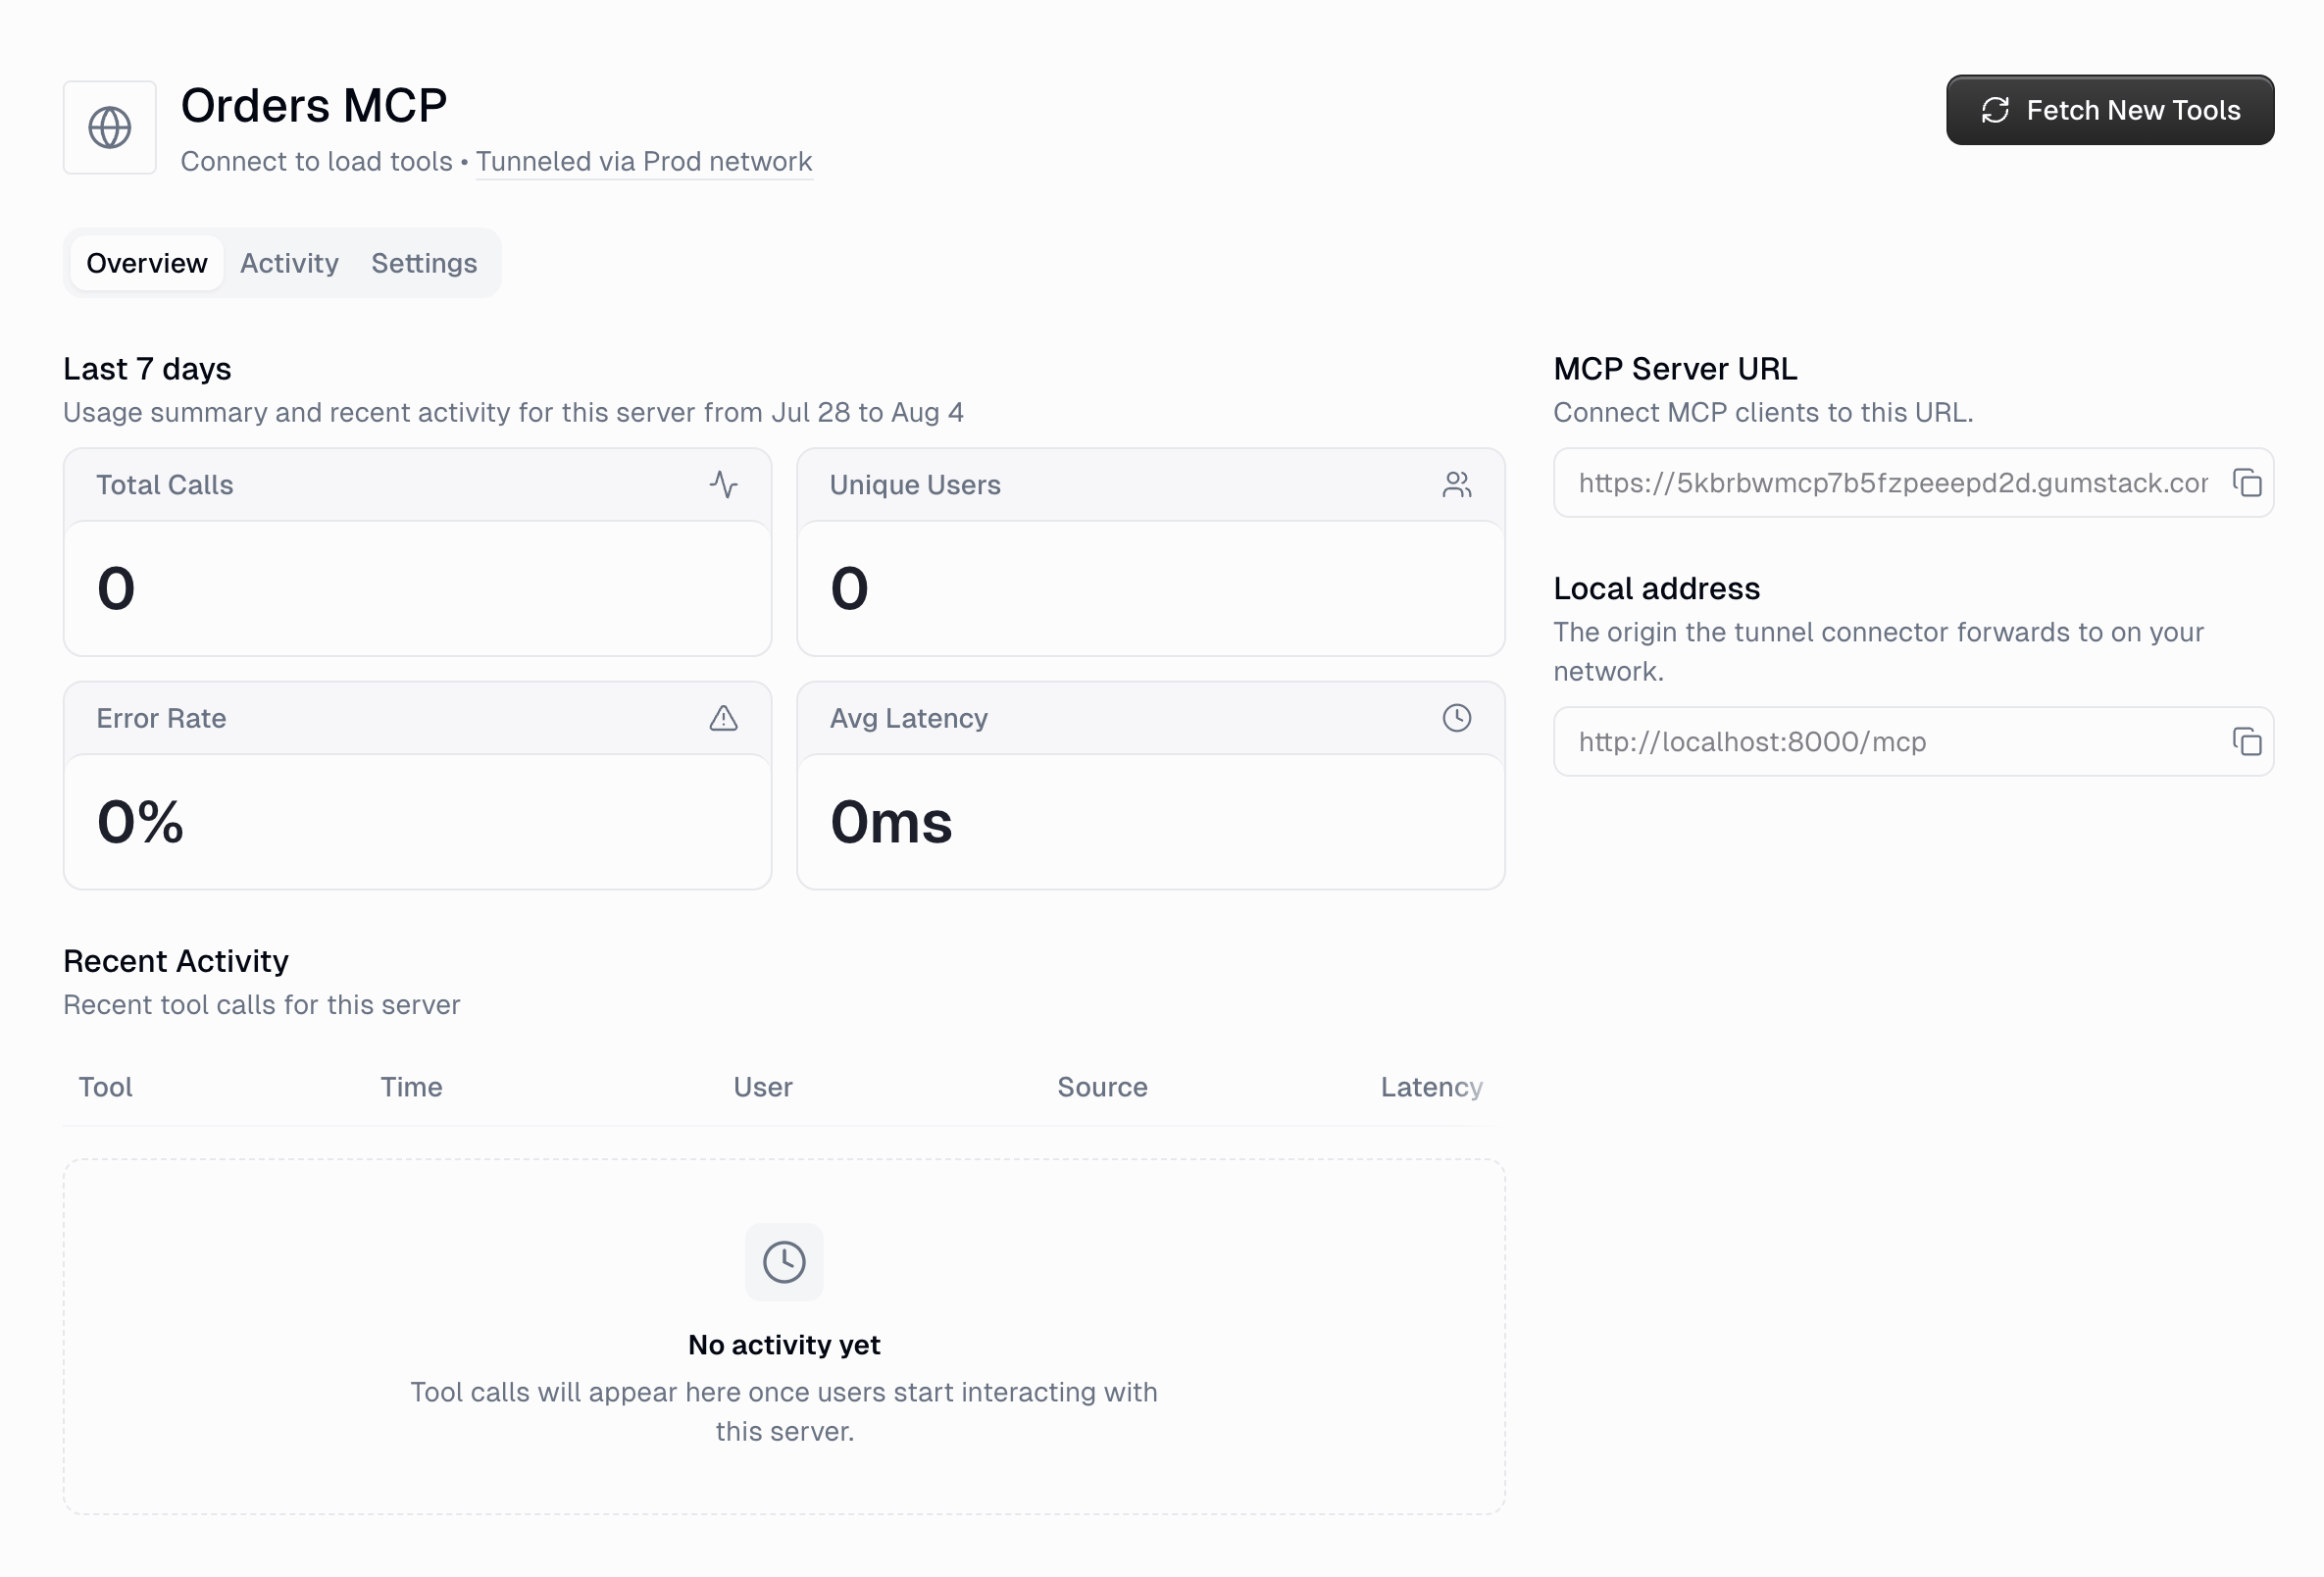 Once the connector is running, click **Fetch New Tools** to discover the server's tools. From there it behaves like any other proxied server: per-role [tool access control](/enterprise-features/user_groups), activity and usage stats, and availability to agents and flows.
## Tunnel status
The status badge on the tunnel list and detail page reflects the live state of your connector:
| Status | What it means |
| ------------ | ------------------------------------------------------------------------------------------------------- |
| **Healthy** | The connector is connected and traffic can flow. |
| **Degraded** | Only some of the connector's connections are up. Traffic may still work, but with reduced redundancy. |
| **Down** | The connector has connected before but isn't connected now — usually it stopped or lost network access. |
| **Inactive** | No connector has connected to this tunnel yet. Run the command from the tunnel's Settings tab. |
| **Unknown** | Gumloop couldn't read the tunnel's status just now. Refresh and try again. |
## Manage a tunnel
The tunnel's **Settings** tab is where you rename it, retrieve the connector token, and delete it.
Once the connector is running, click **Fetch New Tools** to discover the server's tools. From there it behaves like any other proxied server: per-role [tool access control](/enterprise-features/user_groups), activity and usage stats, and availability to agents and flows.
## Tunnel status
The status badge on the tunnel list and detail page reflects the live state of your connector:
| Status | What it means |
| ------------ | ------------------------------------------------------------------------------------------------------- |
| **Healthy** | The connector is connected and traffic can flow. |
| **Degraded** | Only some of the connector's connections are up. Traffic may still work, but with reduced redundancy. |
| **Down** | The connector has connected before but isn't connected now — usually it stopped or lost network access. |
| **Inactive** | No connector has connected to this tunnel yet. Run the command from the tunnel's Settings tab. |
| **Unknown** | Gumloop couldn't read the tunnel's status just now. Refresh and try again. |
## Manage a tunnel
The tunnel's **Settings** tab is where you rename it, retrieve the connector token, and delete it.
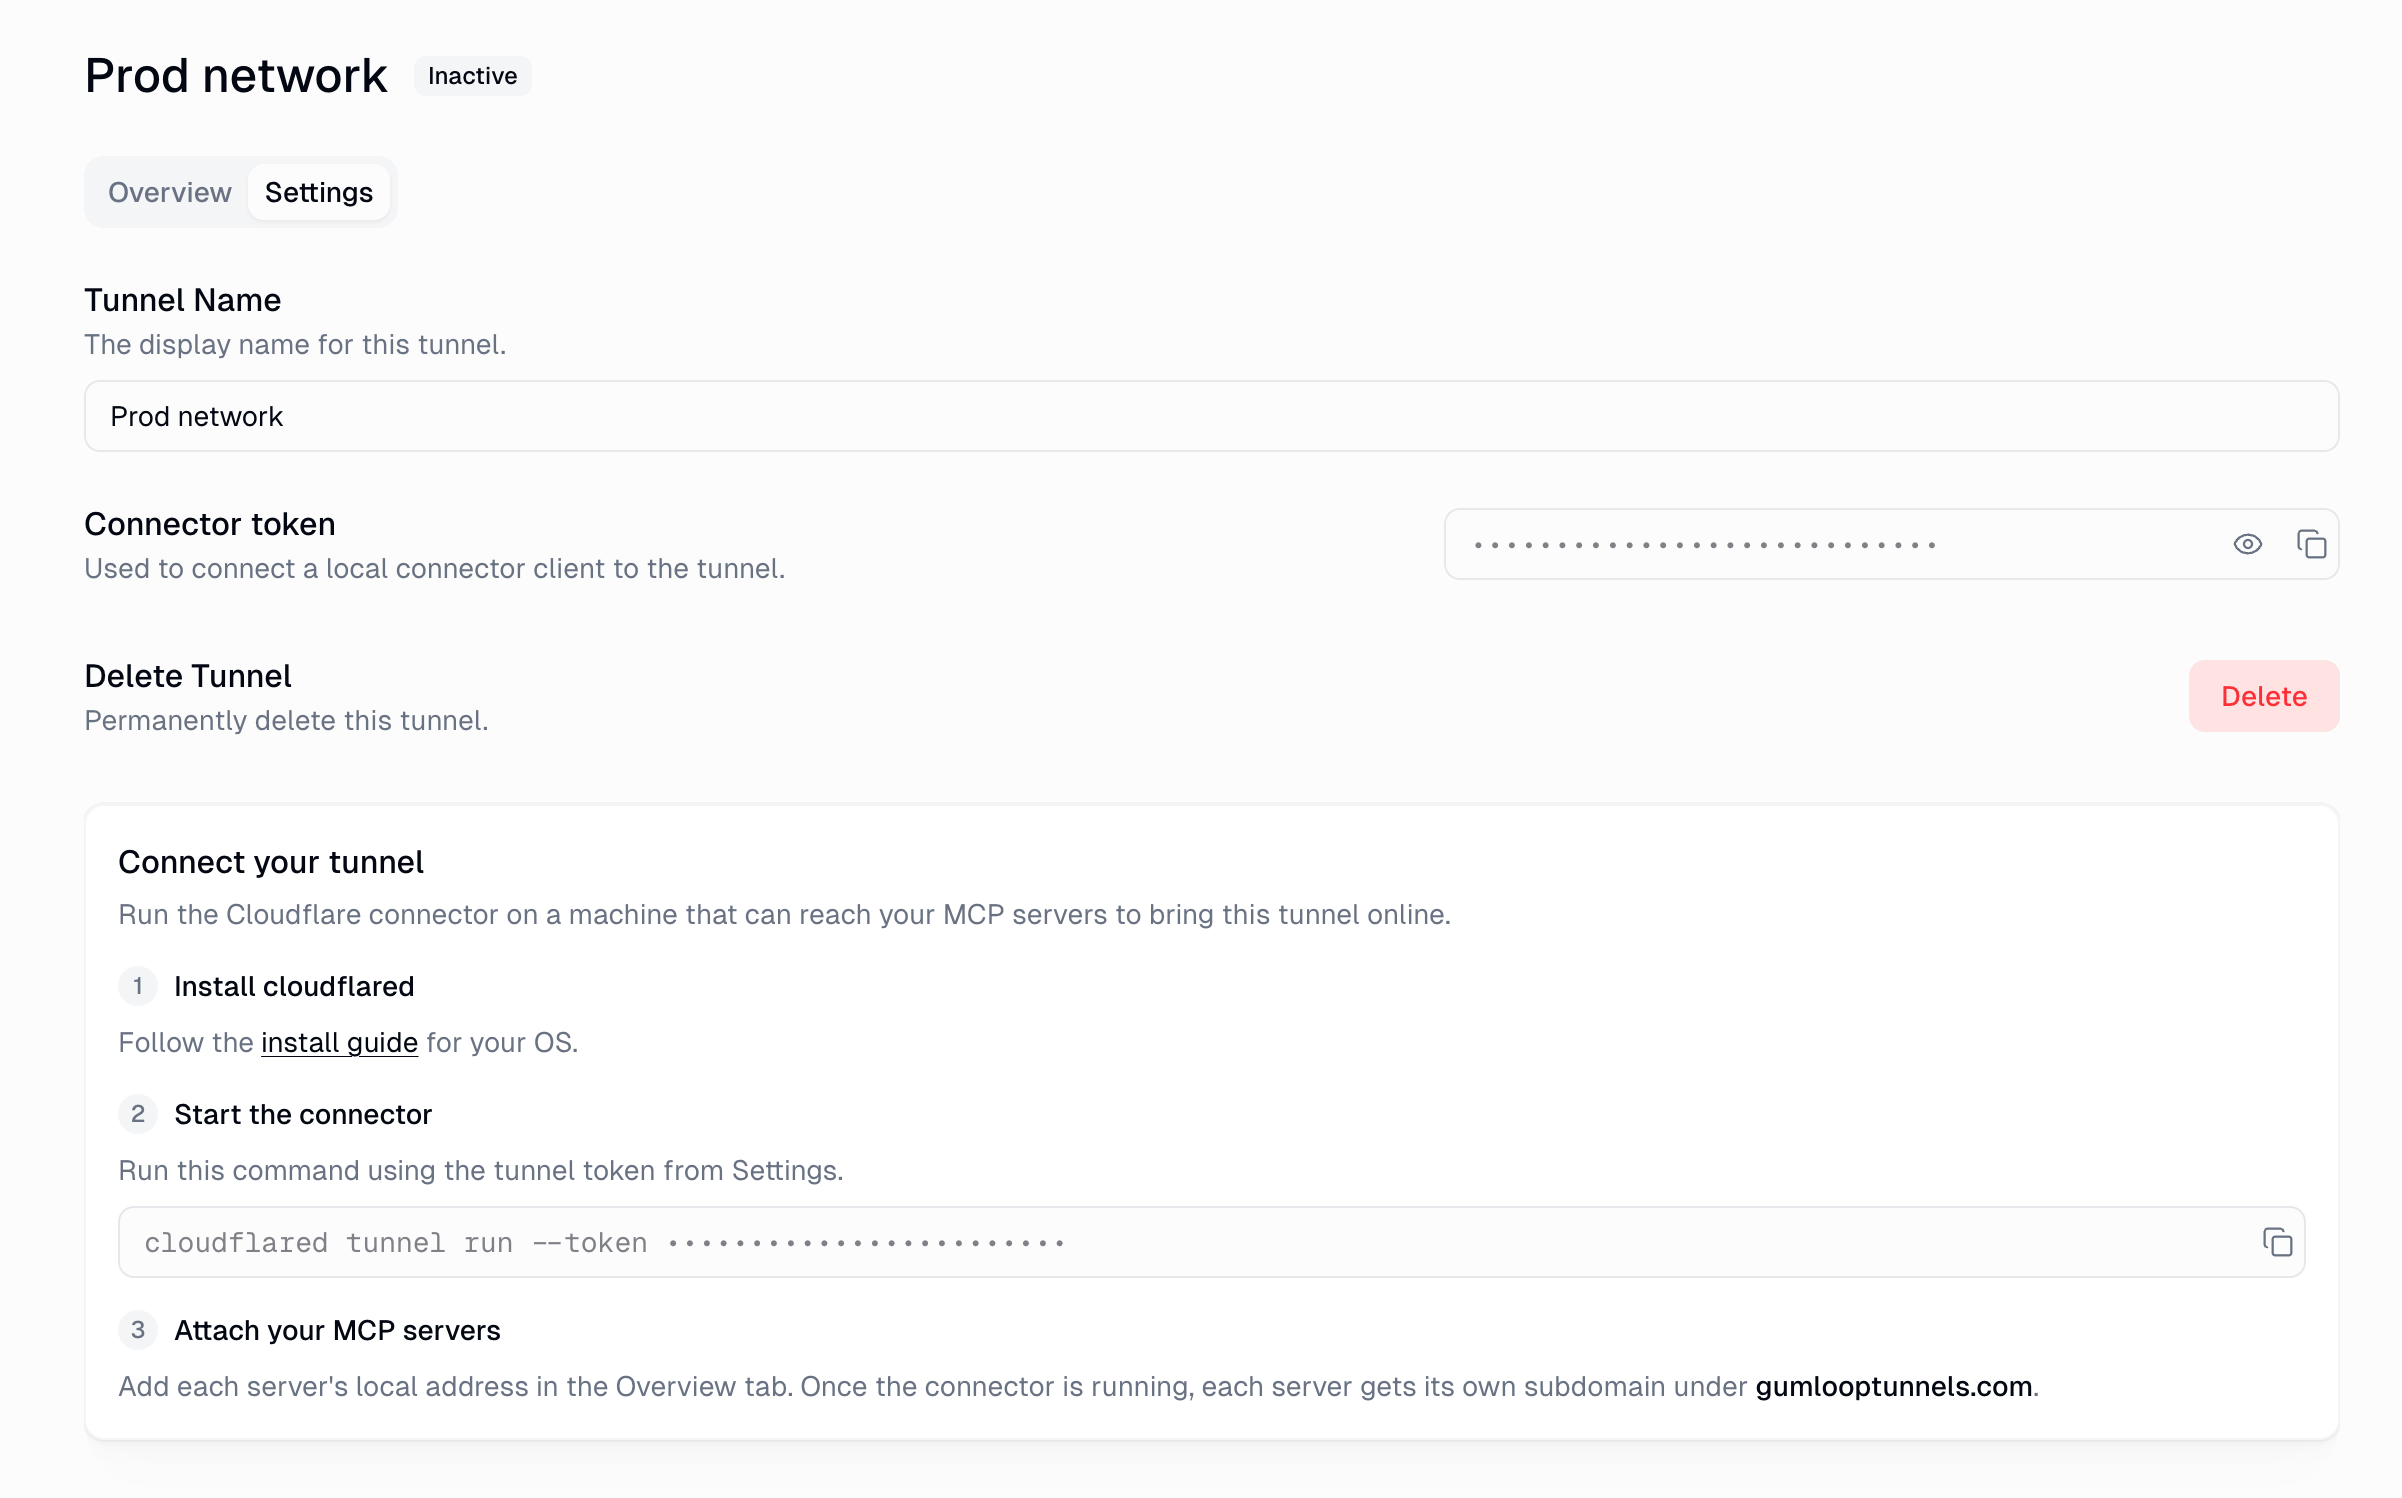 * **Tunnel Name** — the display name; renaming doesn't affect the domain or any attached server.
* **Connector token** — masked by default. Reveal or copy it when you need to start the connector on a new machine. Treat it like a password: anyone with it can connect a connector to your tunnel.
* **Delete Tunnel** — permanently removes the tunnel and its assigned domain.
You must delete the MCP servers attached to a tunnel before you can delete the
tunnel itself; Gumloop blocks the deletion and lists what's still attached.
After deleting, stop the `cloudflared` process on your machine — it can no
longer connect.
## Security
* **Outbound only.** The connector opens a connection from your network to the tunnel. You never open an inbound port or expose your MCP server to the internet.
* **Per-server access control.** Each attached server is published on its own hostname behind its own access credential, which Gumloop provisions and stores for you. Requests that don't carry it are rejected at the edge, before they ever reach your network.
* **Your local addresses stay internal.** The local address is only used by the connector inside your network; it's never the address MCP clients talk to.
* **Admin-gated.** Only organization admins can create tunnels, read the connector token, attach servers, or delete a tunnel.
## Troubleshooting
The connector isn't connected. Check that `cloudflared` is running on the
machine, that it was started with the current token from the tunnel's
Settings tab, and that the machine has outbound internet access. The status
updates when you reload the page.
Its tools haven't been discovered yet. Make sure the connector is running
and the local address is correct, then click **Fetch New Tools** on the
server's detail page.
A healthy tunnel means the connector is reachable — not that your MCP server
is. Verify that the local address you attached responds from the connector
machine (for example, `curl` it there), and check the connector's logs for
connection errors to that origin.
Managing tunnels requires the organization permission for external MCP
servers. Ask an organization admin to create the tunnel and attach servers,
or to grant you the permission.
## FAQ
No. Gumloop provisions and manages the tunnel. You only install
`cloudflared` and run it with the token Gumloop gives you.
On any always-on machine that can reach your MCP servers — a VM in the same
VPC, a container in your cluster, or a bastion host. Run it as a service so
it restarts with the machine.
Yes. Attach as many as you like; each gets its own subdomain and its own MCP
URL, and each shows up separately under Proxied MCPs.
Yes. Running the same command on a second machine adds another connection to
the tunnel, which is a common way to avoid a single point of failure.
Delete the server from its Proxied MCPs settings. That removes its tunnel
route and its subdomain; the tunnel and its other servers are unaffected.
* **Tunnel Name** — the display name; renaming doesn't affect the domain or any attached server.
* **Connector token** — masked by default. Reveal or copy it when you need to start the connector on a new machine. Treat it like a password: anyone with it can connect a connector to your tunnel.
* **Delete Tunnel** — permanently removes the tunnel and its assigned domain.
You must delete the MCP servers attached to a tunnel before you can delete the
tunnel itself; Gumloop blocks the deletion and lists what's still attached.
After deleting, stop the `cloudflared` process on your machine — it can no
longer connect.
## Security
* **Outbound only.** The connector opens a connection from your network to the tunnel. You never open an inbound port or expose your MCP server to the internet.
* **Per-server access control.** Each attached server is published on its own hostname behind its own access credential, which Gumloop provisions and stores for you. Requests that don't carry it are rejected at the edge, before they ever reach your network.
* **Your local addresses stay internal.** The local address is only used by the connector inside your network; it's never the address MCP clients talk to.
* **Admin-gated.** Only organization admins can create tunnels, read the connector token, attach servers, or delete a tunnel.
## Troubleshooting
The connector isn't connected. Check that `cloudflared` is running on the
machine, that it was started with the current token from the tunnel's
Settings tab, and that the machine has outbound internet access. The status
updates when you reload the page.
Its tools haven't been discovered yet. Make sure the connector is running
and the local address is correct, then click **Fetch New Tools** on the
server's detail page.
A healthy tunnel means the connector is reachable — not that your MCP server
is. Verify that the local address you attached responds from the connector
machine (for example, `curl` it there), and check the connector's logs for
connection errors to that origin.
Managing tunnels requires the organization permission for external MCP
servers. Ask an organization admin to create the tunnel and attach servers,
or to grant you the permission.
## FAQ
No. Gumloop provisions and manages the tunnel. You only install
`cloudflared` and run it with the token Gumloop gives you.
On any always-on machine that can reach your MCP servers — a VM in the same
VPC, a container in your cluster, or a bastion host. Run it as a service so
it restarts with the machine.
Yes. Attach as many as you like; each gets its own subdomain and its own MCP
URL, and each shows up separately under Proxied MCPs.
Yes. Running the same command on a second machine adds another connection to
the tunnel, which is a common way to avoid a single point of failure.
Delete the server from its Proxied MCPs settings. That removes its tunnel
route and its subdomain; the tunnel and its other servers are unaffected.