> ## Documentation Index
> Fetch the complete documentation index at: https://docs.gumloop.com/llms.txt
> Use this file to discover all available pages before exploring further.
# Workflow Checkpoints
## What are Workflow Checkpoints
Checkpoints in Gumloop provide a simple way to create snapshots of your work and roll back when needed.
**Here's how it works:**
* You're always editing the live checkpoint directly
* Create checkpoints whenever you want to save a snapshot
* Any past checkpoint can be made live instantly
* Every checkpoint is saved forever in your history
**Simple analogy**: Think of it like Google Docs. You're always editing the real document, and checkpoints lets you create snapshots of your work you can return to at any time.
## Understanding Live Checkpoint vs Saved Checkpoints
The checkpoint that's currently running and that you're editing. Triggers, interfaces, and webhooks all point to this. All your edits happen here and take effect immediately.
Snapshots you've created at specific points in time. These are read-only checkpoints stored in history that can be viewed, duplicated, or promoted to become the new live checkpoint.
## Quick Overview
| | **Live Checkpoint** | **Saved Checkpoint** |
| ----------------------- | ----------------------------------------------- | ------------------------------------- |
| **What is it?** | Your current checkpoint that runs everything | A snapshot saved in history |
| **Can you edit it?** | ✅ Yes - you're always editing this | ❌ No - read-only snapshot |
| **Runs automatically?** | ✅ Yes - triggers, interfaces, webhooks use this | ❌ No - unless promoted to live |
| **Create checkpoint** | Save menu → "Save & Create New Checkpoint" | Already exists in history |
| **Make it live** | Already live | "Make This Checkpoint Live" from menu |
## How Checkpoints Work
### The Workflow of Work
You're always working on the live checkpoint. Changes take effect immediately as you save.
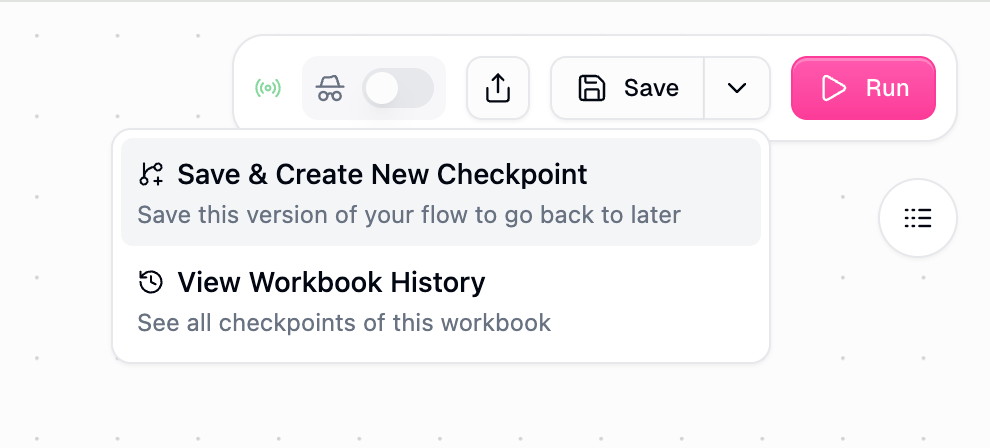
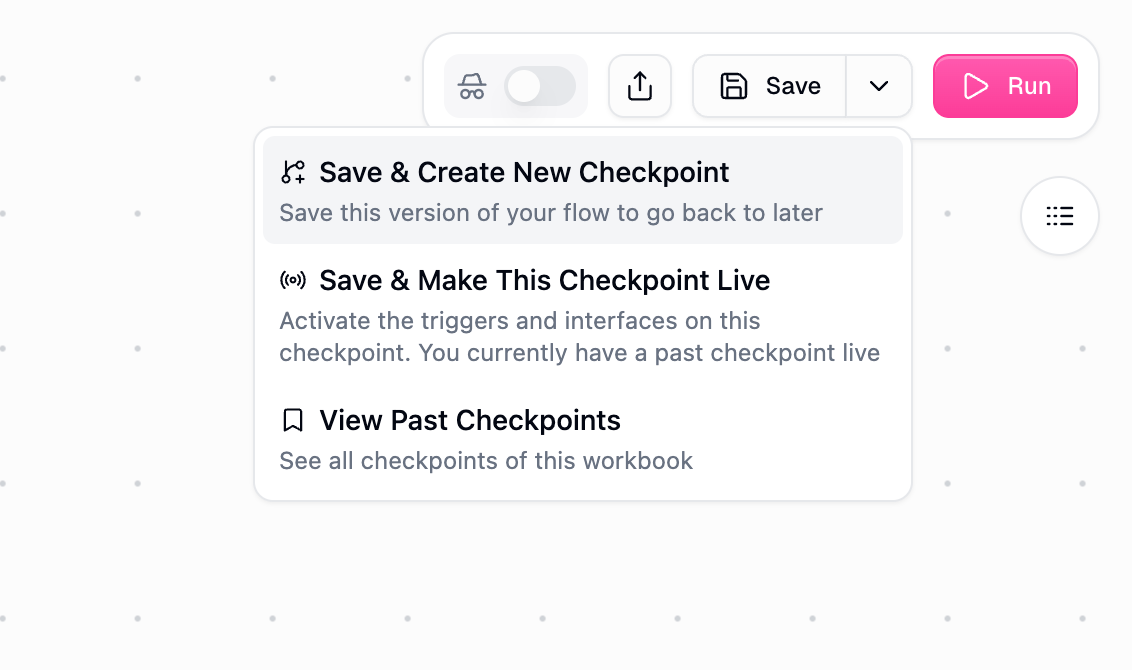
Use Save menu → **Save & Create New Checkpoint** when you want to save a snapshot of your current work.
Keep editing the live checkpoint. Your snapshot remains safely stored.
If something goes wrong, promote any past checkpoint to instantly make it live.
### Real-World Example: Building a Slack Notification Workflow
```text theme={"dark"}
Monday: Build working Slack notification workflow → LIVE
Save & Create New Checkpoint (Checkpoint 1) → snapshot saved
Tuesday: Add email notifications → LIVE
Accidentally break Slack connection → LIVE broken
Open Checkpoint History → Make Checkpoint 1 Live → LIVE restored instantly
Wednesday: Fix the issue properly → LIVE
Add email feature again → LIVE
Save & Create New Checkpoint (Checkpoint 2) → snapshot saved
```
## Creating and Managing Checkpoints
### Creating a New Checkpoint
To create a checkpoint to save a snapshot of your workflow:
1. Click the **Save** dropdown arrow
2. Select **"Save & Create New Checkpoint"**
3. Your current state is saved as a checkpoint
4. Continue editing the live checkpoint
**Pro Tip**: Create checkpoints before making major changes, so you have a known-good state to return to if needed.
### Making a Past Checkpoint Live
When you need to roll back to a stable checkpoint:
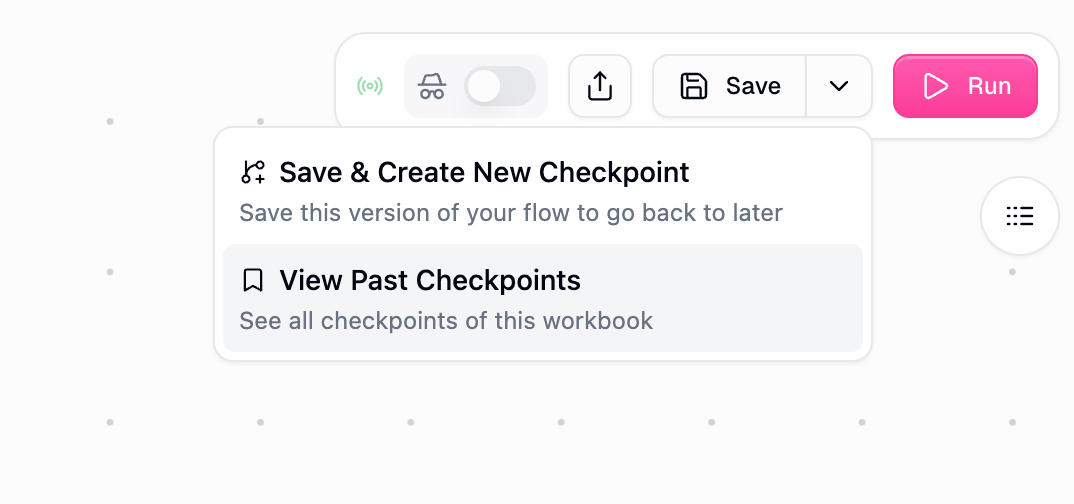
1. Open Checkpoint History from Save menu
2. Find the stable checkpoint you want
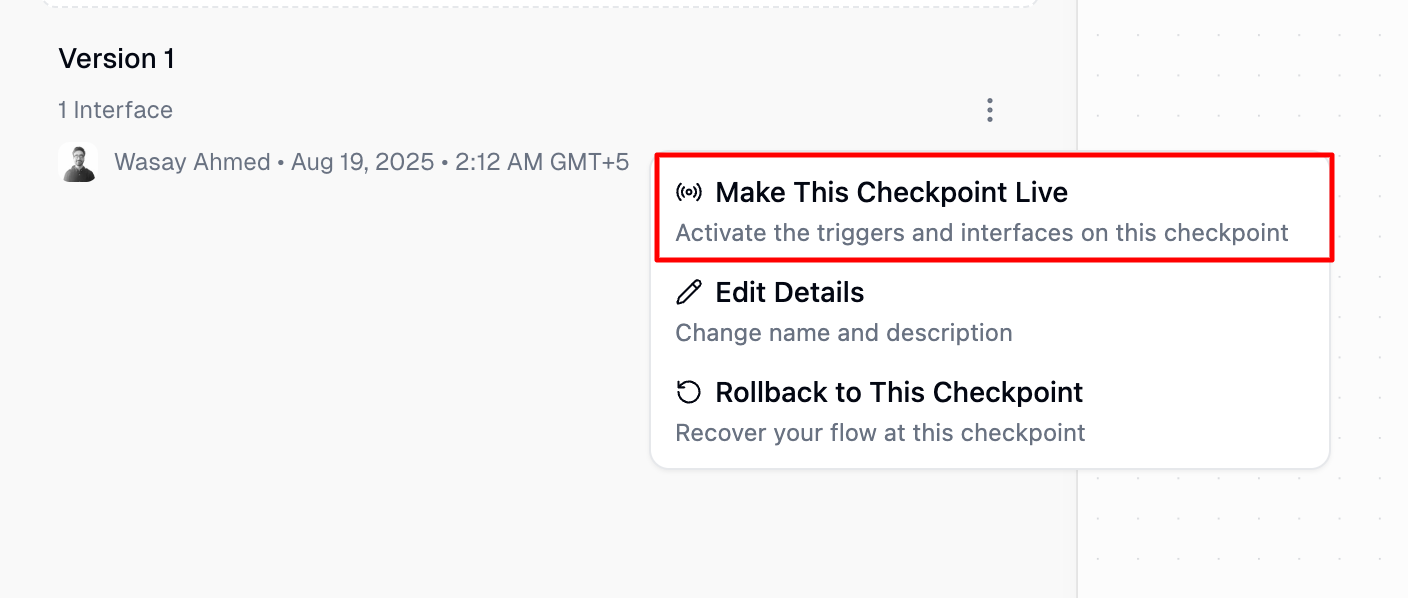
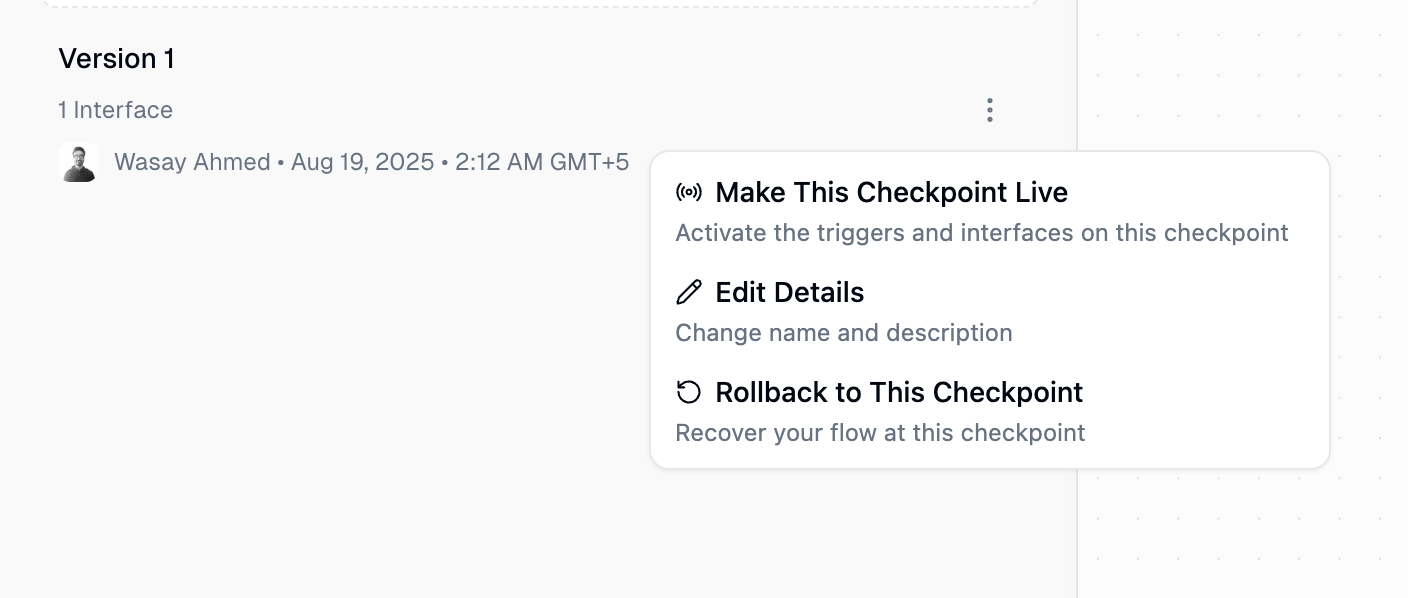
3. Click menu (⋮) → **"Make This Checkpoint Live"**
4. Triggers/interfaces immediately switch to this checkpoint
### Rolling Back to a Checkpoint
When you need to continue working from a past checkpoint, you can **rollback** to it. This replaces your current working draft with that past checkpoint, allowing you to build directly on top of it.
**Steps to Rollback:**
1. Open **Checkpoint History** from the Save menu
2. Find the checkpoint you want to rollback to
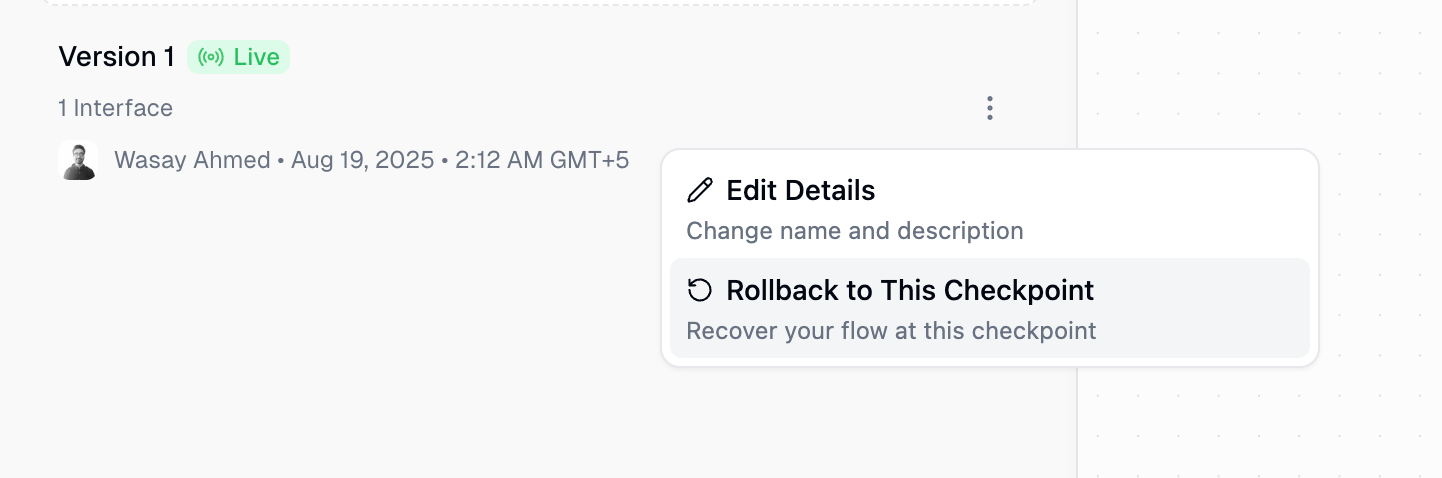
3. Click the menu (⋮) → **"Rollback to This Checkpoint"**
4. Your current draft is replaced with that checkpoint, and you are now editing from it directly
Rolling back is useful when you want to take a past version and **continue evolving it**, rather than just viewing or duplicating it.
***
### Difference Between Rollback and Make Live
| Action | What It Does |
| ------------------------------- | --------------------------------------------------------------------------------------------------------------------- |
| **Rollback to This Checkpoint** | Sets that past checkpoint as your current working draft so you can continue editing it. |
| **Make This Checkpoint Live** | Switches triggers, interfaces, and webhooks to run that checkpoint immediately, without affecting your current draft. |
**Example Workflow:**
```text theme={"dark"}
Checkpoint 3: Stable version
Checkpoint 4: New feature added but buggy
You decide to scrap Checkpoint 4 and keep working from Checkpoint 3:
→ Rollback to Checkpoint 3 → Your editor now shows Checkpoint 3 and you continue building from there
→ When ready, Make This Checkpoint Live → Production switches to the updated version
```
This makes **Rollback** perfect for cases where you want to roll back your actual work in progress and build forward from a previous stable point.
## Working with Triggers
**Important**: Triggers always run from whichever checkpoint is currently live. When you switch checkpoints, all triggers immediately use the new live checkpoint.
### How Triggers Behave
* **While editing**: Your saved changes affect triggers immediately (you're editing live)
* **When creating a checkpoint**: Triggers continue running, just creates a snapshot
* **When making past checkpoint live**: All triggers instantly switch to that checkpoint
| Action | What Happens to Triggers | Important Note |
| ---------------------------- | ------------------------------------ | -------------------------- |
| Edit the workflow | ❌ No effect until saved | Changes are local only |
| **Save** the workflow | ✅ Changes apply immediately | Triggers use saved changes |
| Save & Create New Checkpoint | ✅ No change - just saves snapshot | Triggers keep running |
| Make past checkpoint live | ✅ Triggers switch to that checkpoint | Instant switch |
| Add new trigger + Save | ✅ Active immediately | Must save to activate |
| Delete trigger + Save | ✅ Removed immediately | Must save to deactivate |
## Working with Interfaces
Interfaces work exactly like triggers - they always serve the current live checkpoint:
* Users always see the live checkpoint
* Changes to interfaces take effect immediately
* When you promote a past checkpoint, interfaces instantly switch
* No publish step required
## Past Checkpoints Panel
### Viewing Past Checkpoints
Click **"View Past Checkpoints"** from the Save menu to see all your checkpoints:
Each checkpoint shows:
* Checkpoint number
* Creation date and time
* Author information
* Live badge (if currently live)
* Menu for actions
### Available Actions for Past Checkpoints
From the menu (⋮) next to any past checkpoint:
* **Make This Checkpoint Live**: Instantly switch to this checkpoint
* **Rollback to This Checkpoint**: Create a duplicate of this checkpoint as a new snapshot
* **Edit Details**: Update the name or description
## Advanced: When a Past Checkpoint is Live
This section covers an advanced scenario used by power users who need to maintain stable production while fixing issues.
### What Happens When You Promote a Past Checkpoint
When you make a past checkpoint live:
1. Triggers, interfaces, and webhooks immediately point to that past checkpoint
2. **Your current work is NOT lost** - it becomes a checkpoint
3. The past checkpoint remains read-only (you can't edit it)
4. You continue editing from where you left off
### Returning to Your Latest Work
After promoting a past checkpoint, you might want to switch back to your recent edits:
When a past checkpoint is live, the Save menu shows **"Make This Checkpoint Live"** - click this to:
* Return your recent edits to live status
* Switch triggers/interfaces back to your latest work
### Example Scenario: Production Hotfix
```text theme={"dark"}
1. Production issue occurs
2. Make stable Checkpoint 5 live → Users get working checkpoint
3. Continue fixing in your current checkpoint
4. Test thoroughly
5. Save menu → "Make This Checkpoint Live" → Deploy fix
```
This setup allows you to:
* Instantly restore service with a past checkpoint
* Fix issues without time pressure
* Deploy when ready
## Best Practices
Create a checkpoint before adding new features or making significant edits
Add descriptions to checkpoints so you know what state they represent
When promoting a past checkpoint, verify triggers and interfaces work as expected
## Common Workflows
### Quick Rollback
1. Something breaks in production
2. Open Checkpoint History
3. Find last known good checkpoint
4. Click **"Make This Checkpoint Live"**
5. Production is fixed instantly
### Experimenting Safely
1. Save & Create New Checkpoint (save current state)
2. Make experimental changes
3. If experiment fails: promote the checkpoint back to live
4. If experiment succeeds: create another checkpoint to save it
## Frequently Asked Questions
No. You're always editing the live checkpoint. Changes take effect immediately. Creating checkpoints is just for saving snapshots.
Currently running workflows continue with their checkpoint. New runs will use the newly promoted checkpoint.
No, past checkpoints are read-only snapshots. To work from one, you can either make it live or use "Rollback to This Checkpoint" to create a duplicate.
No, webhook URLs stay constant. They always run whichever checkpoint is currently live.
* **Make This Checkpoint Live**: Switches triggers/interfaces to that checkpoint immediately
* **Rollback to This Checkpoint**: Creates a duplicate snapshot without making it live
No! Your current work is automatically saved. You can return to it using "Make This Checkpoint Live" from the Save menu.
Subflows follow the main workflow's checkpoint. When you switch checkpoints, embedded subflows switch too.
Currently, all checkpoints are kept indefinitely. This ensures you can always recover past states.
That's fine! Most users work directly on the live checkpoint without creating snapshots. Checkpoints are optional - create them when you want a safety net.
This appears when a past checkpoint is currently live. Your recent edits are safe and can be made live by clicking this option.
Global subflows (subflows from other workbooks) behave differently depending on whether they have any checkpoints saved:
**If the global subflow has NO checkpoints:**
* You're always working on its live checkpoint
* Any saves to the global subflow immediately affect ALL workflows using it
* Changes reflect instantly across all workflows using that subflow
**If the global subflow HAS checkpoints:**
* Saves to the global subflow do NOT automatically update workflows using it
* Each workflow locks to a specific checkpoint of the global subflow
* To update: hover over the global subflow node and click "Upgrade Node Version"
* This gives you control over when to adopt changes
**Example:**
* Workflow A uses Global Subflow Checkpoint 3
* You update the Global Subflow and create Checkpoint 4
* Workflow A continues using Checkpoint 3 until you manually upgrade
* This prevents unexpected changes in production workflows
## Summary
**The mental model is simple - just like Google Docs:**
* You're always editing the live checkpoint
* **Save & Create New Checkpoint** = save a snapshot (like starring a revision in Google Docs)
* **Make This Checkpoint Live** = instantly switch to that snapshot
* Triggers, interfaces, and webhooks always use whatever's live