> ## Documentation Index
> Fetch the complete documentation index at: https://docs.gumloop.com/llms.txt
> Use this file to discover all available pages before exploring further.
# Getting Started
Combining your Gumloop workflows with webhook triggers allows you to build APIs visually with no code!
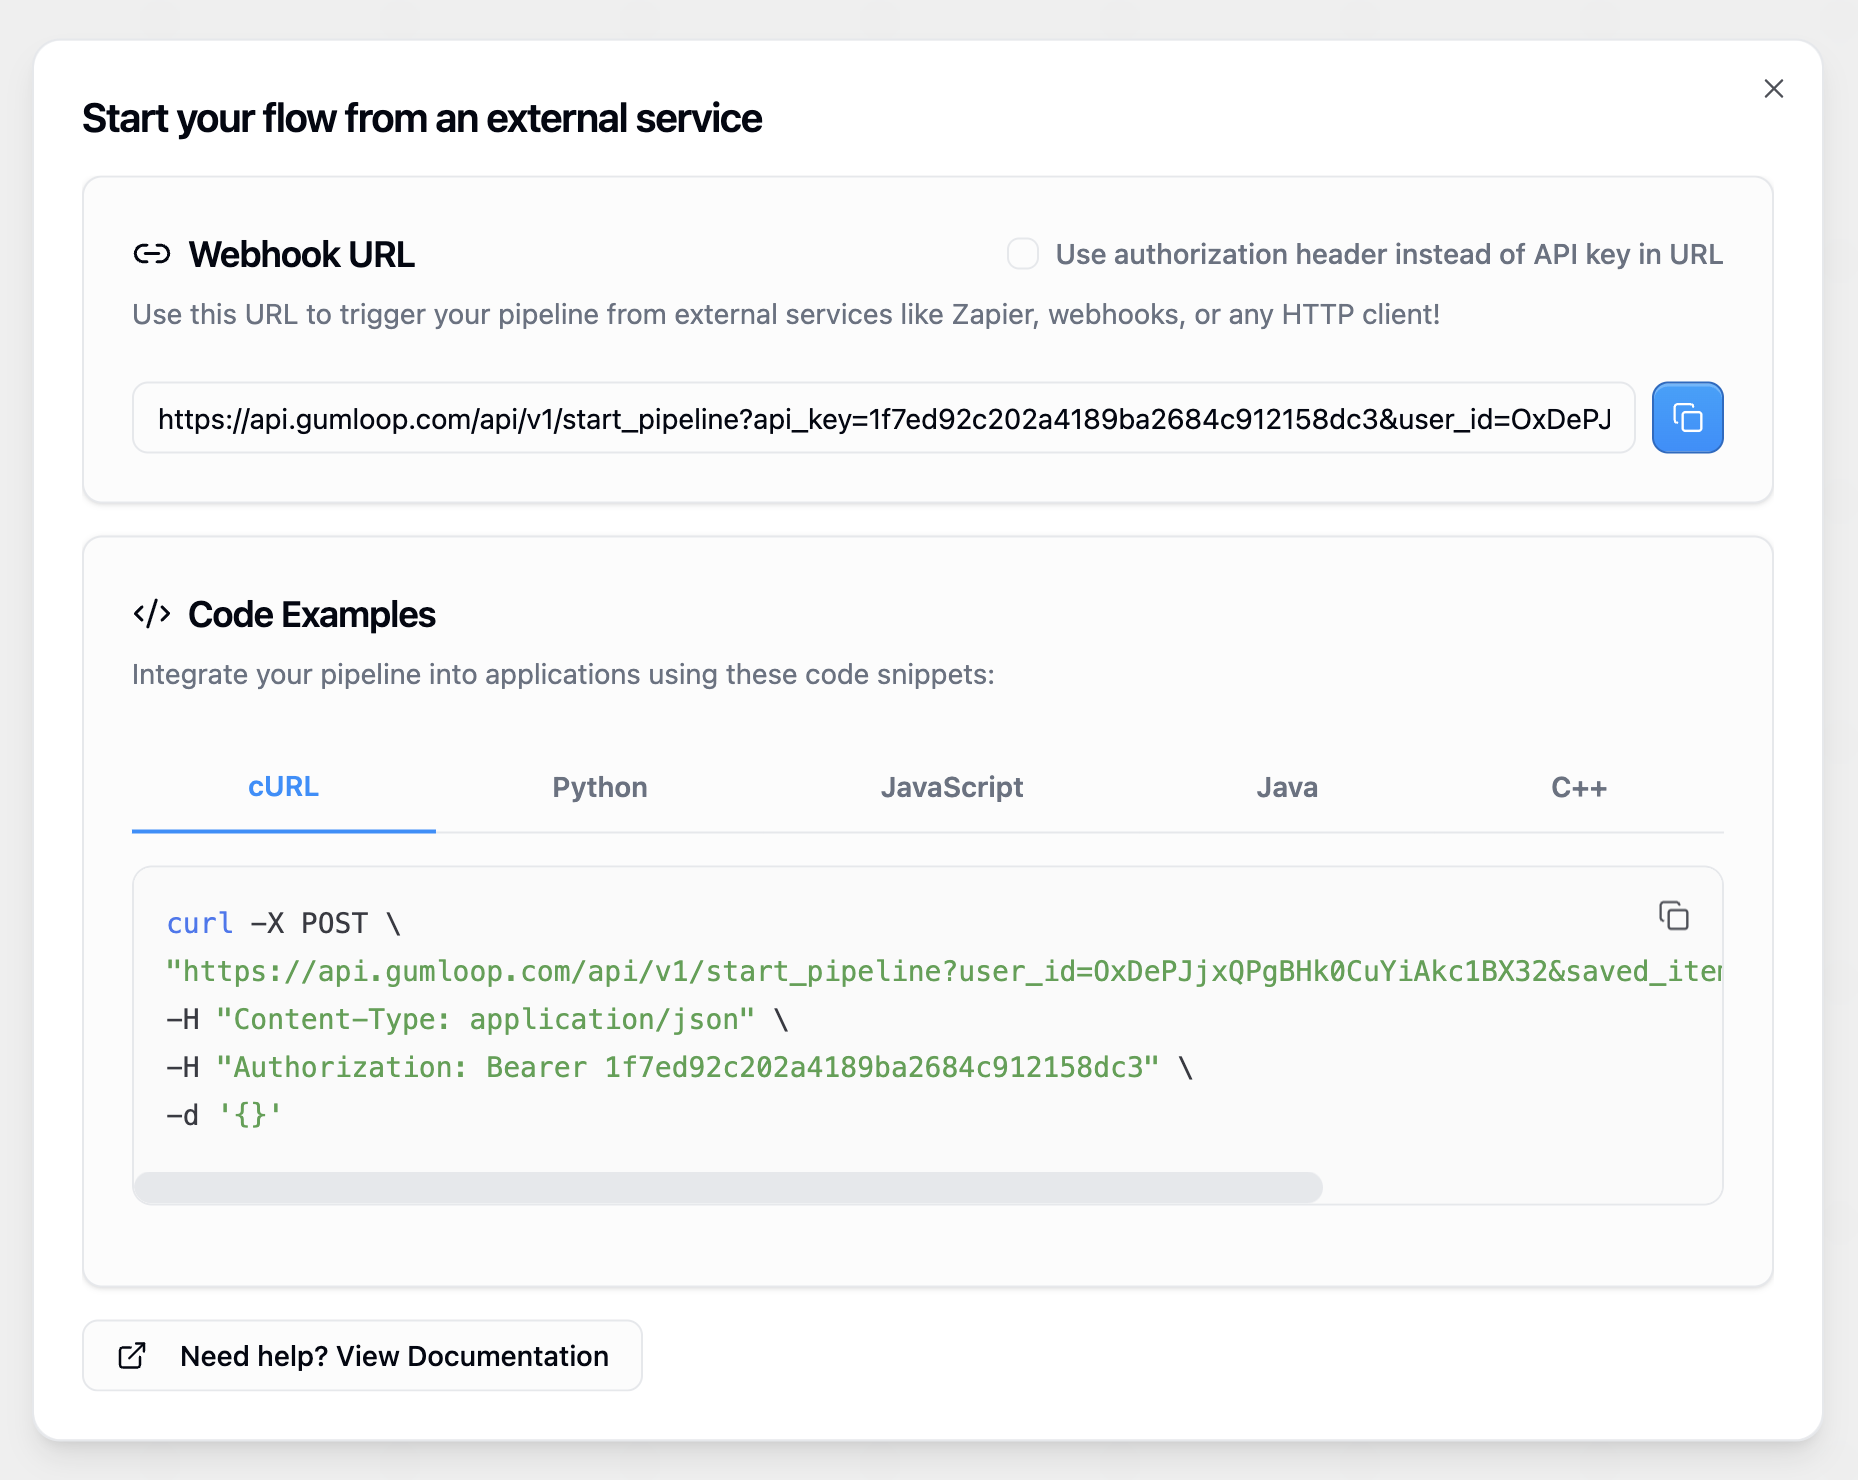
## Webhooks
All Gumloop workflows can be triggered via your own external app using webhooks.
 To see the code necessary to trigger your workflow, navigate to your workflow and click the 'Webhooks' button on the top left side of the pipeline builder.
 ## Finding Your User ID
Many API endpoints require a `user_id` parameter. You can find your User ID on the [Profile Settings page](https://www.gumloop.com/settings/profile/general), under your email address.
## Finding Your User ID
Many API endpoints require a `user_id` parameter. You can find your User ID on the [Profile Settings page](https://www.gumloop.com/settings/profile/general), under your email address.
 Click the copy icon next to your User ID to copy it to your clipboard.
## Authorization
When making requests to trigger your Gumloop workflows, you can authenticate using one of two methods:
The default method is to include your API key as a query parameter in the URL. This method is simpler and works well for most integrations:
```bash theme={"dark"}
curl -X POST \
https://api.gumloop.com/api/v1/start_pipeline?user_id=xxxxxxxxxxxxxx&saved_item_id=xxxxxxxxxxxxxx&api_key=xxxxxxxxxxxx \
-H "Content-Type: application/json" \
-d '{}'
```
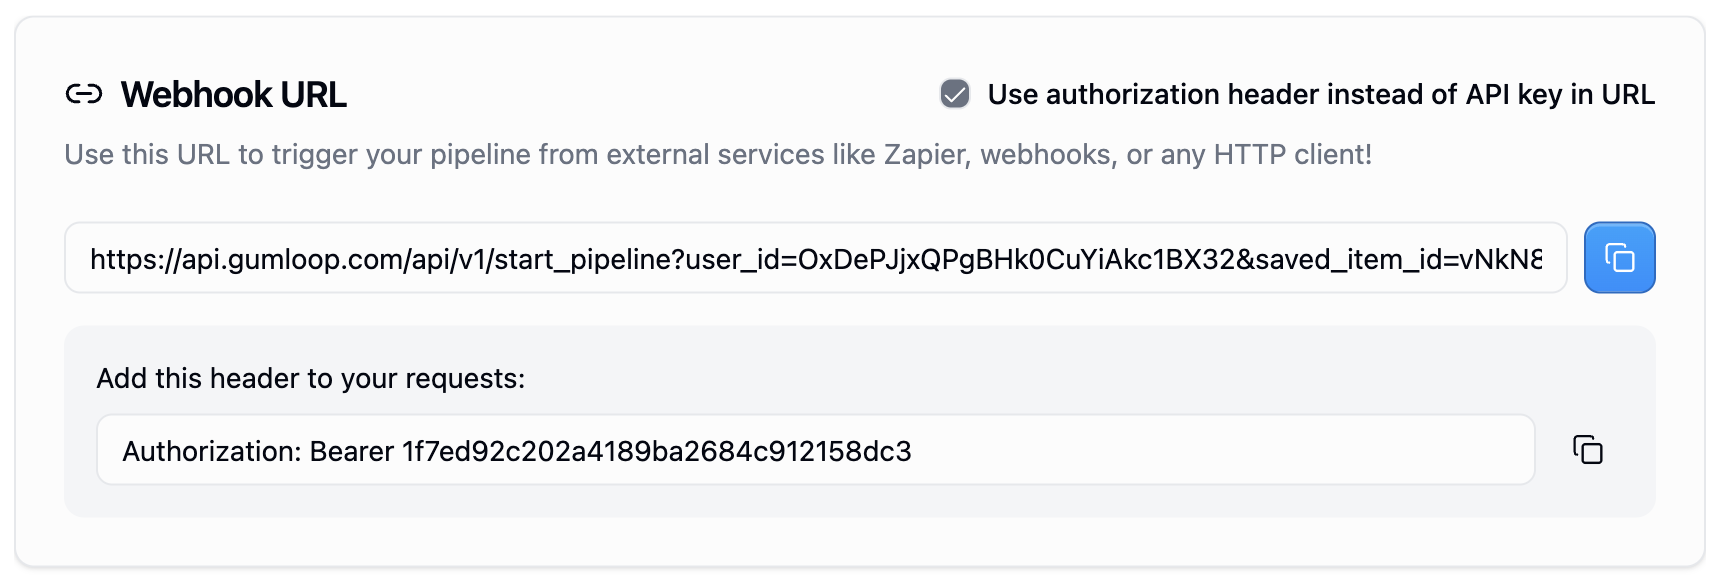
Alternatively, you can use the Authorization header with a Bearer token. This method is preferred when you want to keep credentials out of URLs:
```bash theme={"dark"}
curl -X POST \
https://api.gumloop.com/api/v1/start_pipeline?user_id=xxxxxxxxxxxxxx&saved_item_id=xxxxxxxxxxxxxx \
-H "Content-Type: application/json" \
-H "Authorization: Bearer xxxxxxxxxxxx" \
-d '{}'
```
You can switch between these methods in the webhook modal by checking or unchecking the "Use Authorization Header" option.
Click the copy icon next to your User ID to copy it to your clipboard.
## Authorization
When making requests to trigger your Gumloop workflows, you can authenticate using one of two methods:
The default method is to include your API key as a query parameter in the URL. This method is simpler and works well for most integrations:
```bash theme={"dark"}
curl -X POST \
https://api.gumloop.com/api/v1/start_pipeline?user_id=xxxxxxxxxxxxxx&saved_item_id=xxxxxxxxxxxxxx&api_key=xxxxxxxxxxxx \
-H "Content-Type: application/json" \
-d '{}'
```
Alternatively, you can use the Authorization header with a Bearer token. This method is preferred when you want to keep credentials out of URLs:
```bash theme={"dark"}
curl -X POST \
https://api.gumloop.com/api/v1/start_pipeline?user_id=xxxxxxxxxxxxxx&saved_item_id=xxxxxxxxxxxxxx \
-H "Content-Type: application/json" \
-H "Authorization: Bearer xxxxxxxxxxxx" \
-d '{}'
```
You can switch between these methods in the webhook modal by checking or unchecking the "Use Authorization Header" option.
 All examples below use the Authorization header method, but you can substitute the API key method in any of them.
## Inputs
Most useful workflows require some input from the user. There are two main approaches to handle inputs in your Gumloop workflows:
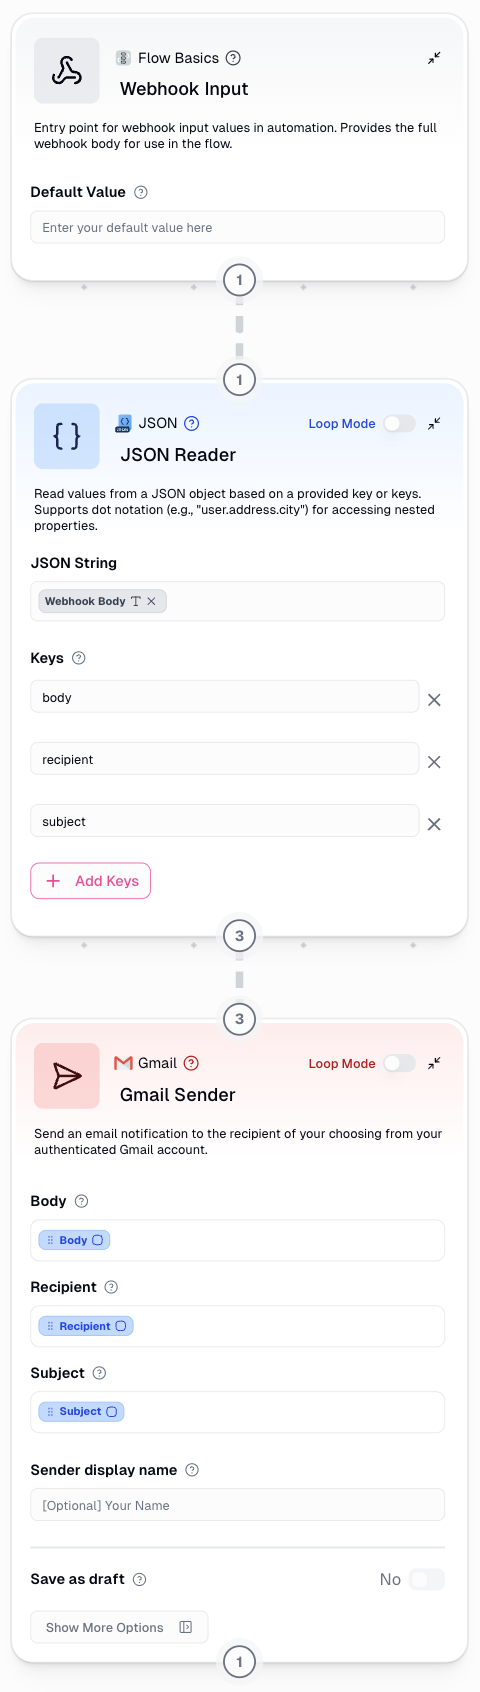
### Webhook Input Node with JSON Parsing
**This is the recommended approach for handling inputs.** Use a Webhook Input node to capture the entire request body as a string, then parse it using a JSON Reader node. This method provides maximum flexibility and makes it easy to handle complex, nested data structures.
All examples below use the Authorization header method, but you can substitute the API key method in any of them.
## Inputs
Most useful workflows require some input from the user. There are two main approaches to handle inputs in your Gumloop workflows:
### Webhook Input Node with JSON Parsing
**This is the recommended approach for handling inputs.** Use a Webhook Input node to capture the entire request body as a string, then parse it using a JSON Reader node. This method provides maximum flexibility and makes it easy to handle complex, nested data structures.
 With this approach, you can send any JSON structure directly in your request body:
```bash theme={"dark"}
curl -X POST \
https://api.gumloop.com/api/v1/start_pipeline?user_id=xxxxxxxxxxxxxx&saved_item_id=xxxxxxxxxxxxxx \
-H "Content-Type: application/json" \
-H "Authorization: Bearer xxxxxxxxxxxx" \
-d '{
"recipient": "recipient@gmail.com",
"subject": "Example of an Email Subject Line",
"body": "Example of the Text of an Email Body",
}'
```
The Webhook Inputs node will capture this entire JSON payload as a string, which you can then parse using a JSON Reader node to extract individual fields or work with the entire data structure.
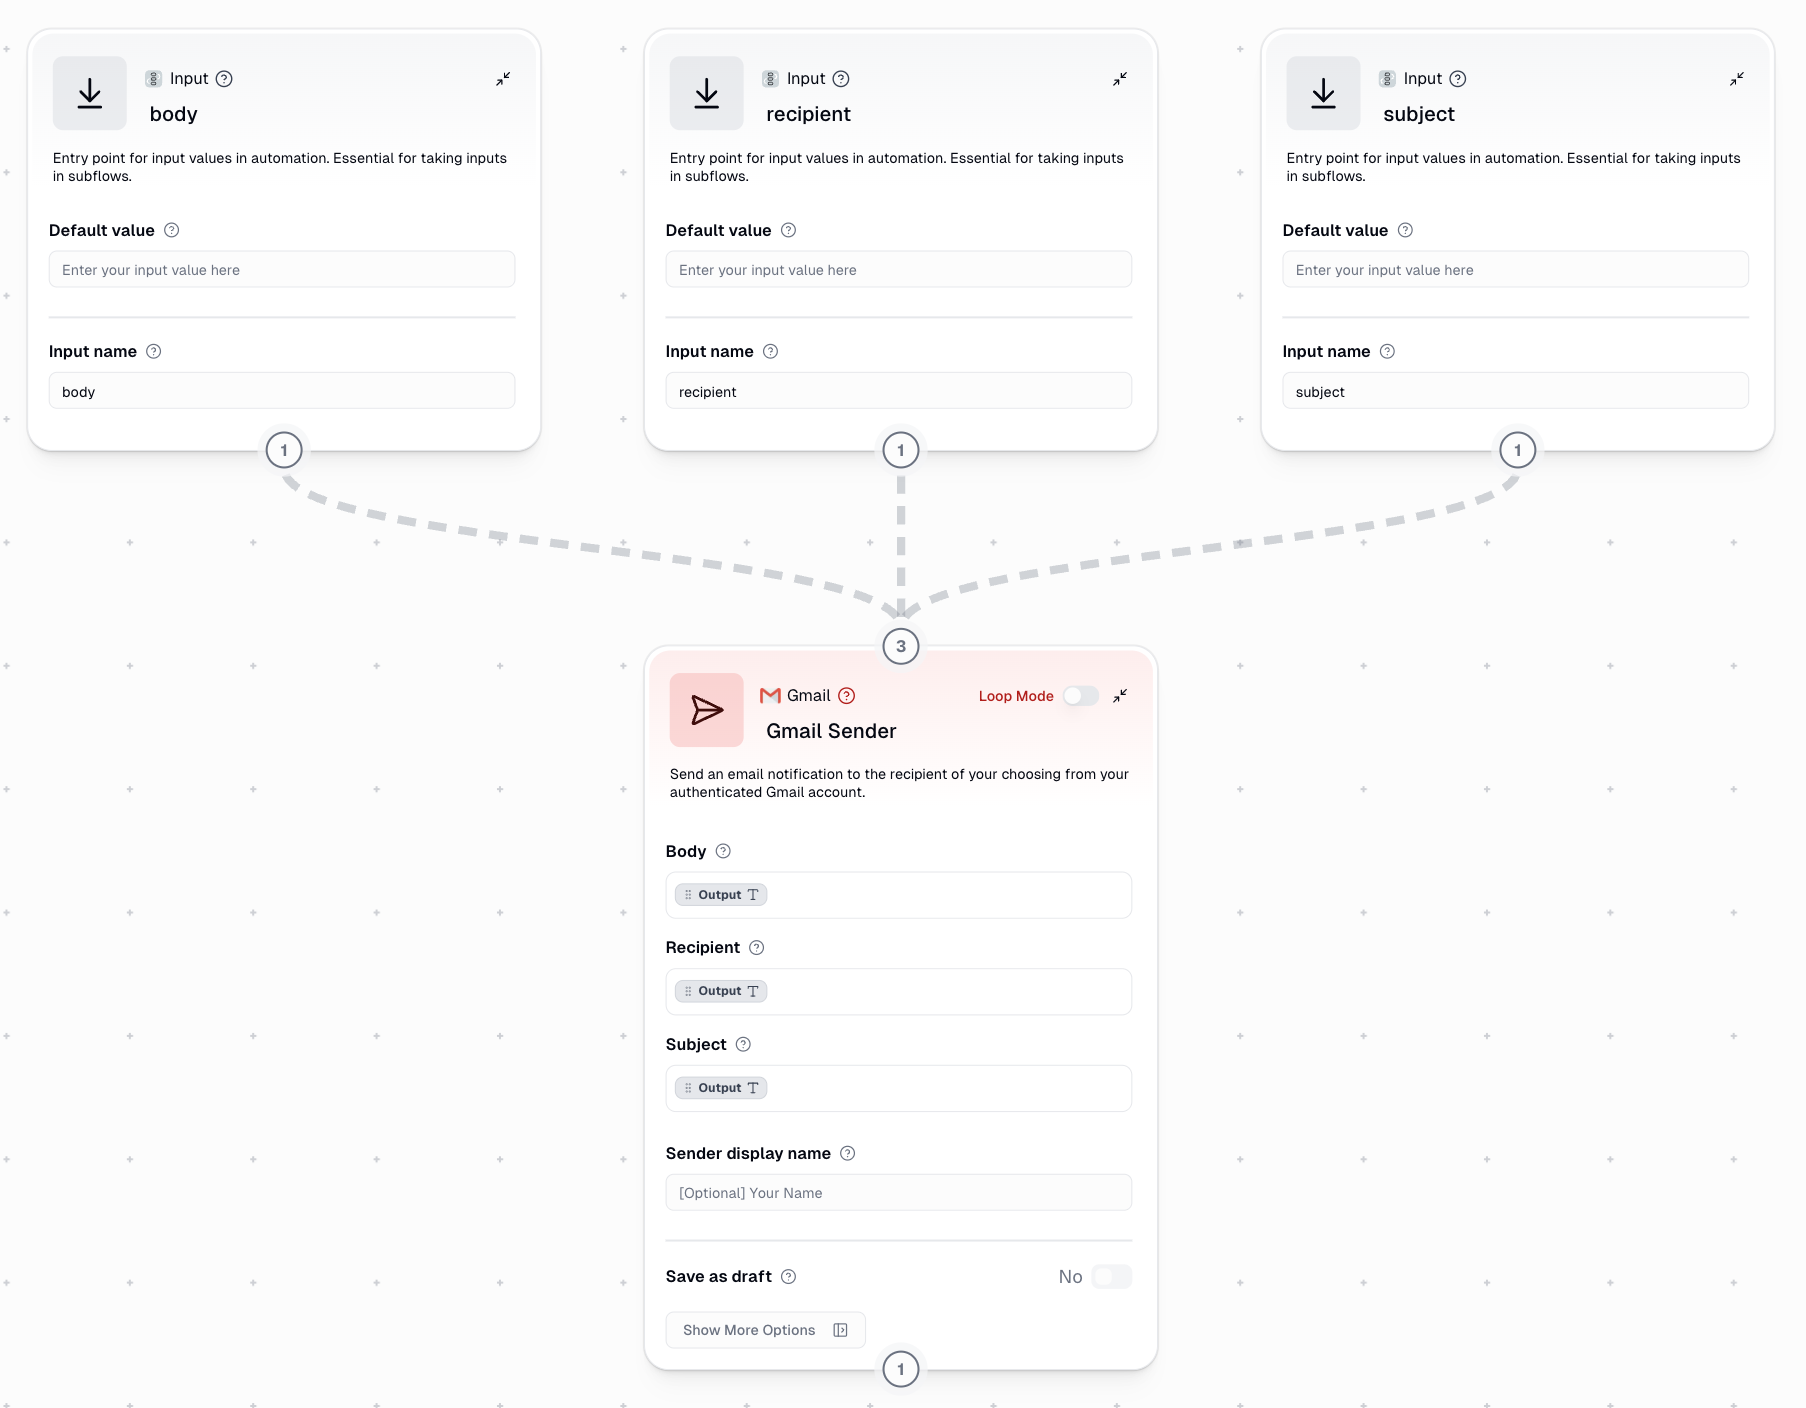
### Alternative Method: Named Input Nodes
While the webhook inputs node with JSON parsing is recommended, there is an alternative method for receiving data that uses named Input nodes. **All the following options require you to set up Input nodes in your workflow where the 'Input name' values represent the name of that input field.** These input names are used to map the information you send via the webhook to the appropriate nodes.
With this approach, you can send any JSON structure directly in your request body:
```bash theme={"dark"}
curl -X POST \
https://api.gumloop.com/api/v1/start_pipeline?user_id=xxxxxxxxxxxxxx&saved_item_id=xxxxxxxxxxxxxx \
-H "Content-Type: application/json" \
-H "Authorization: Bearer xxxxxxxxxxxx" \
-d '{
"recipient": "recipient@gmail.com",
"subject": "Example of an Email Subject Line",
"body": "Example of the Text of an Email Body",
}'
```
The Webhook Inputs node will capture this entire JSON payload as a string, which you can then parse using a JSON Reader node to extract individual fields or work with the entire data structure.
### Alternative Method: Named Input Nodes
While the webhook inputs node with JSON parsing is recommended, there is an alternative method for receiving data that uses named Input nodes. **All the following options require you to set up Input nodes in your workflow where the 'Input name' values represent the name of that input field.** These input names are used to map the information you send via the webhook to the appropriate nodes.
 **Once you have set up your named Input nodes, you can choose from any of the following options to send data to your workflow:**
Just like with the Webhook Input node, you can pass inputs by name directly in the body of the request. This approach is concise and straightforward:
```bash theme={"dark"}
curl -X POST \
https://api.gumloop.com/api/v1/start_pipeline?user_id=xxxxxxxxxxxxxx&saved_item_id=xxxxxxxxxxxxxx \
-H "Content-Type: application/json" \
-H "Authorization: Bearer xxxxxxxxxxxx" \
-d '{
"recipient": "recipient@gmail.com",
"subject": "Example of an Email Subject Line",
"body": "Example of the Text of an Email Body"
}'
```
When using any of the above methods to trigger a workflow, any provided headers will also be passed along as inputs to the workflow. If you have an Input node with the same name as a header, it will be provided the header value as input.
This method is not recommended for regular use, but can be useful in specific integration scenarios:
```bash theme={"dark"}
curl -X POST \
https://api.gumloop.com/api/v1/start_pipeline?user_id=xxxxxxxxxxxxxx&saved_item_id=xxxxxxxxxxxxxx \
-H "Content-Type: application/json" \
-H "Authorization: Bearer xxxxxxxxxxxx" \
-H "recipient: recipient@gmail.com" \
-H "subject: Example of an Email Subject Line" \
-H "body: Example of the Text of an Email Body" \
-d '{}'
```
## Outputs
When you run a Gumloop pipeline remotely, the POST request to `https://api.gumloop.com/api/v1/start_pipeline` will return a `run_id` and a URL that links to the workflow run.
Here is an example of the response:
```json theme={"dark"}
{
"run_id": B7uiXDngvzFvUWxHRKQFAD,
"saved_item_id": q3dasHQBidkNeXvAZo6Dby,
"url": https://www.gumloop.com/pipeline?run_id=B7uiXDngvzFvUWxHRKQFAD&flow_id=q3dasHQBidkNeXvAZo6Dby
}
```
You can use `run_id` to poll a separate endpoint to get information about the ongoing run like the status, logs, and outputs when it is completed.
### Polling for Run Status
In order to poll, make a `GET` request to `https://api.gumloop.com/api/v1/get_pl_run` with `run_id` as a query parameter.
Here is an example of a GET request with cURL, Python, and JavaScript and their outputs:
```bash cURL theme={"dark"}
curl 'https://api.gumloop.com/api/v1/get_pl_run?run_id=B7uiXDngvzFvUWxHRKQFAD&user_id=your_user_id' \
-H 'Authorization: Bearer xxxxxxxxxxxxx'
```
```python Python theme={"dark"}
import requests
url = "https://api.gumloop.com/api/v1/get_pl_run?run_id=B7uiXDngvzFvUWxHRKQFAD&user_id=your_user_id"
headers = {
"Authorization": "Bearer xxxxxxxxxxxx"
}
response = requests.get(url, headers=headers)
print(response.json())
```
```javascript JavaScript theme={"dark"}
const url = 'https://api.gumloop.com/api/v1/get_pl_run?run_id=B7uiXDngvzFvUWxHRKQFAD&user_id=your_user_id';
const headers = {
Authorization: 'Bearer xxxxxxxxxxxxxx',
};
fetch(url, {
method: 'GET',
headers: headers,
})
.then((response) => response.json())
.then((data) => console.log(data));
```
### Response Structure
```json theme={"dark"}
{
"created_ts": "2023-11-19T18:06:31.102786+00:00",
"finished_ts": null,
"log": [
"\u001b[34m__system__: __STARTING__:Read files from GitHub\u001b[0m"
],
"outputs": {},
"run_id": "B7uiXDngvzFvUWxHRKQFAD",
"state": "RUNNING",
"user_id": "your_user_id"
}
```
The key attributes here are `log`, `state`, and `outputs`.
Contains a running log of each node and the activities within it.
One of "STARTED", "RUNNING", "TERMINATED", "FAILED" or "DONE".
A JSON object with key-value pair where the key is the `output name` and the value is the `output value`. This will only be populated when your pipeline reaches a "DONE" state and you have named output nodes in your pipeline.
**Once you have set up your named Input nodes, you can choose from any of the following options to send data to your workflow:**
Just like with the Webhook Input node, you can pass inputs by name directly in the body of the request. This approach is concise and straightforward:
```bash theme={"dark"}
curl -X POST \
https://api.gumloop.com/api/v1/start_pipeline?user_id=xxxxxxxxxxxxxx&saved_item_id=xxxxxxxxxxxxxx \
-H "Content-Type: application/json" \
-H "Authorization: Bearer xxxxxxxxxxxx" \
-d '{
"recipient": "recipient@gmail.com",
"subject": "Example of an Email Subject Line",
"body": "Example of the Text of an Email Body"
}'
```
When using any of the above methods to trigger a workflow, any provided headers will also be passed along as inputs to the workflow. If you have an Input node with the same name as a header, it will be provided the header value as input.
This method is not recommended for regular use, but can be useful in specific integration scenarios:
```bash theme={"dark"}
curl -X POST \
https://api.gumloop.com/api/v1/start_pipeline?user_id=xxxxxxxxxxxxxx&saved_item_id=xxxxxxxxxxxxxx \
-H "Content-Type: application/json" \
-H "Authorization: Bearer xxxxxxxxxxxx" \
-H "recipient: recipient@gmail.com" \
-H "subject: Example of an Email Subject Line" \
-H "body: Example of the Text of an Email Body" \
-d '{}'
```
## Outputs
When you run a Gumloop pipeline remotely, the POST request to `https://api.gumloop.com/api/v1/start_pipeline` will return a `run_id` and a URL that links to the workflow run.
Here is an example of the response:
```json theme={"dark"}
{
"run_id": B7uiXDngvzFvUWxHRKQFAD,
"saved_item_id": q3dasHQBidkNeXvAZo6Dby,
"url": https://www.gumloop.com/pipeline?run_id=B7uiXDngvzFvUWxHRKQFAD&flow_id=q3dasHQBidkNeXvAZo6Dby
}
```
You can use `run_id` to poll a separate endpoint to get information about the ongoing run like the status, logs, and outputs when it is completed.
### Polling for Run Status
In order to poll, make a `GET` request to `https://api.gumloop.com/api/v1/get_pl_run` with `run_id` as a query parameter.
Here is an example of a GET request with cURL, Python, and JavaScript and their outputs:
```bash cURL theme={"dark"}
curl 'https://api.gumloop.com/api/v1/get_pl_run?run_id=B7uiXDngvzFvUWxHRKQFAD&user_id=your_user_id' \
-H 'Authorization: Bearer xxxxxxxxxxxxx'
```
```python Python theme={"dark"}
import requests
url = "https://api.gumloop.com/api/v1/get_pl_run?run_id=B7uiXDngvzFvUWxHRKQFAD&user_id=your_user_id"
headers = {
"Authorization": "Bearer xxxxxxxxxxxx"
}
response = requests.get(url, headers=headers)
print(response.json())
```
```javascript JavaScript theme={"dark"}
const url = 'https://api.gumloop.com/api/v1/get_pl_run?run_id=B7uiXDngvzFvUWxHRKQFAD&user_id=your_user_id';
const headers = {
Authorization: 'Bearer xxxxxxxxxxxxxx',
};
fetch(url, {
method: 'GET',
headers: headers,
})
.then((response) => response.json())
.then((data) => console.log(data));
```
### Response Structure
```json theme={"dark"}
{
"created_ts": "2023-11-19T18:06:31.102786+00:00",
"finished_ts": null,
"log": [
"\u001b[34m__system__: __STARTING__:Read files from GitHub\u001b[0m"
],
"outputs": {},
"run_id": "B7uiXDngvzFvUWxHRKQFAD",
"state": "RUNNING",
"user_id": "your_user_id"
}
```
The key attributes here are `log`, `state`, and `outputs`.
Contains a running log of each node and the activities within it.
One of "STARTED", "RUNNING", "TERMINATED", "FAILED" or "DONE".
A JSON object with key-value pair where the key is the `output name` and the value is the `output value`. This will only be populated when your pipeline reaches a "DONE" state and you have named output nodes in your pipeline.